ViRFQ

ViRFQ User Guide

For exporting businesses — printed from virfq.com/en/huong-dan

Version 09/09/2026

Table of contents

  1. Chapter 0 · Getting started with ViRFQ

    • Register, verify your email and sign in
  2. Chapter 1 · The Overview dashboard

    • Reading the Overview dashboard
  3. Chapter 2 · Business profile

    • Completing the business profile
  4. Chapter 3 · Products

    • Creating an export-ready product page
  5. Chapter 4 · The Verified badge

    • Earning the Verified badge
  6. Chapter 5 · RFQ Board and contact unlocks

    • RFQ Board: finding quote requests and unlocking buyer details
  7. Chapter 6 · Marketplace

    • Marketplace: where buyers find you
  8. Chapter 7 · Nancy, the data assistant

    • Nancy, the data assistant: ask export data questions and find buyers
  9. Chapter 8 · Customers and pipeline

    • Managing customers in the pipeline
  10. Chapter 9 · WhatsApp and the auto-reply assistant

    • WhatsApp: connect a number, the inbox and the auto-reply assistant
  11. Chapter 10 · Meta Ads

    • Meta Ads: connect your ad account and see how many buyers your ad spend brings
  12. Chapter 11 · Account, plan and team

    • Buying the Platform plan, payment, invoices, security and staff accounts
  13. Chapter 12 · For buyers and frequently asked questions

    • For buyers, frequently asked questions and how to get support

Chapter 0

Getting started with ViRFQ

Register, verify your email, sign in and complete the first company details.

Register, verify your email and sign in

Create a free exporter account, enter the 6-digit verification code, complete the first company details and sign in to the dashboard.

This article is for a company using ViRFQ for the first time. You will create an account, verify your email, enter a few company details and reach the dashboard. The whole flow takes about 3 minutes and is free — no card or bank transfer needed yet.

Step 1: Create the account

  1. 1

    Bước 1: Open virfq.com/en/register. Choose the Exporter role (1) — overseas buyers choose the box next to it.

    • Enter your full name (2) and the exporting company name (3) exactly as on the business registration — this name appears on the public profile and on invoices.
    • Use a work email (4) you read every day: verification codes, new-RFQ alerts and buyer messages all go there.
    • Phone number (5): type it without the leading 0; the +84 country code is preselected. Password (6): at least 8 characters.
    ViRFQ registration page with the Exporter role box (1), full name (2), company name (3), email (4), phone (5), password (6), terms checkbox (7) and the Create account button (8)
    Registration form: (1) role, (2) full name, (3) company name, (4) work email, (5) phone, (6) password, (7) accept the terms, (8) Create account.
  2. 2

    Bước 2: Tick the Terms of Service box (7) and click Create account (8). The system moves to the email verification screen.

Step 2: Verify the email with the 6-digit code

  1. 1

    Bước 1: Open your mailbox and find the ViRFQ email with the 6-digit code. Enter it in the six boxes (1) — you can paste the whole code at once. Click Verify and enter ViRFQ (2).

    • No email? Check the Spam/Promotions folder or click Resend code (3). The code is valid for 6 hours; the email also contains a link you can open instead of typing the code.
    Email verification screen with six code boxes (1), the Verify and enter ViRFQ button (2) and the Resend code button (3)
    Email verification: (1) enter the 6-digit code, (2) verify, (3) resend the code if it has not arrived.

Step 3: First company details

  1. 1

    Bước 1: After verification ViRFQ asks for a few details to build the company profile. Fastest way: paste your company website address (1) and click Auto-fill (2) — the AI assistant reads the website and pre-fills the name, product categories and introduction.

    • No website? Type the company name (3), choose the business type (4: manufacturer, trader, cooperative or farm), tick the product categories you sell, then pick the founding year and staff size.
    • Click Complete (5). You may click *Skip, fill in later* — but an empty profile does not appear on the Marketplace until it is completed (see "Business profile").
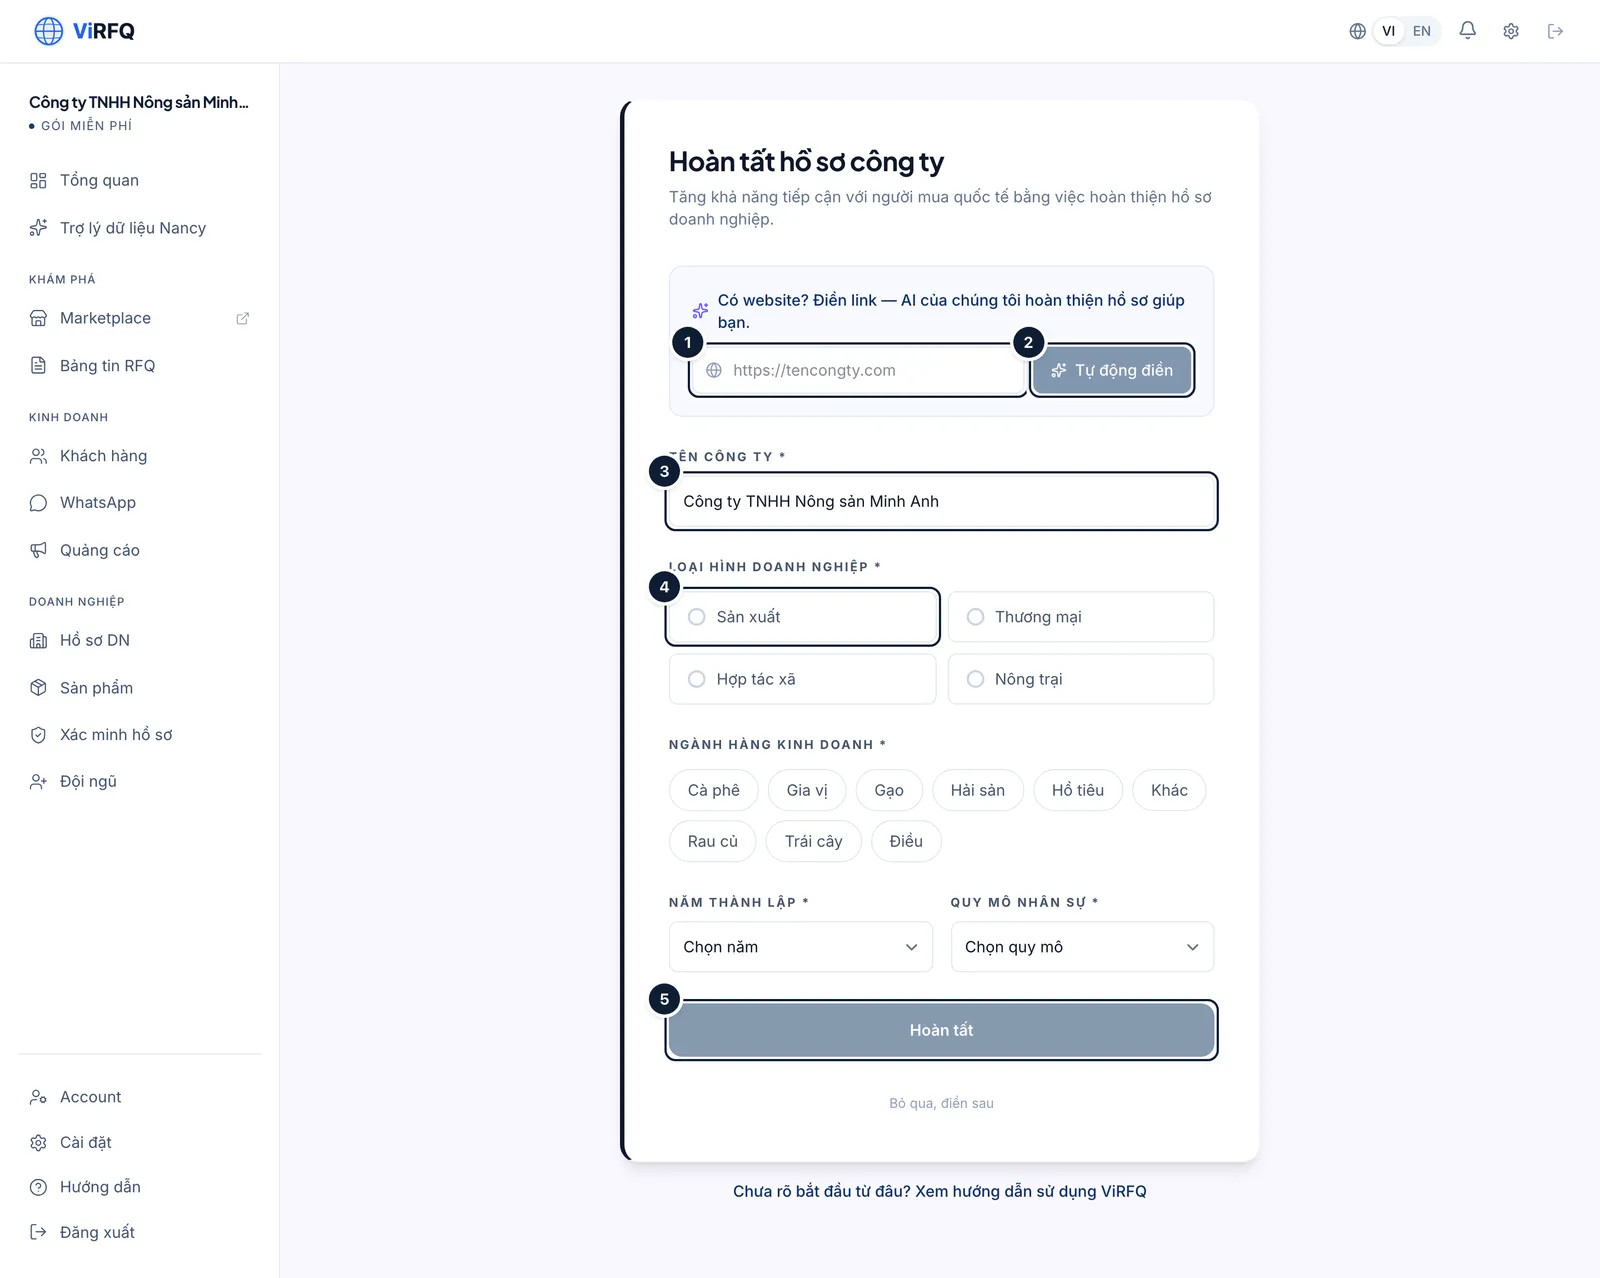
    Company setup screen with the website field (1), Auto-fill button (2), company name (3), business type (4) and the Complete button (5)
    Company setup: (1) website, (2) auto-fill, (3) company name, (4) business type, (5) Complete.

Signing in next time

  1. 1

    Bước 1: Open virfq.com/en/login. Enter your email (1) and password (2) and click Sign in (3).

    • Tick Remember me on this device on your own computer: the session lasts 30 days. Without it, closing the browser signs you out.
    ViRFQ login page with the Email field (1), Password field (2) and the Sign in button (3)
    Sign in with a password: (1) email, (2) password, (3) Sign in.
  2. 2

    Bước 2: Forgot the password? Switch to the Email code tab (1), enter your email (2) and click Send login code (3). ViRFQ emails a 6-digit code; entering it takes you straight to the dashboard, no password needed.

    • A login code is valid for 10 minutes and can be used once.
    The Email code tab (1) on the login page with the email field (2) and the Send login code button (3)
    Sign in with an emailed code: (1) choose the tab, (2) email, (3) send the code.
  3. 3

    Bước 3: To set a new password click Forgot password?, enter your email (1) and click Send verification code (2). Enter the code together with the new password on the same page.

    • After the password changes, every signed-in device is signed out — sign in again with the new password.
    Password reset page with the login email field (1) and the Send verification code button (2)
    Reset the password: (1) email, (2) send the code.
  4. 4

    Bước 4: On a phone the login page collapses into one column; the steps are identical to the desktop.

    ViRFQ login page on a phone
    ViRFQ login page on a phone

Tip

Several people in the company use ViRFQ? Do not share the password. Create a separate account for each sales staff member under Team — see "Account, plan and team".

Important

ViRFQ never asks for your password by phone or WhatsApp. Only type your password on virfq.com.

Frequently asked questions

Can I register with a personal email (Gmail)?
Yes. A work email on the company domain, however, makes buyers trust you more when you contact them and helps ViRFQ verify the business faster.
How many accounts can one company create?
One owner account per company. Sales staff accounts are added under Team (Platform plan); they share the plan and company data but sign in separately.
I already have an account but forgot which email I used.
Contact ViRFQ support through the Contact page or the hotline in the footer, with the company name and tax code, and we will look it up.
Chapter 1

The Overview dashboard

Read the key numbers and know what needs your attention today.

Reading the Overview dashboard

Understand the 5 key numbers, the customer funnel and the list of things that need your attention today, right after signing in.

Overview is the first screen after signing in. It answers three questions: how long my plan has left, where buyers came from this week, and what I need to do right now. Every number is clickable and leads to its detail page.

The key numbers

  1. 1

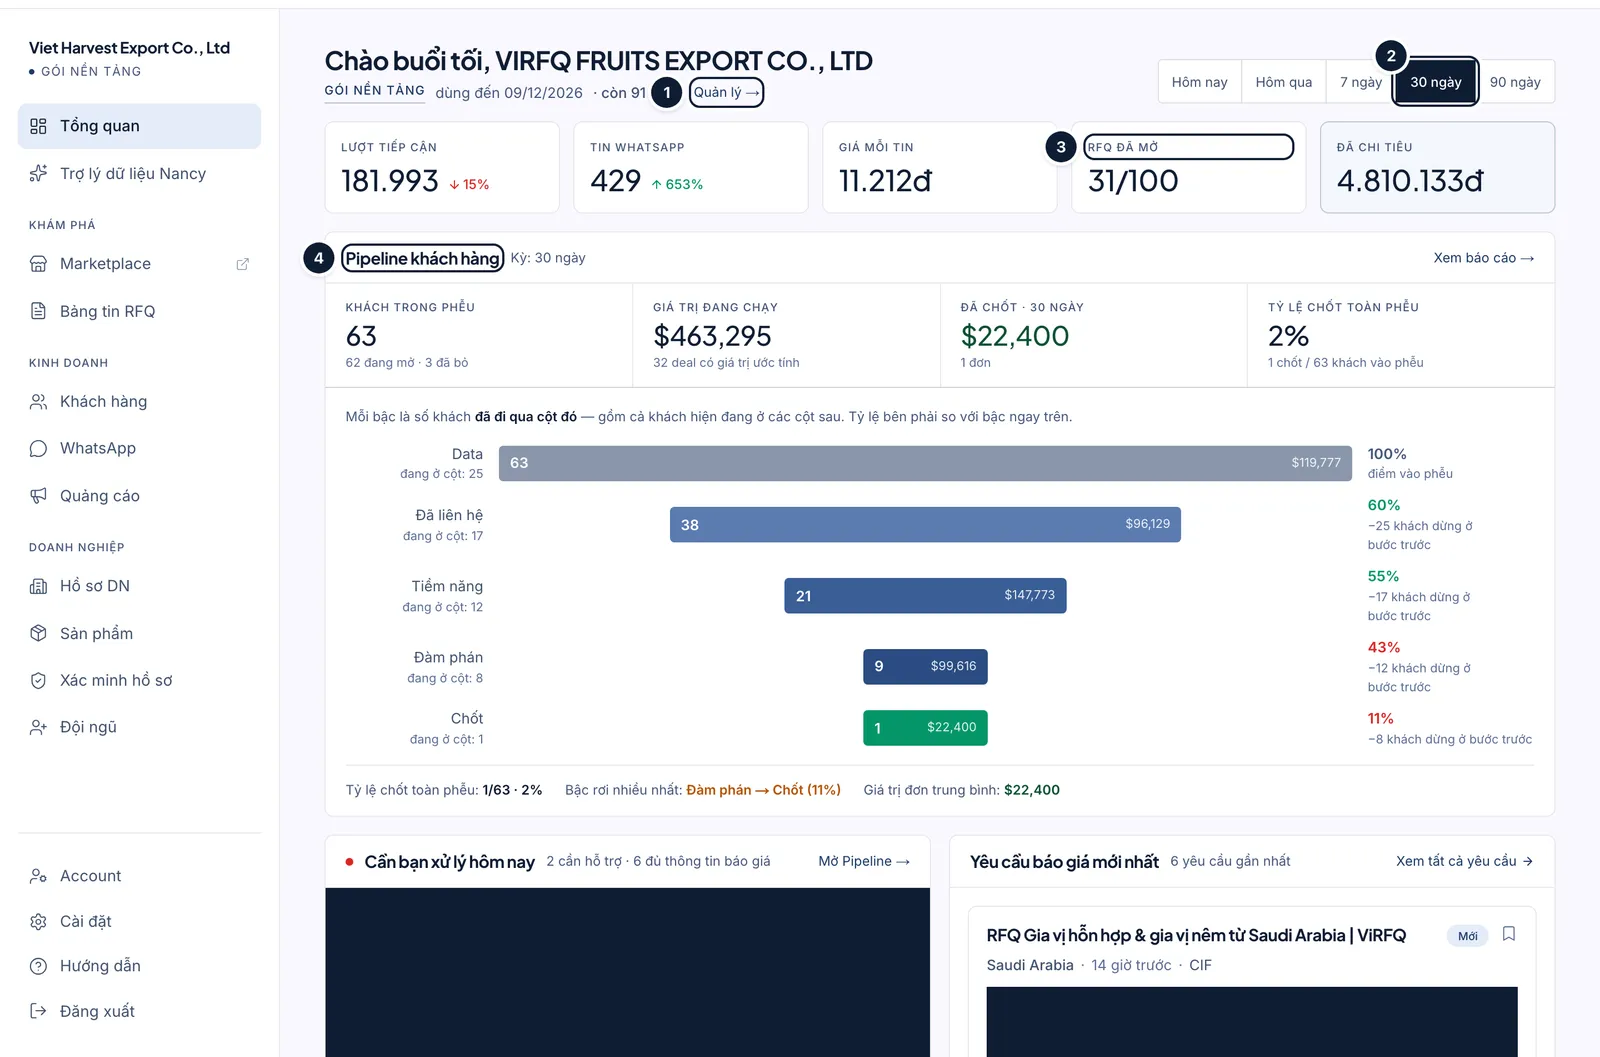
    Bước 1: Right under the greeting you see the current plan, expiry date and days left; click Manage (1) to see payment history or buy a new term.

    • The Today / Yesterday / 7 days / 30 days / 90 days selector (2) applies to every number below.
    • Reach and WhatsApp messages: how many people saw your ads and how many messages buyers sent to your WhatsApp number in the chosen period; the arrow shows the change versus the previous period.
    • Cost per message: ad spend divided by messages received — the lower the better.
    • RFQ unlocks (3): buyer-contact unlocks used out of this month’s allowance.
    • Spent: total Meta ad spend in the period (shown only once you have connected an ad account).
    Top of the Overview dashboard: Manage plan link (1), 30-day period selector (2), RFQ unlocks tile (3) and the Customer pipeline block (4)
    Overview: (1) manage the plan, (2) choose a period, (3) RFQ unlocks used, (4) customer funnel.
  2. 2

    Bước 2: The Customer pipeline block (4) summarises the sales funnel: how many customers are in it, the value of open deals, how many were won and the win rate. Each bar is the number of customers who passed through that column; the percentage on the right compares it with the bar above.

    • Click View report to open the Customers board with the same period selected.

What needs your attention today

  1. 1

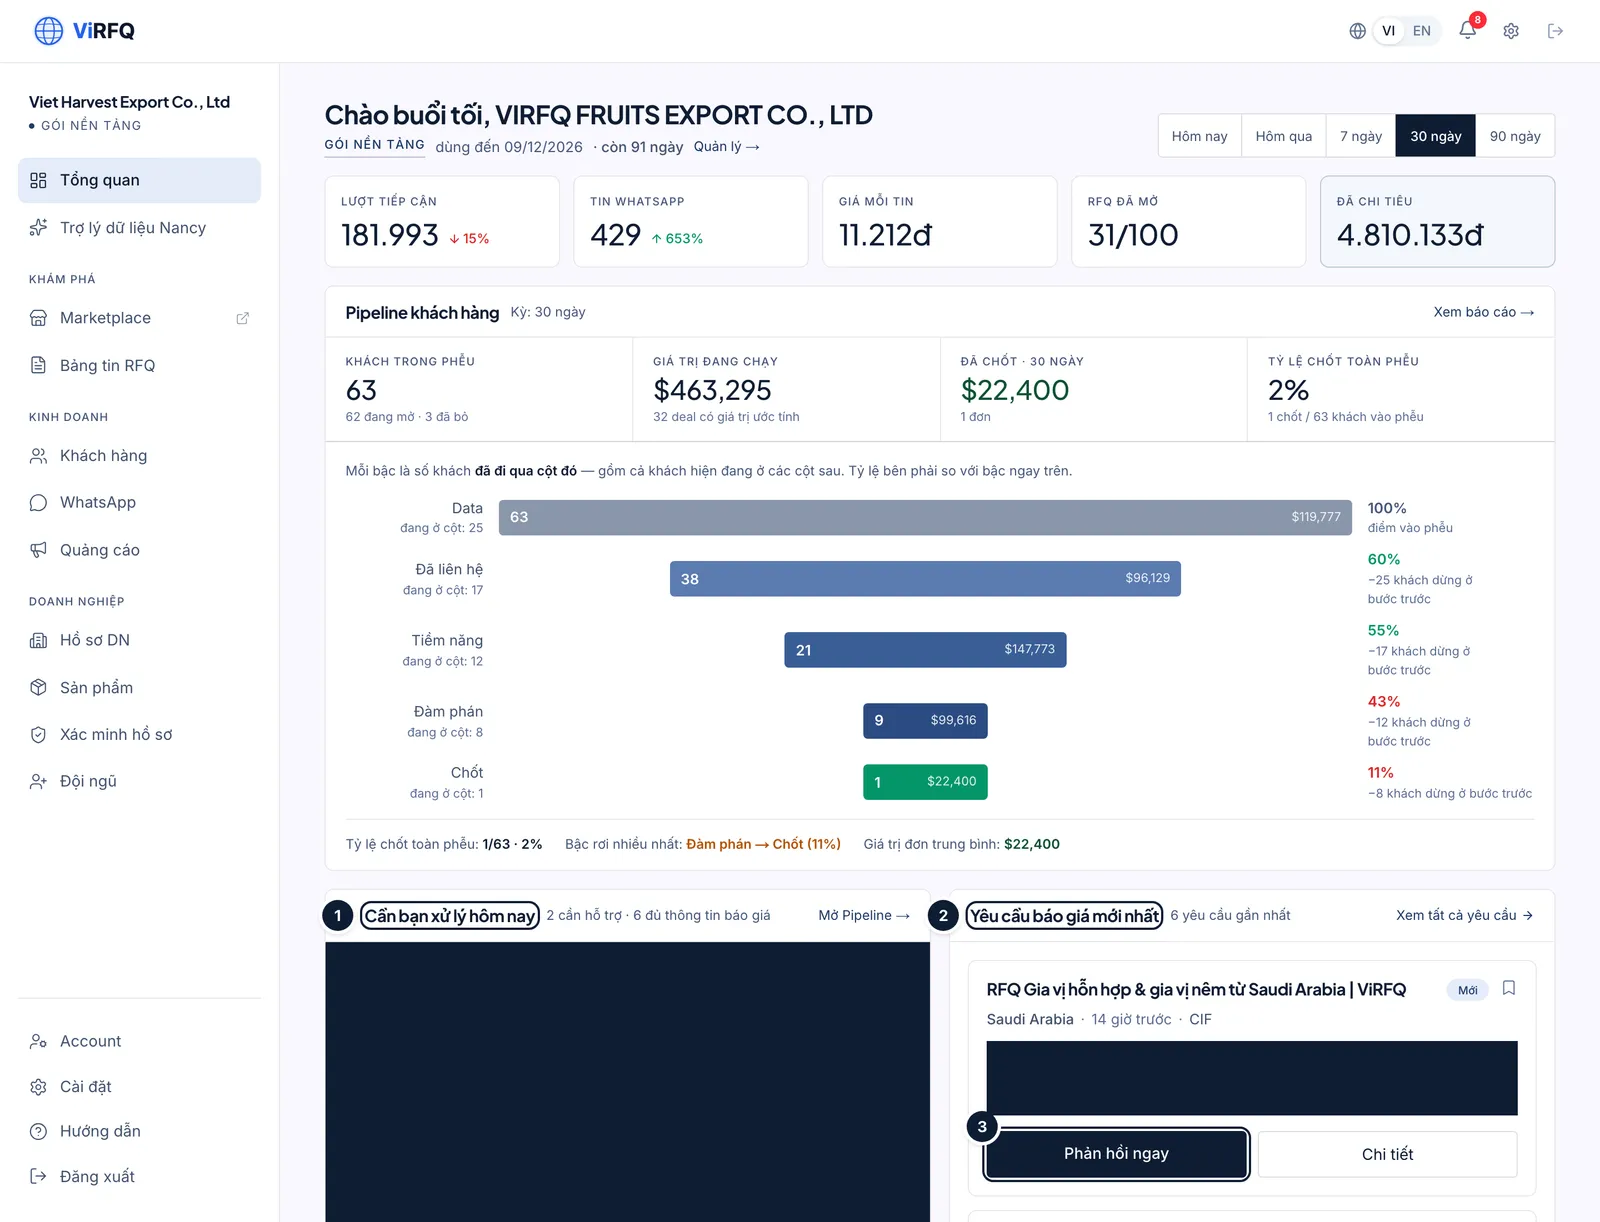
    Bước 1: Scroll down. The Needs your action today block (1) lists WhatsApp conversations the auto-reply assistant cannot handle further: buyers who need support (clock icon) or who are quote-ready (tick icon) and are waiting for your quote. Click a row to open that conversation.

    Lower half of the Overview dashboard with the Needs your action today block (1), the Latest RFQ Submissions block (2) and the Reply Now button (3)
    Today: (1) conversations waiting for you, (2) latest RFQs, (3) reply to an RFQ.
  2. 2

    Bước 2: The Latest RFQ Submissions block (2) shows new RFQs in your product categories. Click Reply Now (3) to unlock the contact details and reach the buyer, or Details to read the full request first.

  3. 3

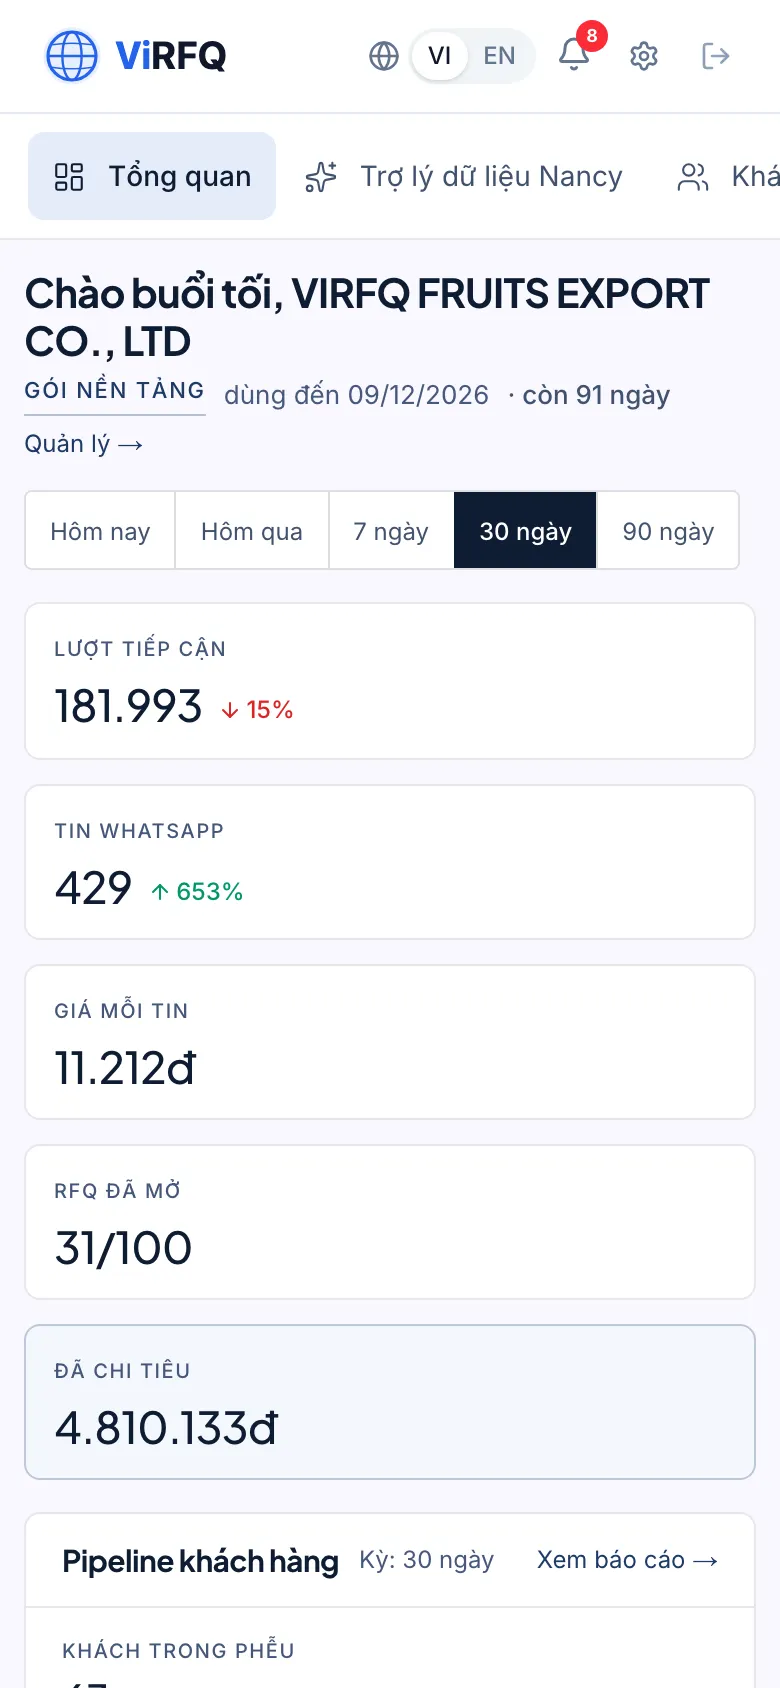
    Bước 3: On a phone the tiles stack vertically and the navigation bar sits under the logo; swipe sideways to reach the other sections.

    Overview dashboard on a phone with the metric tiles stacked
    Overview dashboard on a phone with the metric tiles stacked

Why do some tiles show 0 or a dash?

Reach, WhatsApp messages and Spent only have values once you have connected a WhatsApp number and a Meta ad account. A new account or the Free plan shows 0 — that is not an error.

Frequently asked questions

How often do the numbers refresh?
WhatsApp messages and RFQs update immediately. Meta ad figures sync on a schedule; click "Sync again" under Ads to fetch the latest numbers.
I am a sales staff member — why do I see fewer sections than the owner?
Staff accounts only see the customer-facing sections (Overview, Nancy, RFQ Board, Customers, WhatsApp). Money, company profile and product sections are visible to the owner account only.

Chapter 2

Business profile

Complete the public profile so buyers trust you and get in touch.

Completing the business profile

Fill in company details, factory photos, trade terms and documents so your public profile shows on the Marketplace and earns buyer trust.

The business profile is the company page overseas buyers see on the Marketplace and when they open your products. The more complete it is — real factory photos, clear trade terms, submitted documents — the easier it is for buyers to get in touch. The WhatsApp assistant also reads this profile to answer buyers on your behalf.

Open the profile and fill it quickly from your website

  1. 1

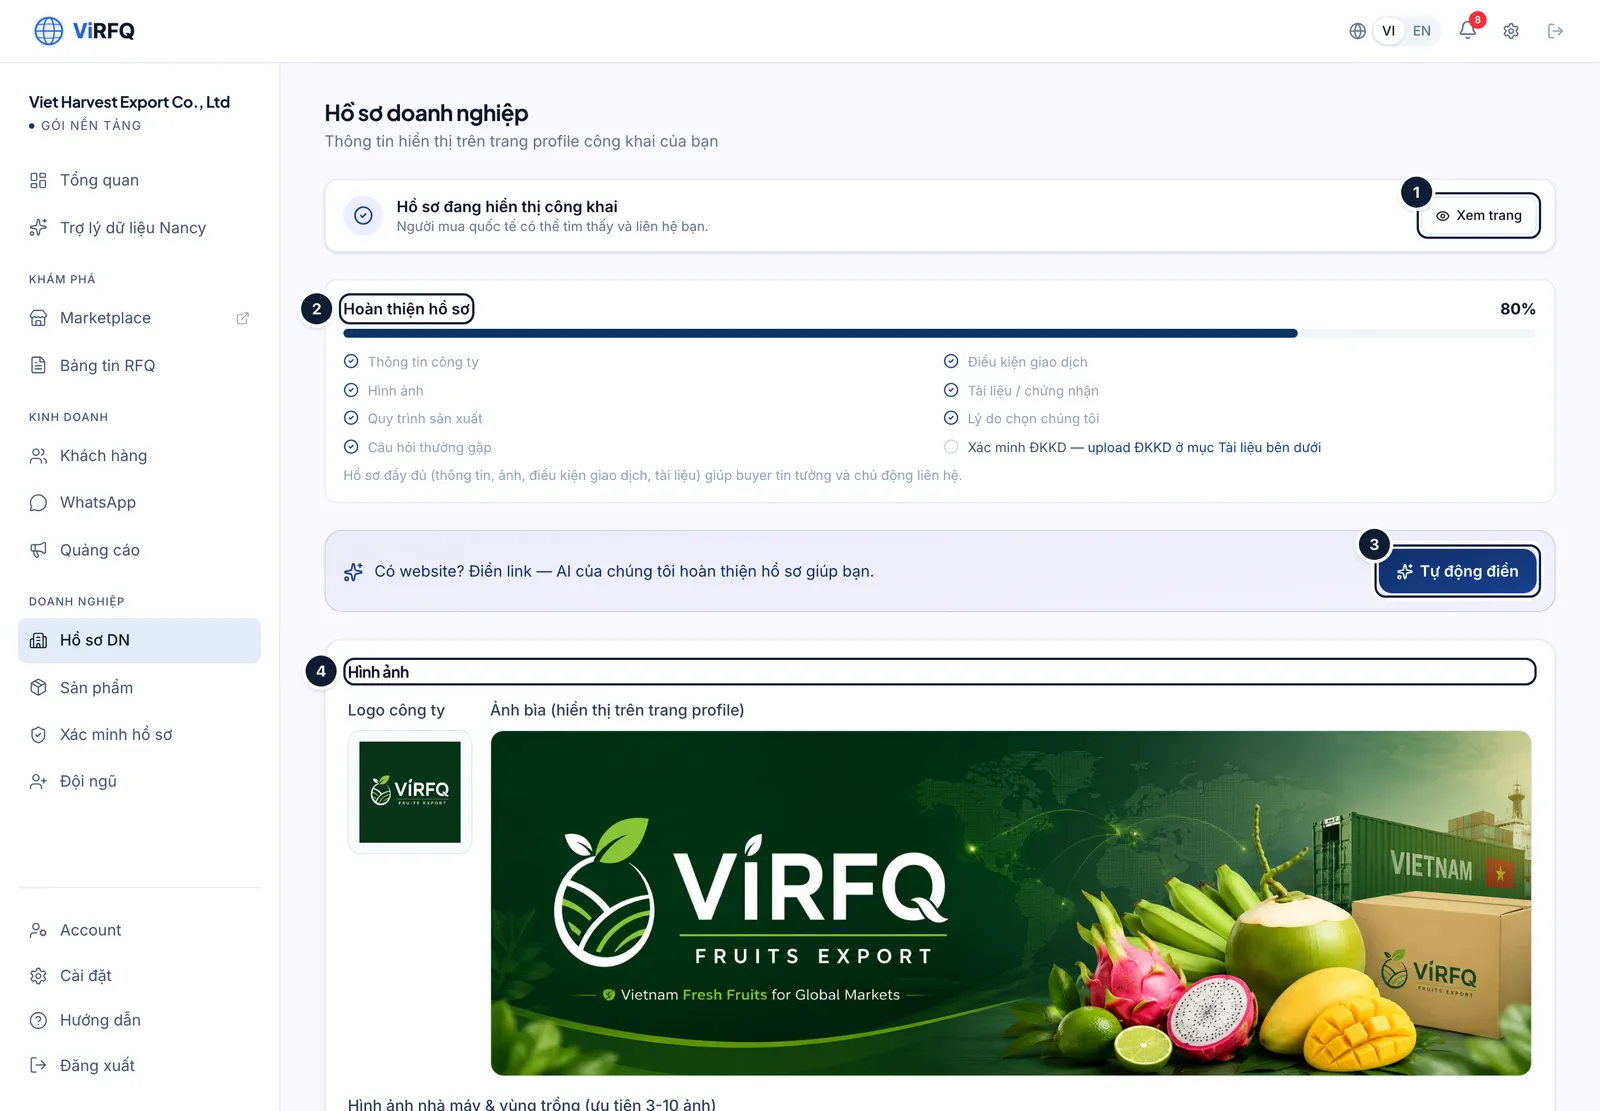
    Bước 1: Go to Business Profile in the left column. At the top are the profile status and the View page button (1) that opens the public page. The Profile completeness bar (2) shows what is still missing — aim for 100%.

    • Have a website? Paste the link and click Auto-fill (3): the AI assistant reads the site and fills the introduction, categories, capacity and suggests images. You can still edit every field before saving.
    • Images (4): upload a logo, a cover photo and 3–10 factory, growing-area and production-line photos with short captions (for example "Processing workshop", "Gia Lai growing area"). Real photos convince buyers more than any text.
    Top of the Business Profile page with the View page button (1), the Profile completeness bar (2), the Auto-fill from website button (3) and the Images section (4)
    Business profile: (1) view the public page, (2) completeness, (3) auto-fill, (4) images.

Basic information and trade terms

  1. 1

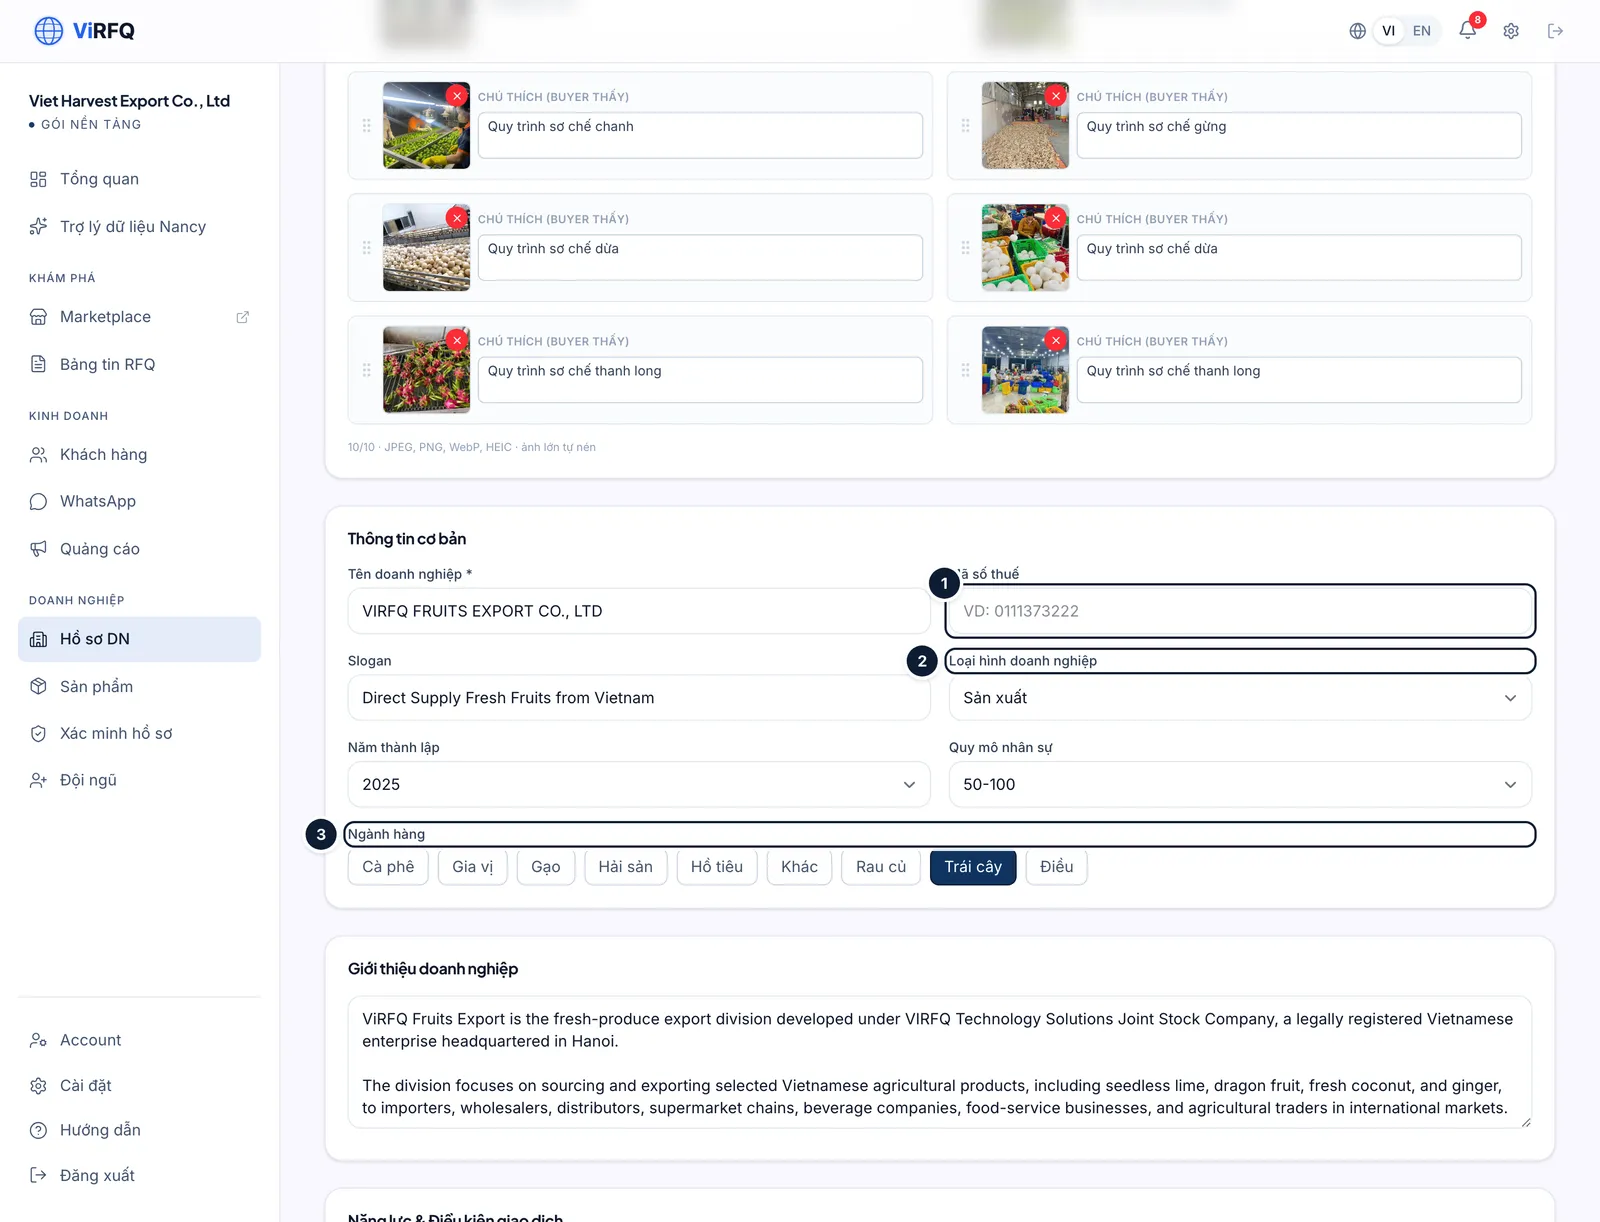
    Bước 1: Scroll to Basic information: enter the tax code (1) exactly as on the business registration, choose the business type (2) and tick the product categories (3) you sell.

    • Write the Company introduction in 3–5 sentences in Vietnamese: what the company does, for how many years, and its strengths. ViRFQ translates it into English for buyers automatically.
    Basic information section with the tax code field (1), business type (2) and product categories (3)
    Basic information: (1) tax code, (2) business type, (3) categories.
  2. 2

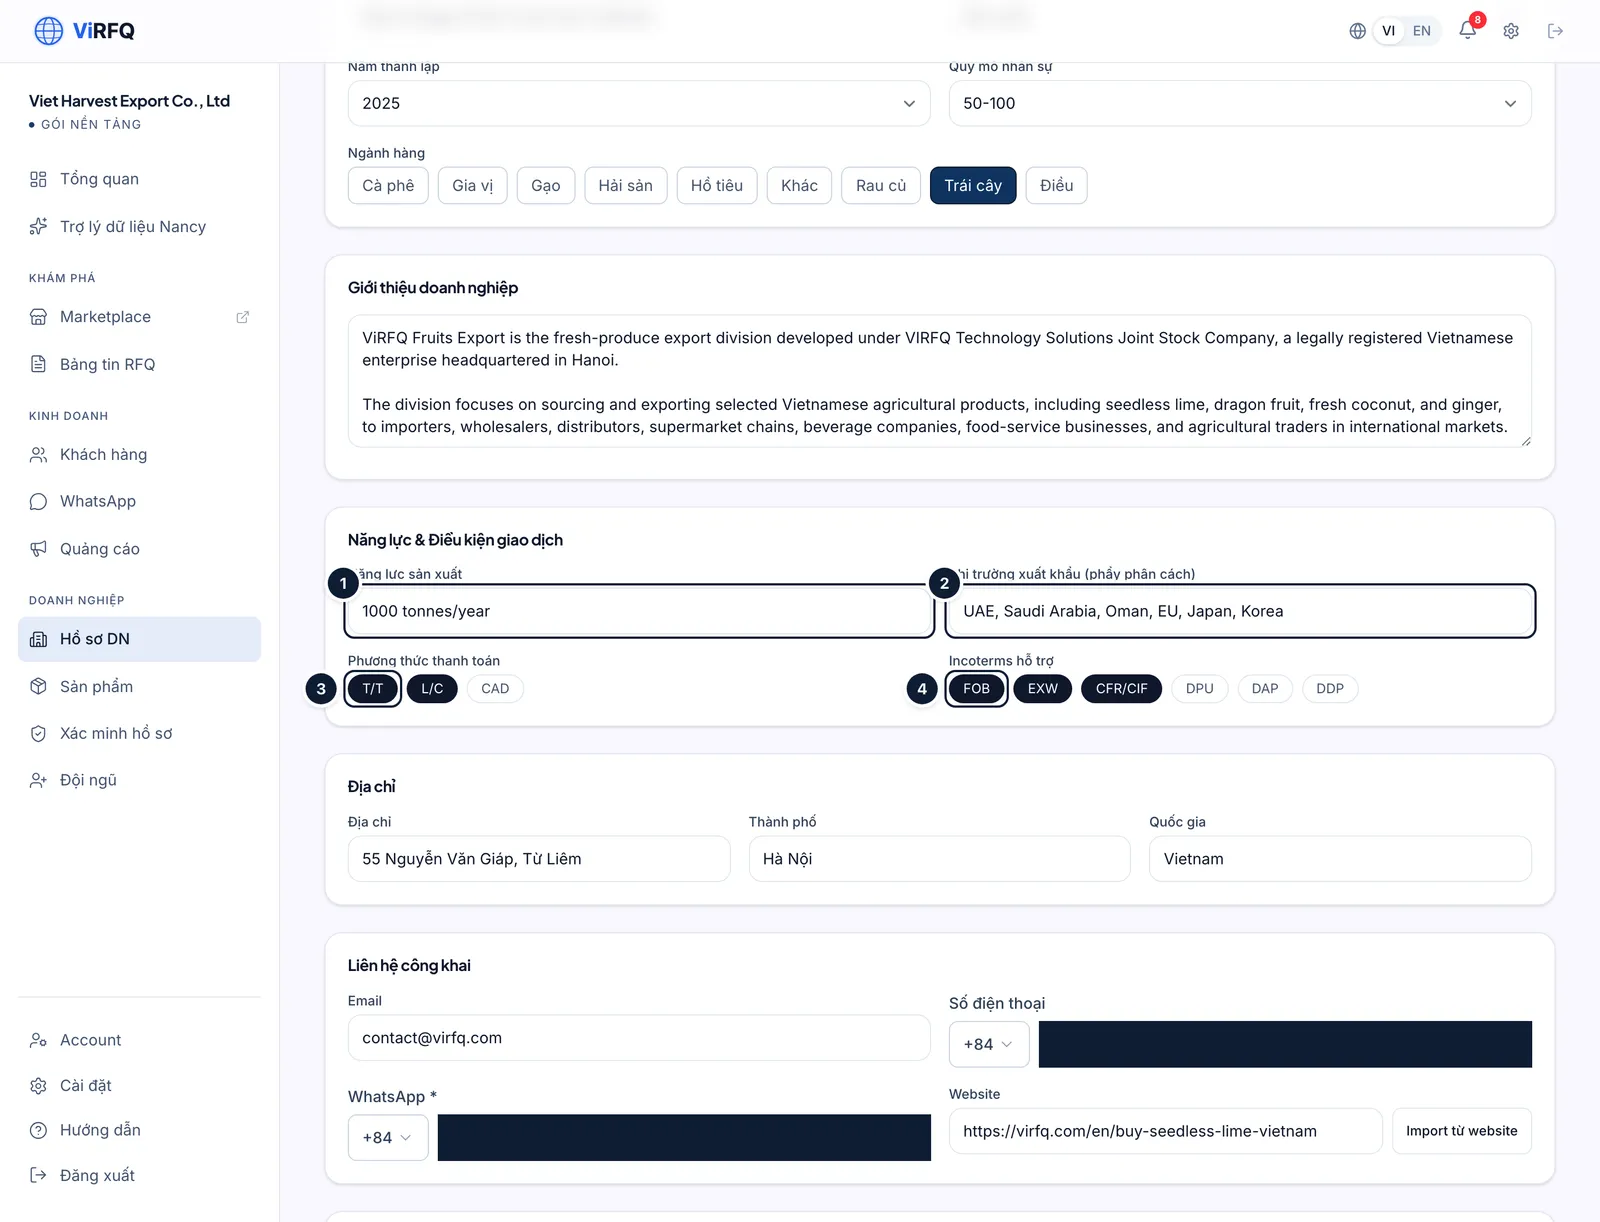
    Bước 2: Under Capacity & trade terms: enter the production capacity (1), the export markets (2) separated by commas, then click the payment methods (3: T/T, L/C, CAD) and the Incoterms you support (4: FOB, CIF/CFR, EXW…). Buyers filter suppliers by exactly these fields.

    • Public contact: the email, phone and WhatsApp number shown on the public page — use the number your sales team monitors.
    Capacity and trade terms section with the production capacity field (1), export markets (2), the T/T payment method button (3) and the FOB Incoterms button (4)
    Trade terms: (1) capacity, (2) markets, (3) payment, (4) Incoterms.

Documents

  1. 1

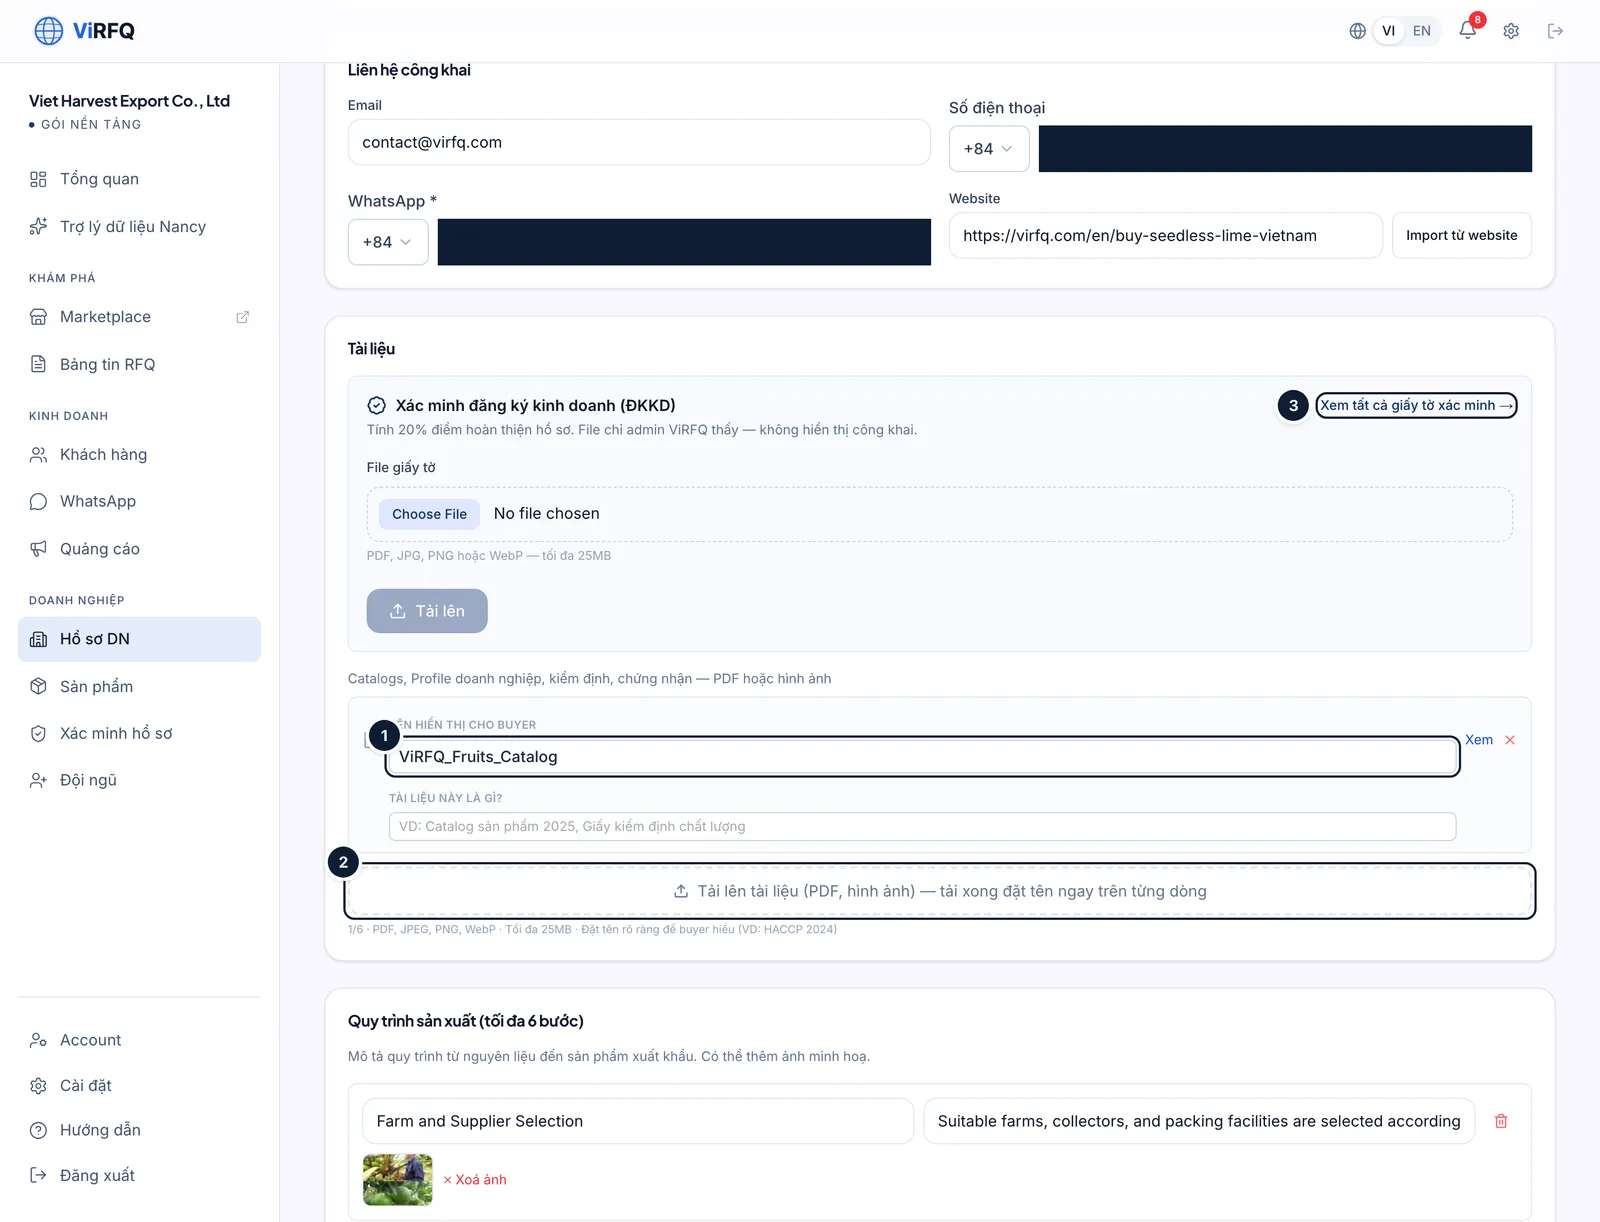
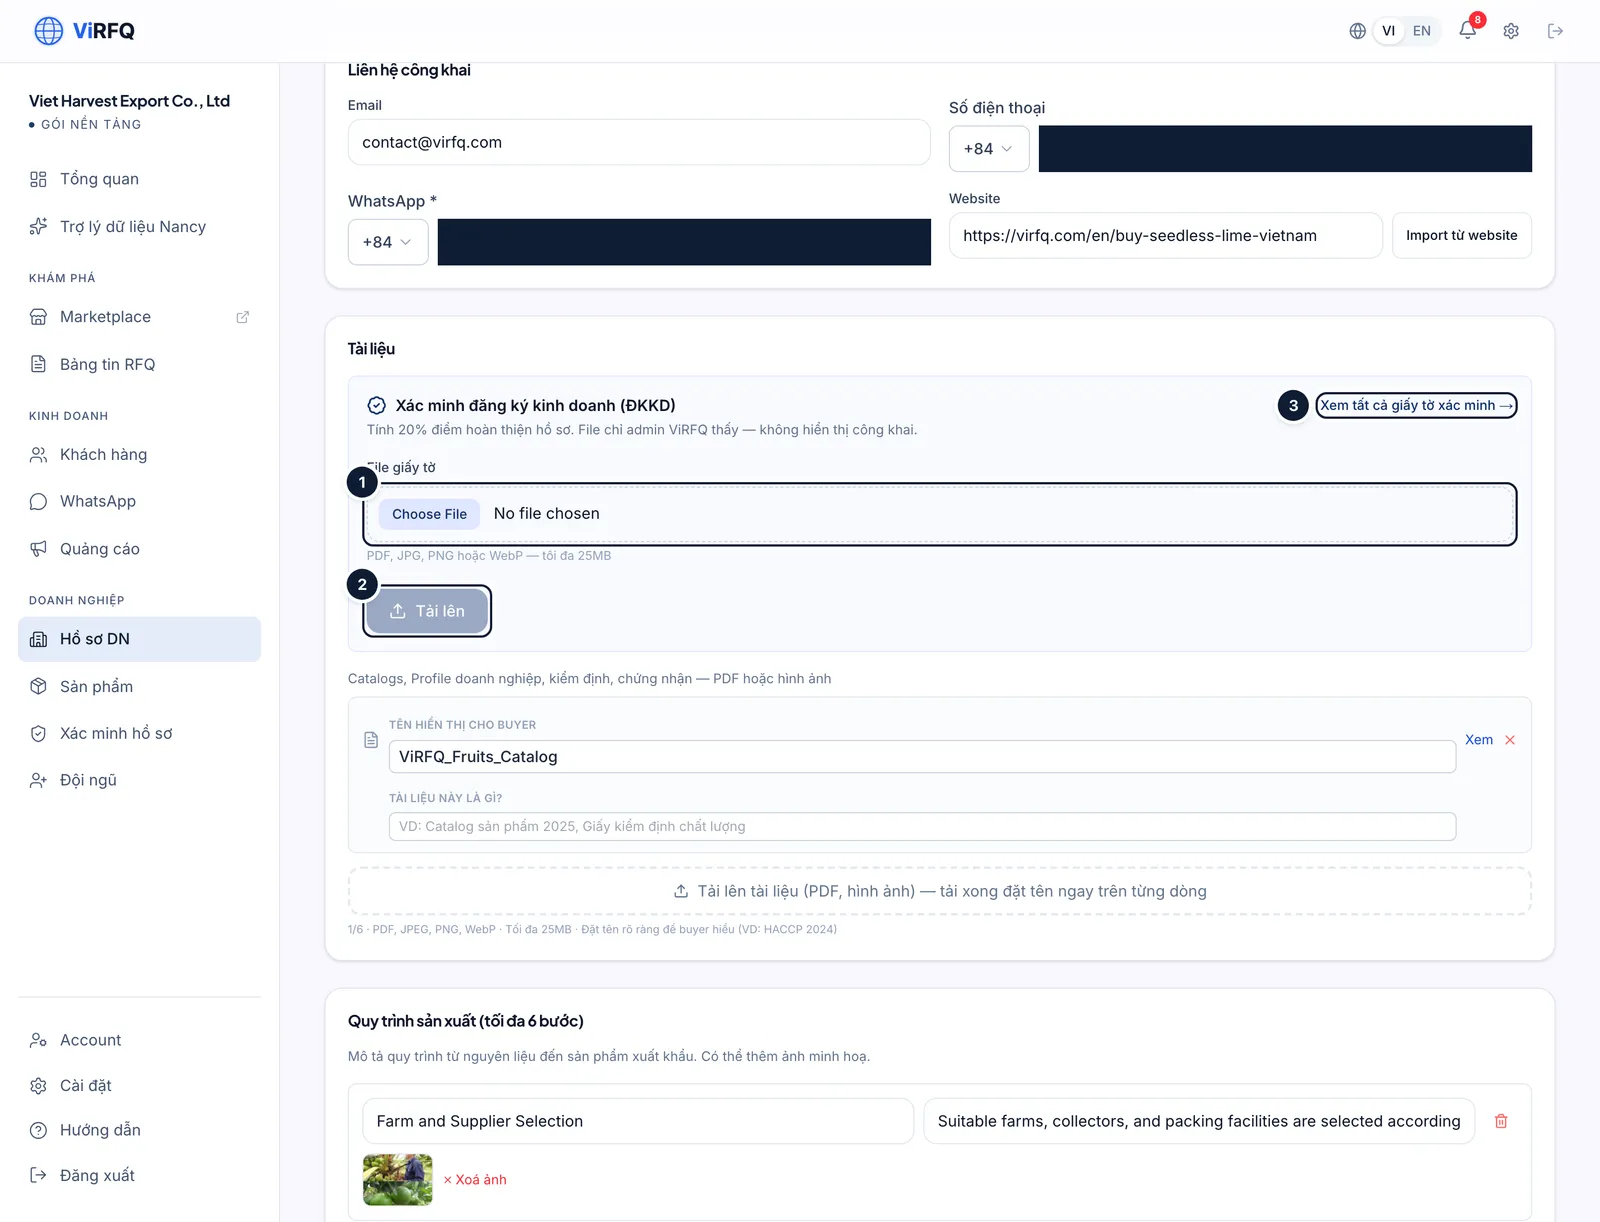
    Bước 1: The Documents section has two separate blocks. The lower block is the public documents for buyers (catalogue, HACCP/ISO/Halal certificates): click Upload document (2), then set the display name for buyers (1) on the line that was just uploaded — the file appears on the public page with a download button. The upper block is Business registration (ĐKKD) verification (private, seen only by the ViRFQ team) and is used for the Verified badge — see "The Verified badge" or click View all verification documents (3).

    • Accepted files: PDF, JPG, PNG, WebP — up to 25 MB each. A business registration uploaded in the public block does not count as a verification document — submit it in the business registration verification block.
    Documents section with the display-name field (1) and the Upload document button (2) in the public documents block, and the View all verification documents link (3) in the business registration block
    Documents: (1) display name, (2) upload a public document, (3) go to verification.

Process, reasons to choose you, FAQ and save

  1. 1

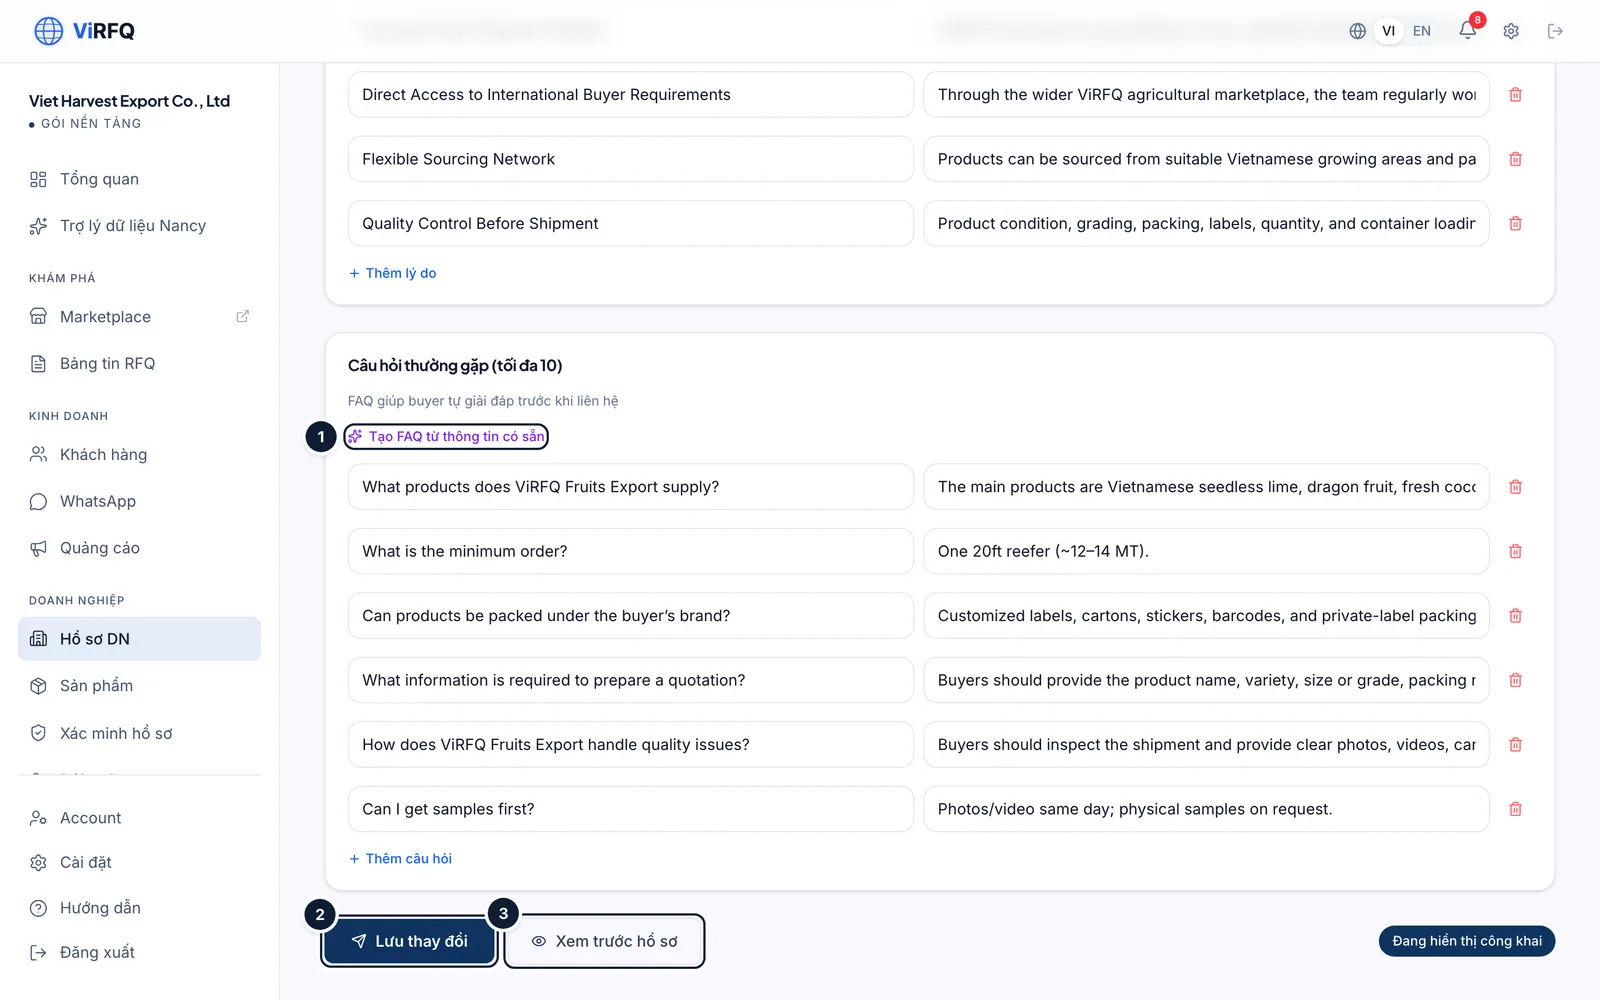
    Bước 1: At the bottom three sections tell the company story: Production process (up to 6 steps), Why choose us (up to 6) and FAQ (up to 10). Click Generate FAQ from existing info (1) to let the AI draft from what you filled in, edit, then click the save button (2). Preview profile (3) opens exactly the page buyers see.

    • New profile (draft): the save button reads Publish profile — the WhatsApp number under Public contact is required; after clicking, the profile moves to Pending review. Saving as a draft keeps it a draft and does not queue it for review.
    • Published profile (as in the screenshot): the button reads Save changes; every edit goes straight to the public page after saving.
    Bottom of the Business Profile page with the Generate FAQ from existing info button (1), Save changes (2) and Preview profile (3)
    Finish: (1) generate the FAQ, (2) save, (3) preview.
  2. 2

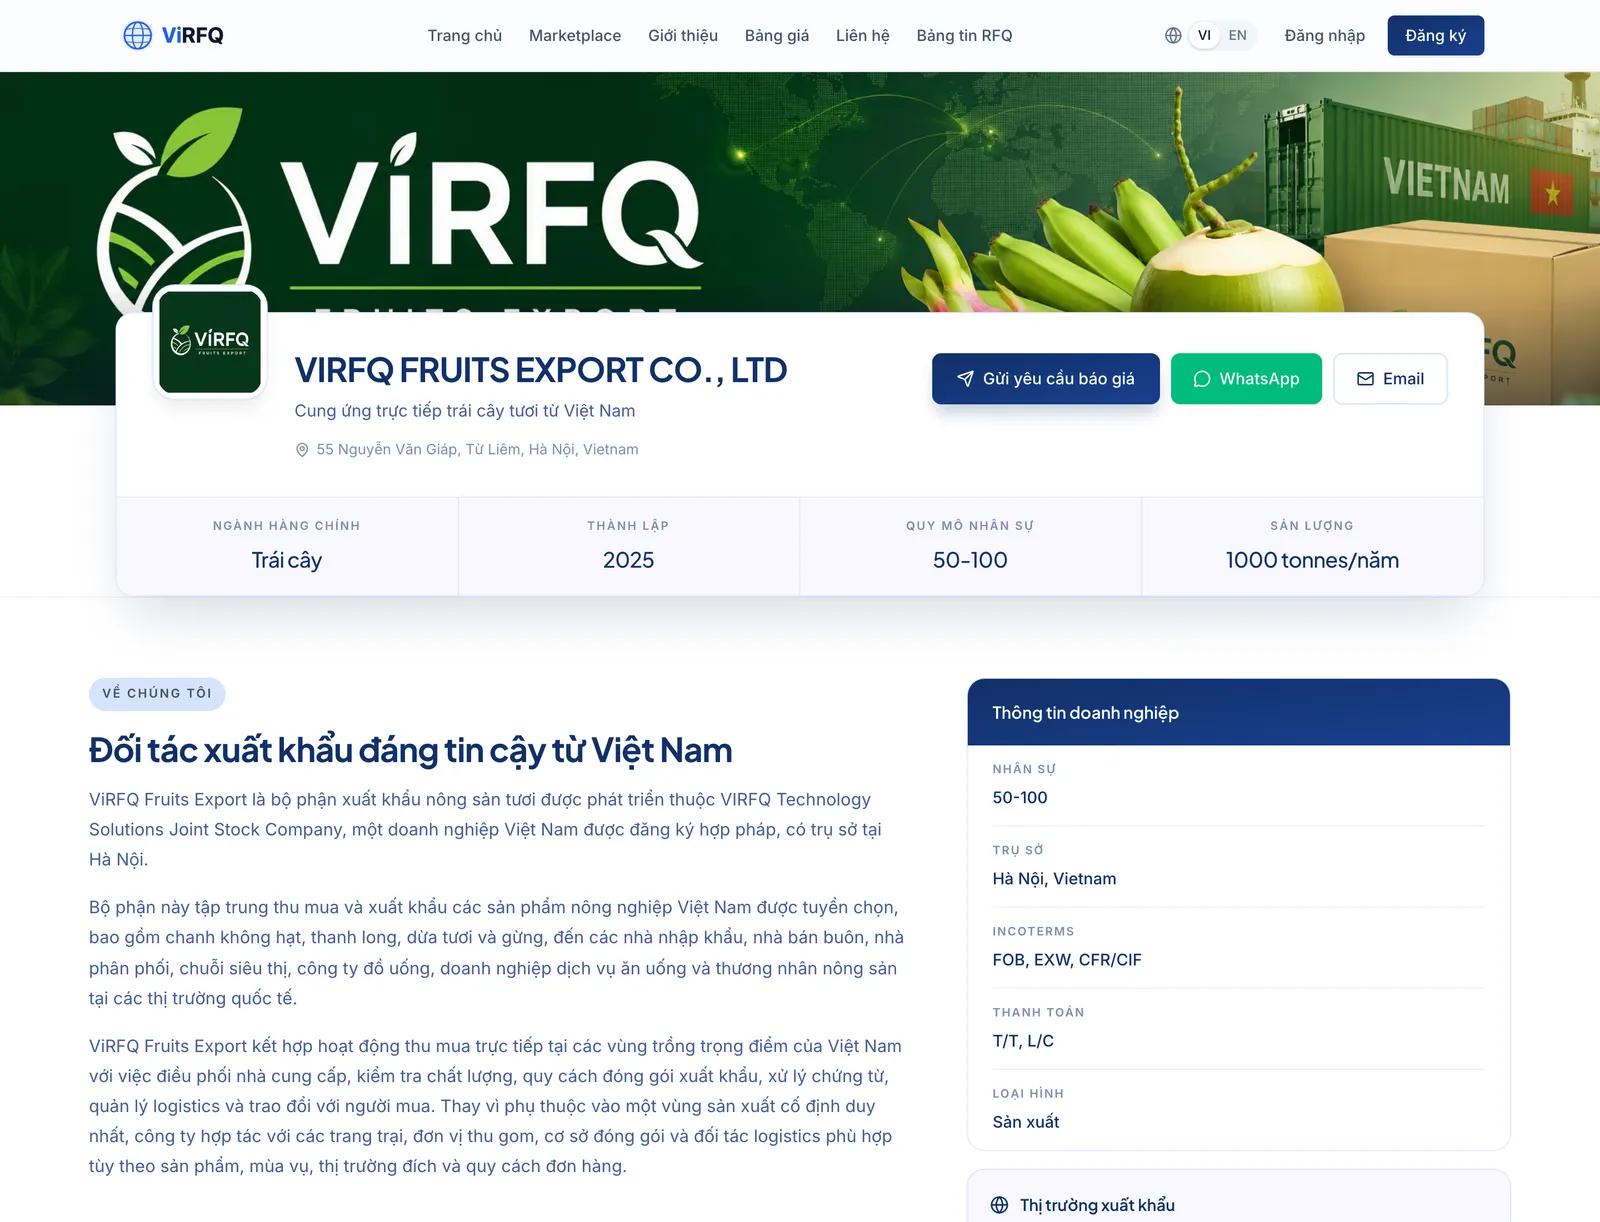
    Bước 2: The public company page has an address of the form virfq.com/en/supplier/company-name. Send this link to buyers or add it to your email signature — every change saved in Business Profile shows there immediately.

    Public profile page of an exporter on ViRFQ with cover photo, introduction and products
    The public page buyers see.

Profile and products share photos

Factory photos, the process and the FAQ from the Business Profile are copied to product pages that have no content of their own. A photo uploaded directly to a product always takes priority over one borrowed from the profile.

Tip

Overseas buyers read the English version. After saving, open View page and switch to EN at the top to check the translation; adjust the Vietnamese text if a sentence came out wrong.

Frequently asked questions

When does my profile appear on the Marketplace?
Fill in the name, introduction, categories, at least one photo and the WhatsApp number, then click Publish profile — the profile enters Pending review. The ViRFQ team reviews the content (usually within 1 working day) and switches the public listing on. The status shows at the top of the Business Profile page; a profile only saved as a draft is not reviewed.
I have several factories or several product categories.
Tick every category you sell and upload photos of each factory with a location caption. Each company has one profile; details of each product go on its Product page.
Can sales staff edit the profile?
No. The business profile, products and documents are edited by the owner account only; staff can only view the public page.

Chapter 3

Products

Create export-ready product pages, auto-filled from your website.

Creating an export-ready product page

Add a product with specifications, certificates, loading port and lead time; auto-fill from your website and view the public product page.

Every product you create is its own page on the Marketplace, with its own address to send to buyers and to run ads on. A good product page answers the questions buyers ask first: specifications, certificates, minimum order, loading port and lead time. The WhatsApp assistant uses exactly this information to answer buyers.

The product list

  1. 1

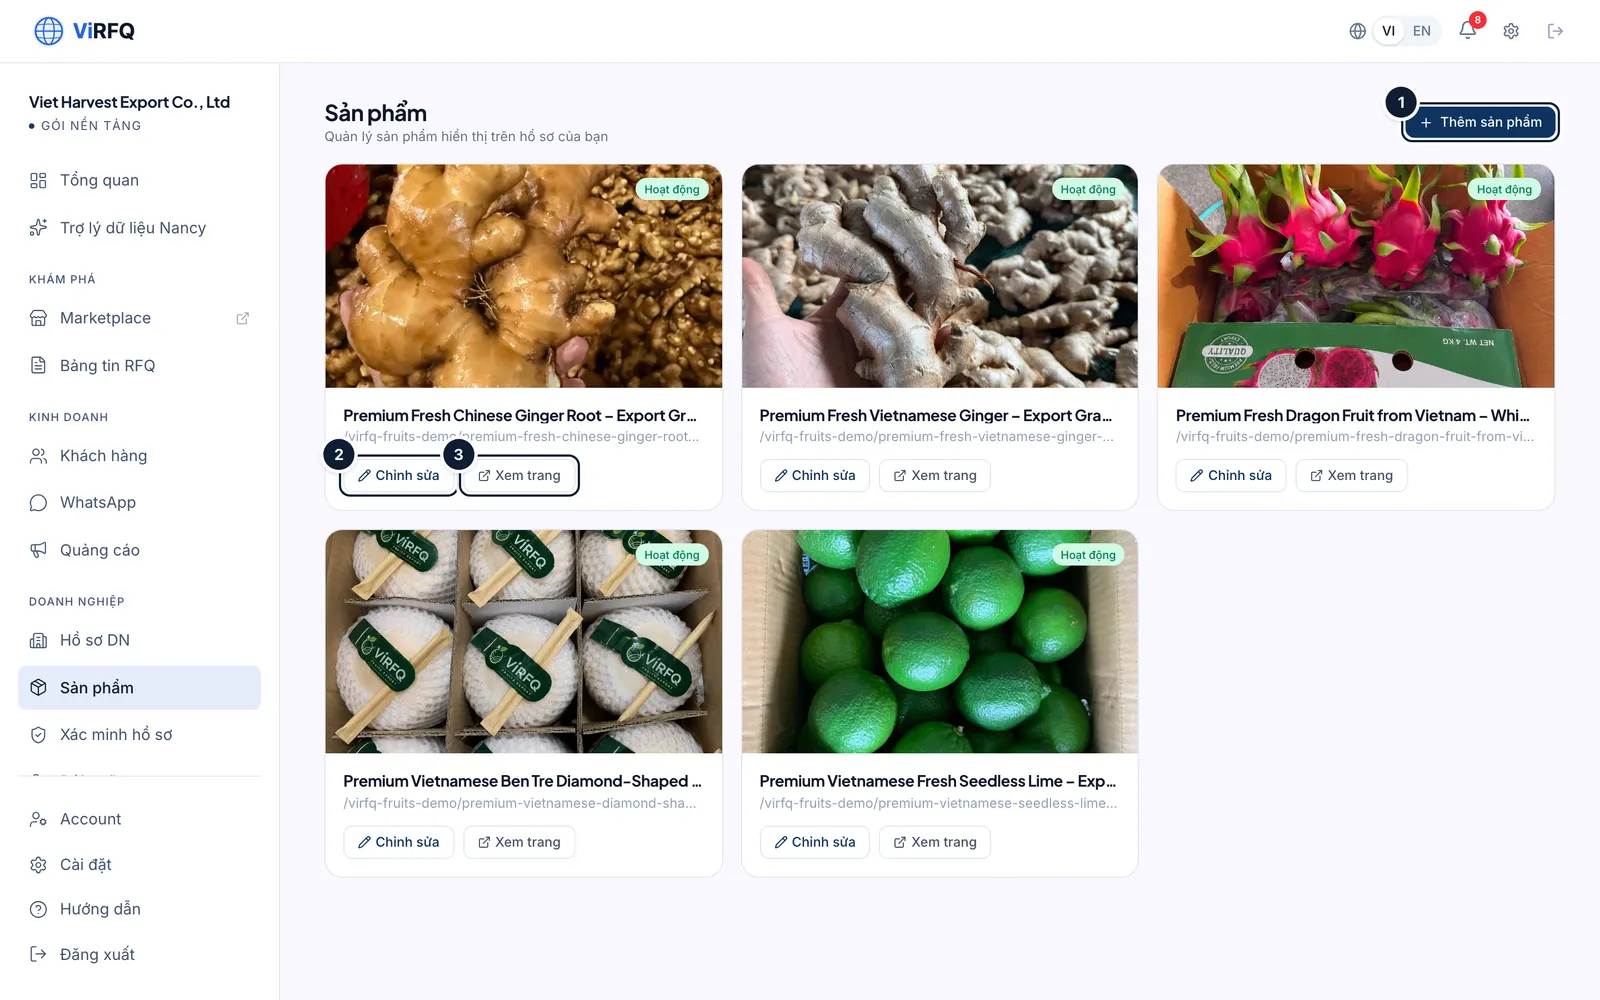
    Bước 1: Go to Products in the left column. Click Add product (1) to create one; for an existing product use Edit (2) or View page (3) to open the public page.

    • The Active label means the page is publicly visible. A newly created product is content-reviewed by the ViRFQ team before it goes live.
    Product list with the Add product button (1) and the Edit (2) and View page (3) buttons on each card
    Products: (1) add, (2) edit, (3) view the public page.

Create a new product

  1. 1

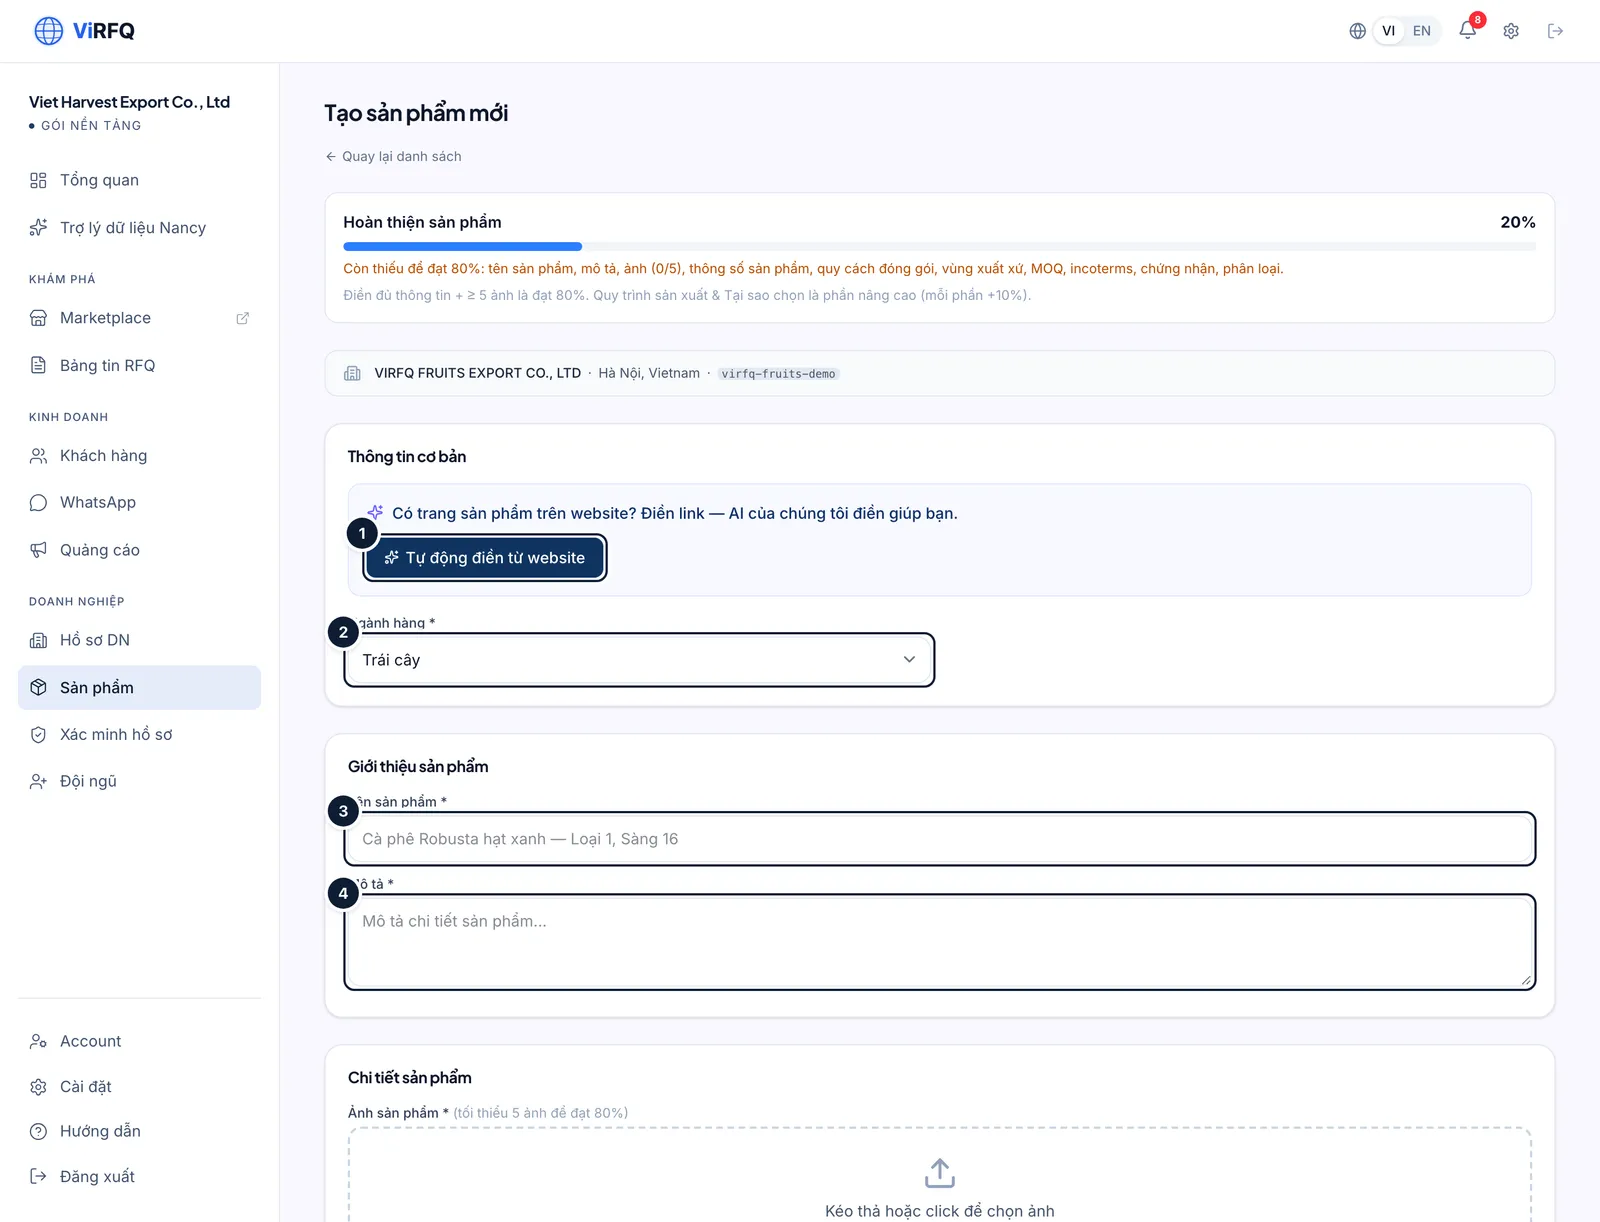
    Bước 1: Fastest: click Auto-fill from website (1) and paste the link of the product page on your own website — the AI reads it and pre-fills the name, description and specifications. Without a website, choose the category (2), type the product name (3) the way buyers search for it (for example "Robusta green coffee beans — Grade 1, Screen 16") and write the description (4).

    • Upload at least 5 photos of the product to reach 80% completeness. Real photos of your goods, packing and containers convince more than stock images.
    • Product details table: add one row per specification (moisture, size, impurities…) or use the suggestion buttons such as *+ Variety*, *+ Fruit size*, *+ Brix*.
    Top of the New product page with the Auto-fill from website button (1), the category field (2), product name (3) and description (4)
    New product: (1) auto-fill, (2) category, (3) name, (4) description.
  2. 2

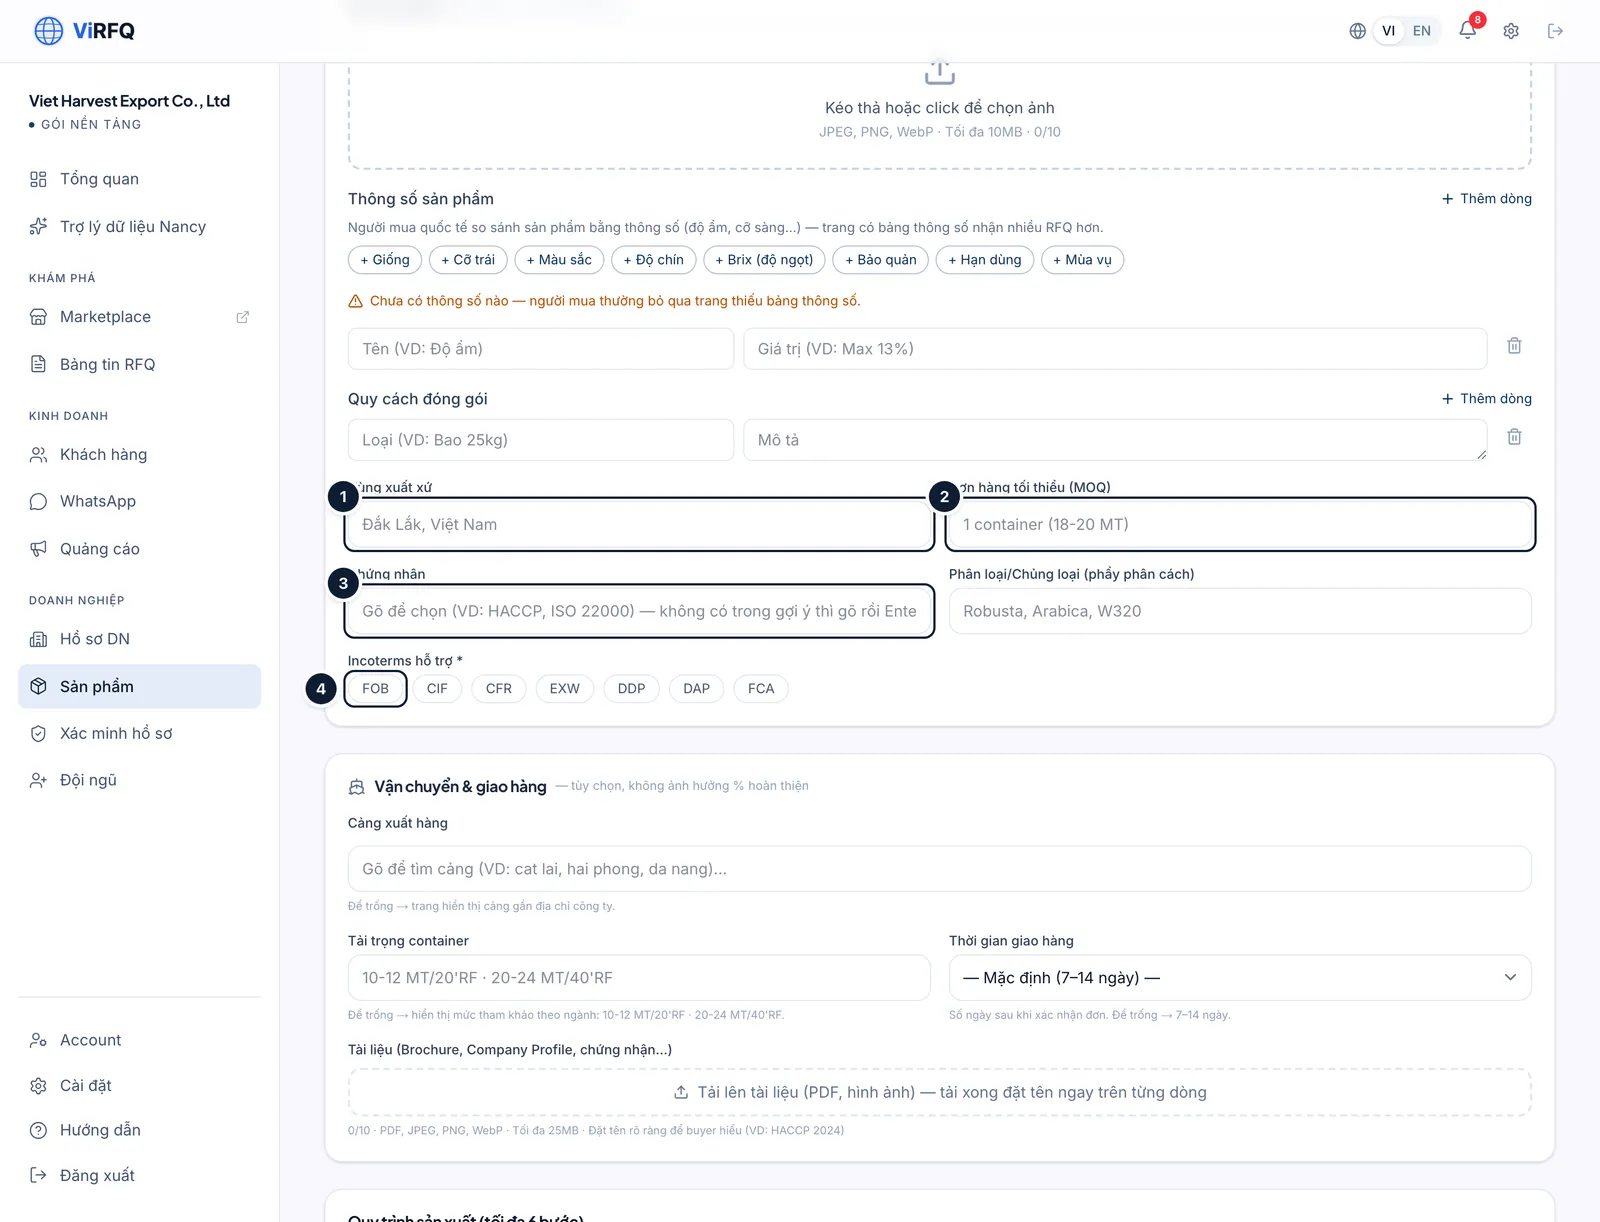
    Bước 2: Enter the origin region (1), the minimum order (2), the certificates (3: type to pick HACCP, ISO 22000, Halal…) and click the supported Incoterms (4).

    Product details section with the origin region field (1), minimum order (2), certificates (3) and the FOB and CIF Incoterms buttons (4)
    Details: (1) origin, (2) MOQ, (3) certificates, (4) Incoterms.
  3. 3

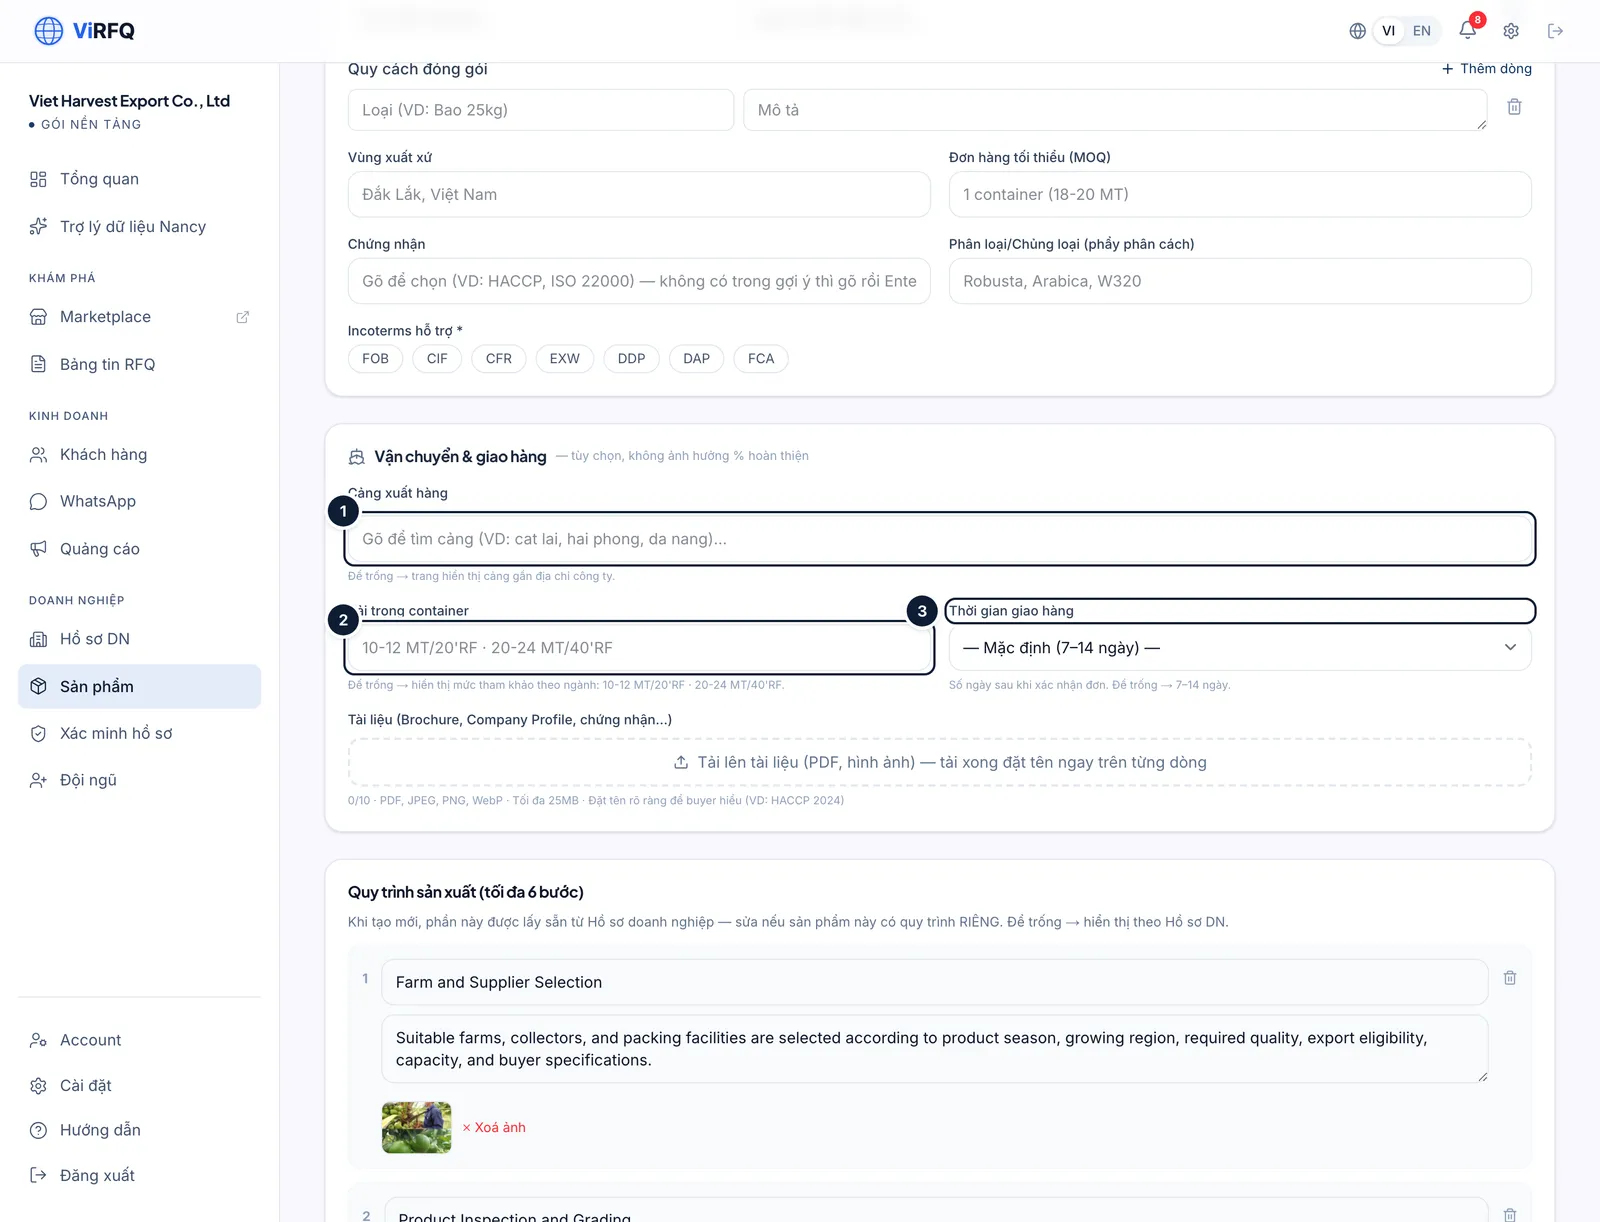
    Bước 3: In Shipping & delivery: type to pick the loading port (1), enter the container load (2, for example 10–12 t per 20-ft reefer) and choose the lead time (3). These three facts appear on the product page and in the WhatsApp assistant’s answers.

    Shipping and delivery section with the loading port field (1), container load (2) and lead time (3)
    Shipping: (1) loading port, (2) container load, (3) lead time.
  4. 4

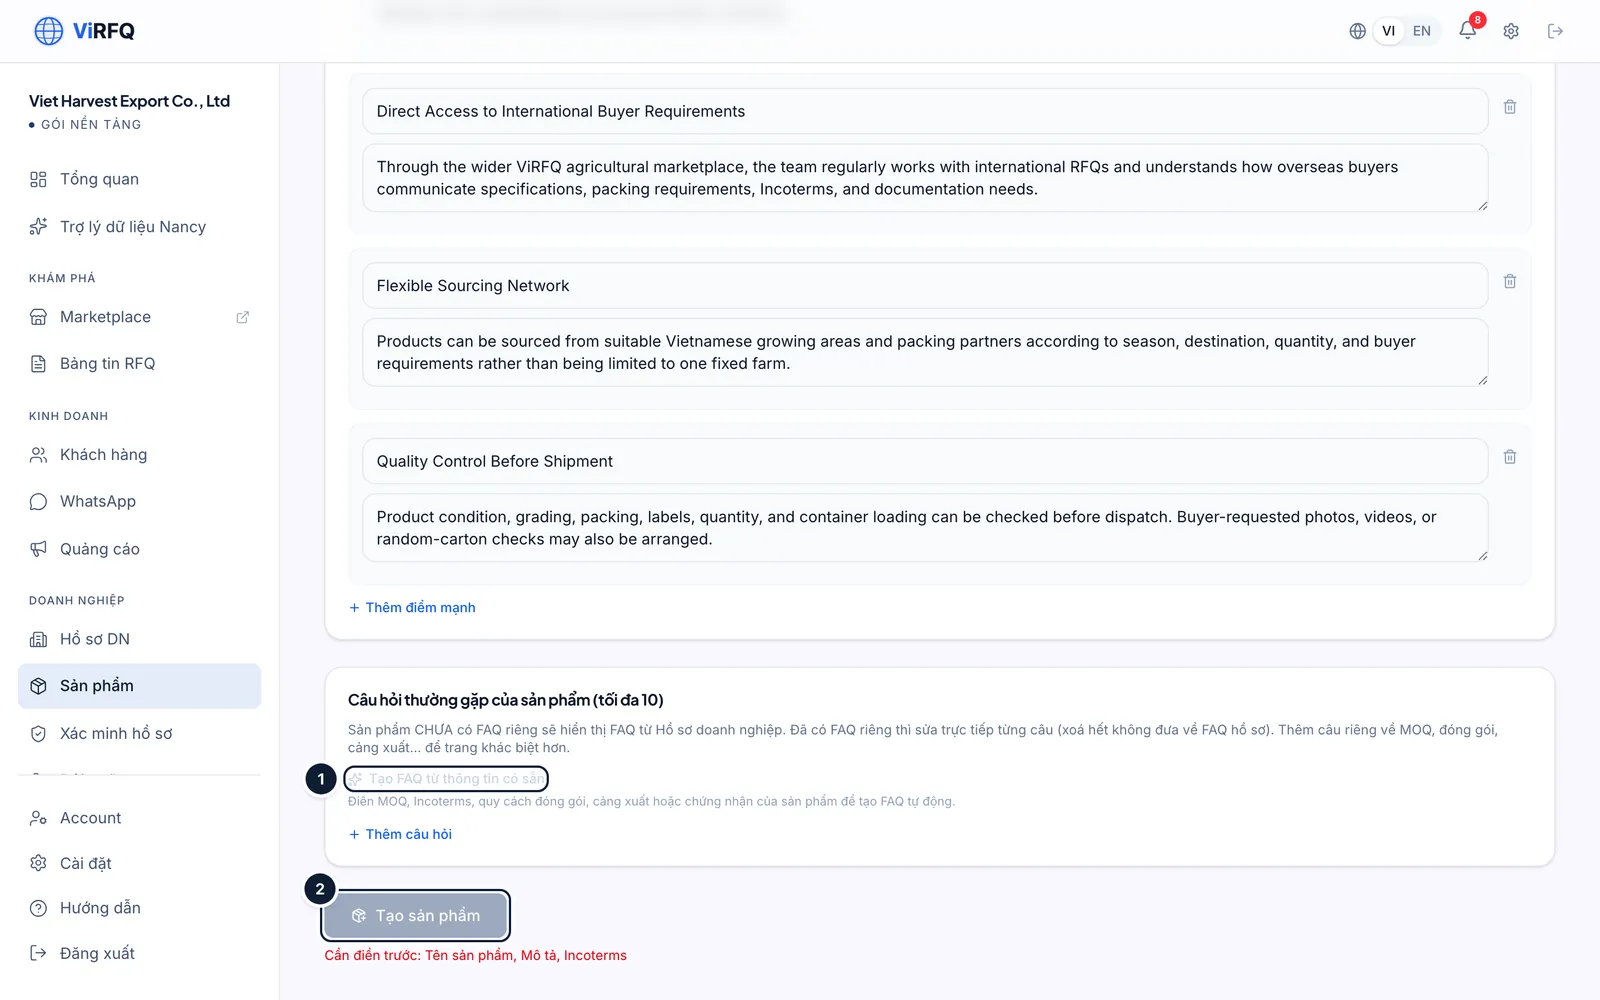
    Bước 4: At the bottom describe the production process, the strengths and the FAQ — click Generate FAQ from existing info (1) to let the AI draft it. Check everything, then click Create product (2).

    • The product page address is generated automatically in English from the product name and never changes afterwards, so links already sent to buyers keep working.
    Bottom of the New product page with the Generate FAQ from existing info button (1) and the Create product button (2)
    Finish: (1) generate the FAQ, (2) create the product.

Tip

Create one product per main specification you sell (for example "Cashew W320" and "Cashew W240") instead of merging them into one page. Buyers search by exact specification and Meta ads target better too.

Product photos always win

If you do not upload process photos or a FAQ of its own, the product page borrows them from the Business Profile. Once you upload photos for the product, they always replace the borrowed ones.

Frequently asked questions

How many products can I create?
There is no limit. Prefer quality: give every page 5 photos, specifications and delivery terms.
Why is my product page not on the Marketplace yet?
A new product stays pending until the ViRFQ team reviews its content (usually within 1 working day). You can still preview it with View page.
I want to rename or delete a product.
Click Edit to change the content; the page address stays the same. To hide a product, contact support to switch it off without losing data.

Chapter 4

The Verified badge

Submit documents to earn the Verified mark on your profile.

Earning the Verified badge

Submit the business registration and proof of exports within the last 24 months so ViRFQ can award the Verified mark on your public profile.

The Verified badge tells buyers that ViRFQ has checked you are a real company that really exports. The badge is not part of any plan and cannot be bought — it is granted only after the ViRFQ team reviews your documents by hand. Verified profiles are what buyers filter for first on the Marketplace.

Two conditions

  • A valid business registration certificate — submit a scan or photo in the business registration block under Documents in the Business Profile.
  • At least one proof of export within the last 24 months — an export customs declaration, a certificate of origin (C/O) or a bill of lading (B/L), for the product category you sell on ViRFQ.

Submit the documents

  1. 1

    Bước 1: Condition 1 — business registration: go to Business Profile and scroll to Documents. The top block is Business registration (ĐKKD) verification — choose the file (1) and click Upload (2). This file is seen only by the ViRFQ team and is never shown publicly. The View all verification documents link (3) takes you to the Verification page.

    • Do not confuse it with the public documents block right below (catalogue, HACCP/ISO/Halal for buyers to download): files uploaded there are public and do not count as verification documents.
    The business registration verification block in the Documents section of the Business Profile with the file field (1), the Upload button (2) and the View all verification documents link (3)
    Business registration block (private): (1) choose the file, (2) upload, (3) go to verification.
  2. 2

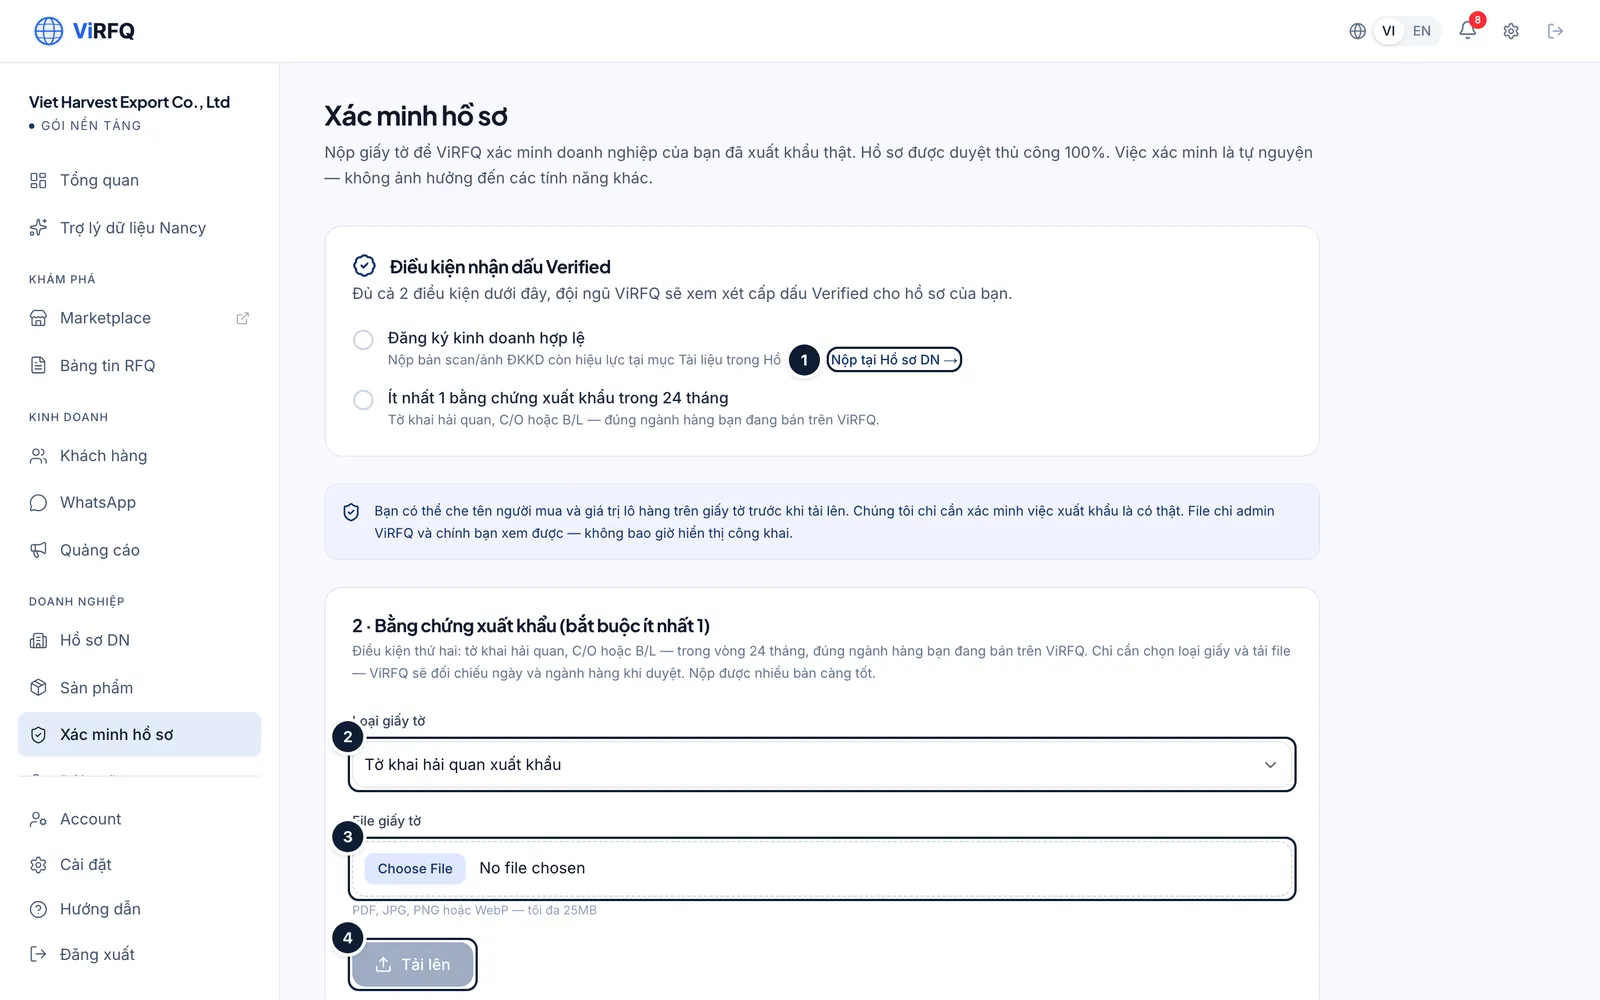
    Bước 2: Condition 2 — proof of export: open Verification in the left column. If the business registration is not submitted yet, the Submit in Business Profile link (1) sends you back to the step above. Choose the document type (2), choose the file (3) and click Upload (4). The more documents, the better.

    • Accepted files: PDF, JPG, PNG, WebP — up to 25 MB. You may black out buyer names and shipment values before uploading; ViRFQ only needs to see that the export is real, in your category and within 24 months.
    • Documents are visible to the ViRFQ team and to you only — never publicly.
    Verification page with the Submit in Business Profile link (1), the document type selector (2), the file field (3) and the Upload button (4)
    Verification: (1) submit the registration, (2) document type, (3) choose the file, (4) upload.
  3. 3

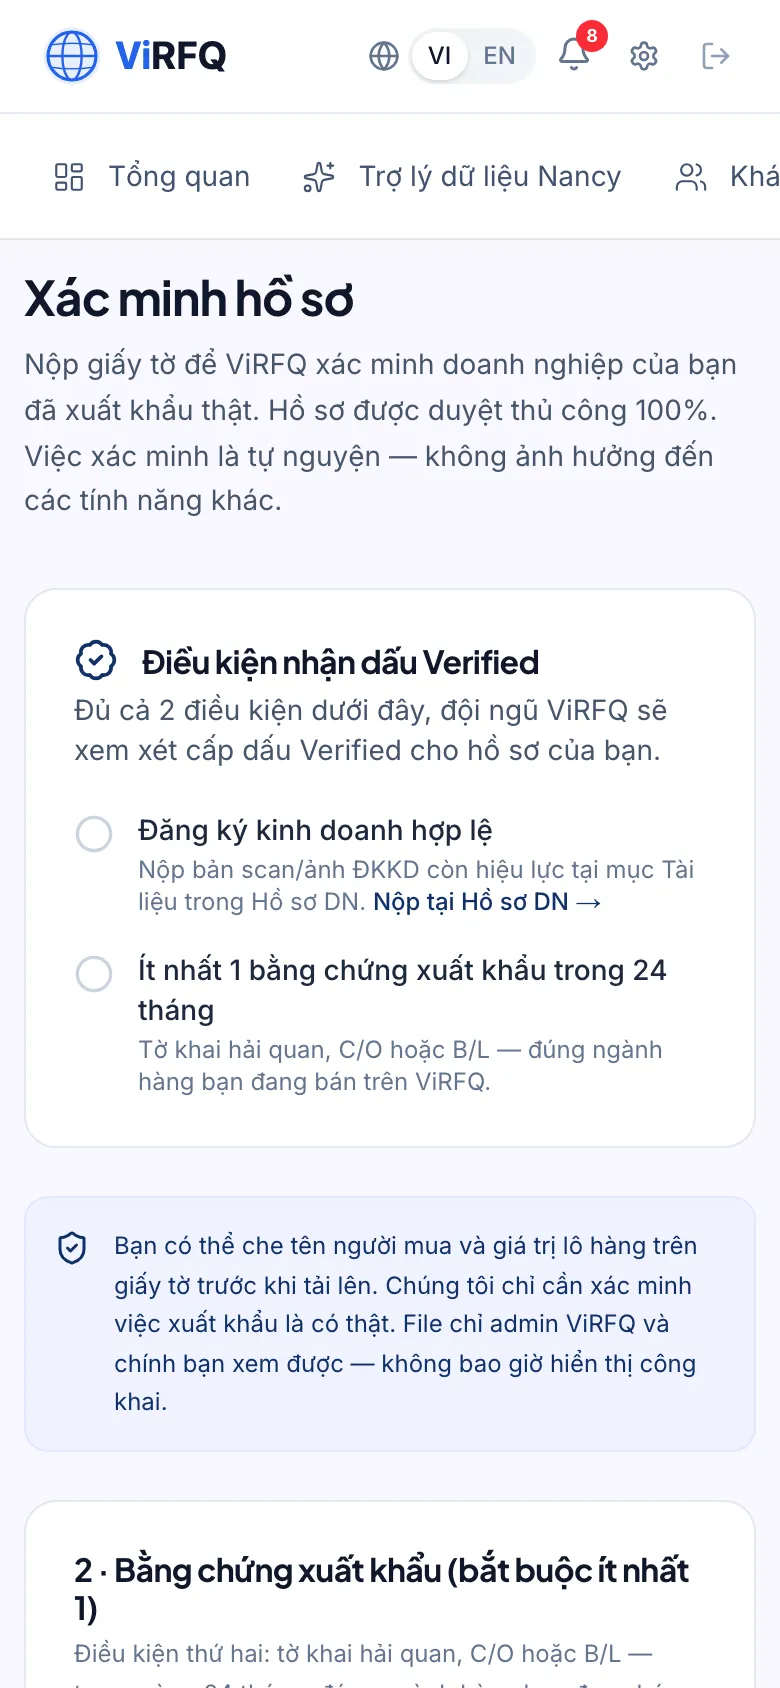
    Bước 3: After uploading, the document appears in the list as Pending. The ViRFQ team checks the dates and the category and marks it Approved or Rejected with a reason. Once both conditions are approved, the ViRFQ team grants the badge (one manual step, usually the same day); you receive an email and the badge appears on your profile and product pages.

    Verification page on a phone
    Verification page on a phone

Important

Submit only documents of your own company. Borrowed or edited documents are rejected and the account may be locked under the Anti-abuse Policy.

Frequently asked questions

How long does the review take?
Usually 1–2 working days after both document types are submitted.
We are a new company and have not exported yet.
You can still use every feature; you just do not have the badge yet. After the first shipment, submit the customs declaration to earn it.
A document was rejected — can I resubmit?
Yes. Read the reason in the list, upload a better copy (sharp, right category, within 24 months) and submit again; there is no limit on attempts.

Chapter 5

RFQ Board and contact unlocks

Find matching quote requests, unlock buyer details and respond.

RFQ Board: finding quote requests and unlocking buyer details

Filter quote requests by category, country and delivery terms; read the verification score and unlock buyer contact details with your plan allowance.

An RFQ (request for quotation) is an invitation to quote from an international buyer: what they need, how much, under which delivery terms and to which country. Every RFQ on ViRFQ is moderated by the team and given a verification score. The Platform plan includes 100 contact unlocks per month and shows new RFQs 4 hours earlier than free users.

Browse and filter quote requests

  1. 1

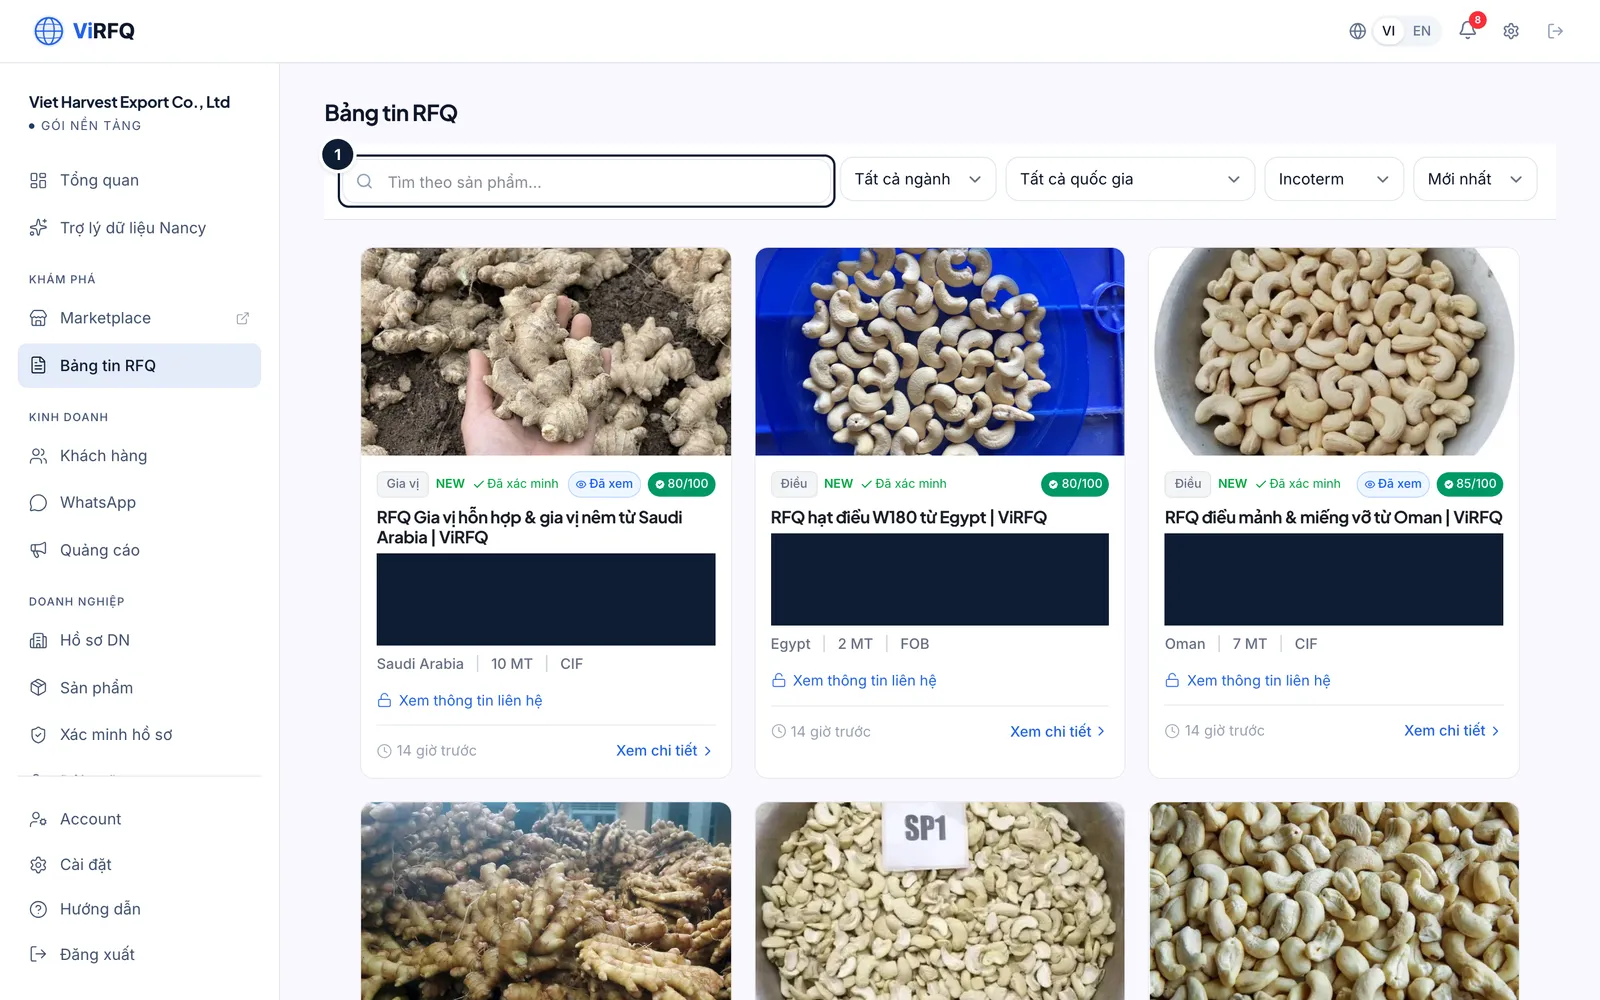
    Bước 1: In the dashboard click RFQ Board in the left column. Type a product into the search box (1) or use the filters next to it.

    The RFQ Board in the dashboard with the product search box (1) and the category, country and Incoterm filters
    RFQ Board: search box (1) and filters.
  2. 2

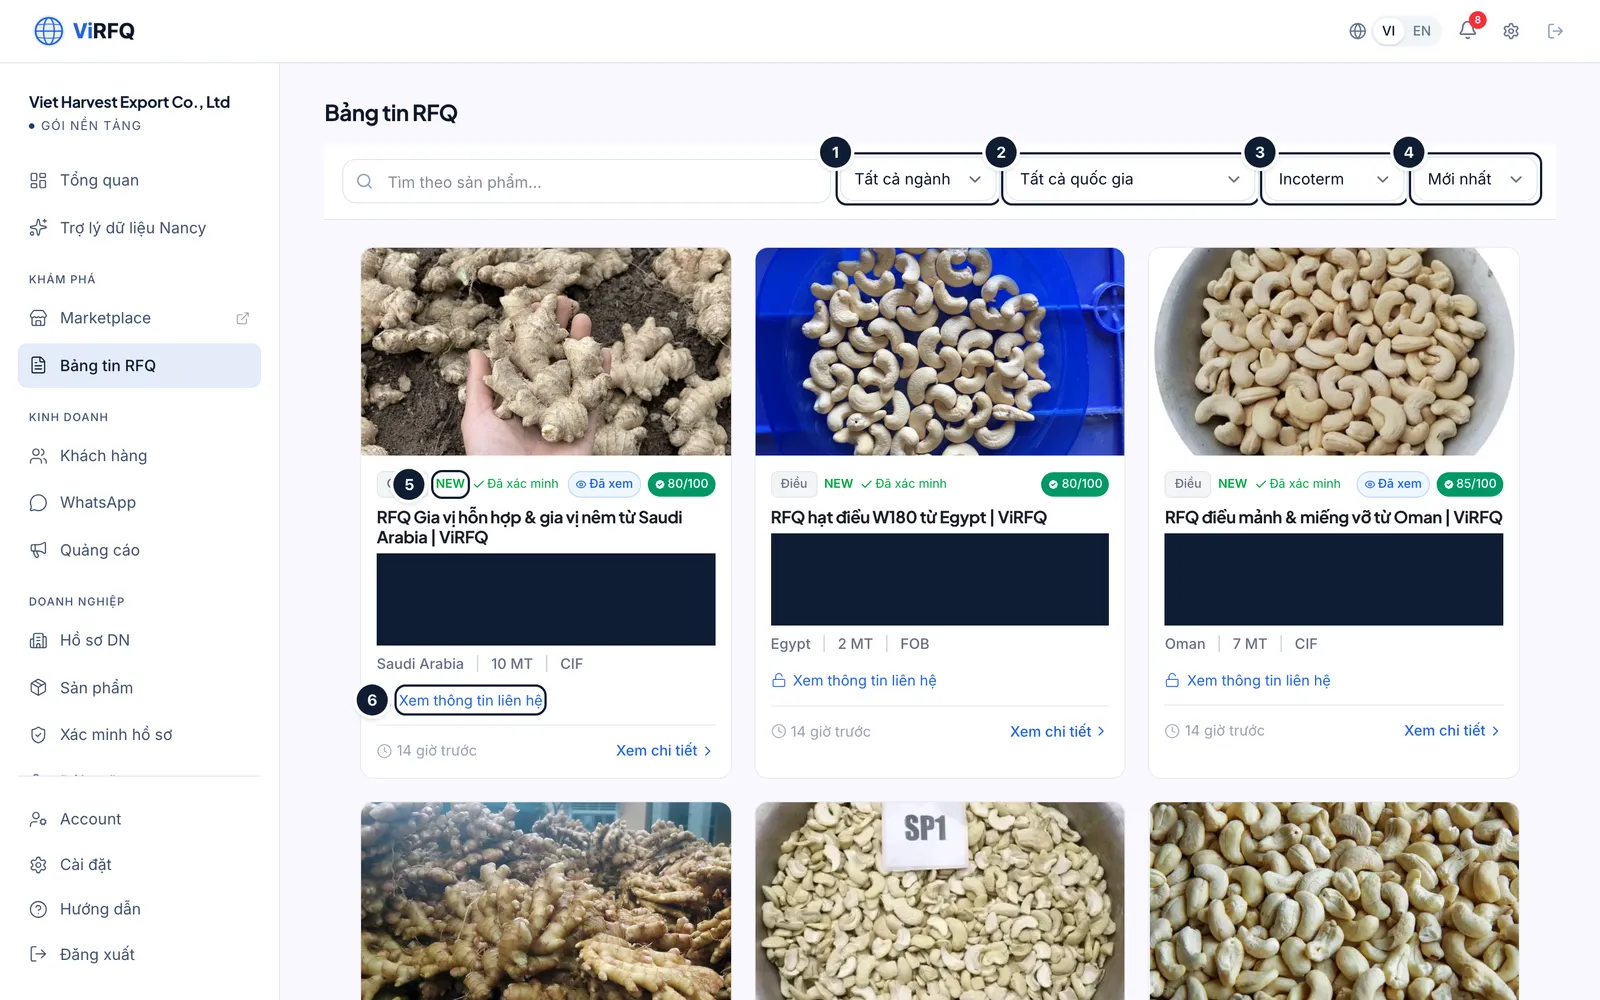
    Bước 2: The Category (1), Country (2), Incoterm (3) and Sort (4) filters narrow the list. The NEW label (5) marks RFQs posted in the last 24 hours; the Viewed label saves you re-reading. The View contact info line (6) on a card means you have not unlocked that RFQ yet.

    • The 80/100 or 85/100 on a card is the verification score — a total of several signals: the buyer replied to ViRFQ on WhatsApp/email, the company was confirmed, the request has specifications, quantity, destination port and delivery time. RFQs below 80 are reviewed by the ViRFQ team by hand before they reach the board.
    • A high score does not mean every field is present: open the RFQ to see the score breakdown and read the description carefully before unlocking.
    Filters on the RFQ Board: category (1), country (2), Incoterm (3), sort (4), the NEW label (5) and the View contact info line (6) on a card
    Filters: (1) category, (2) country, (3) Incoterm, (4) sort; (5) NEW label; (6) not unlocked yet.
  3. 3

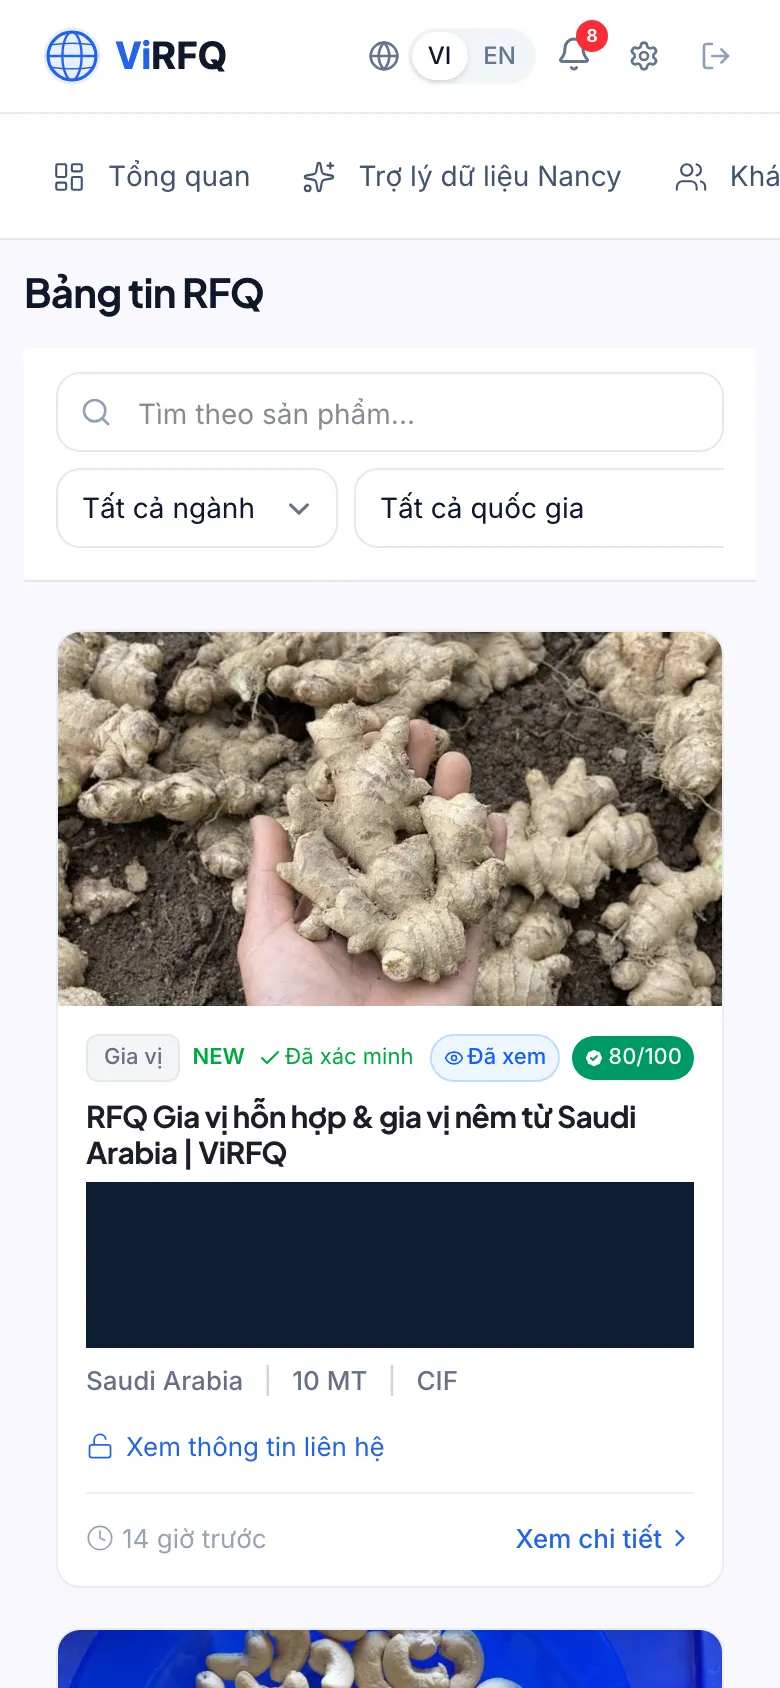
    Bước 3: On a phone the filters line up under the search box; scroll to read each RFQ.

    The RFQ Board on a phone with the search box and filters stacked
    The RFQ Board on a phone with the search box and filters stacked

Read the details and unlock the contact

  1. 1

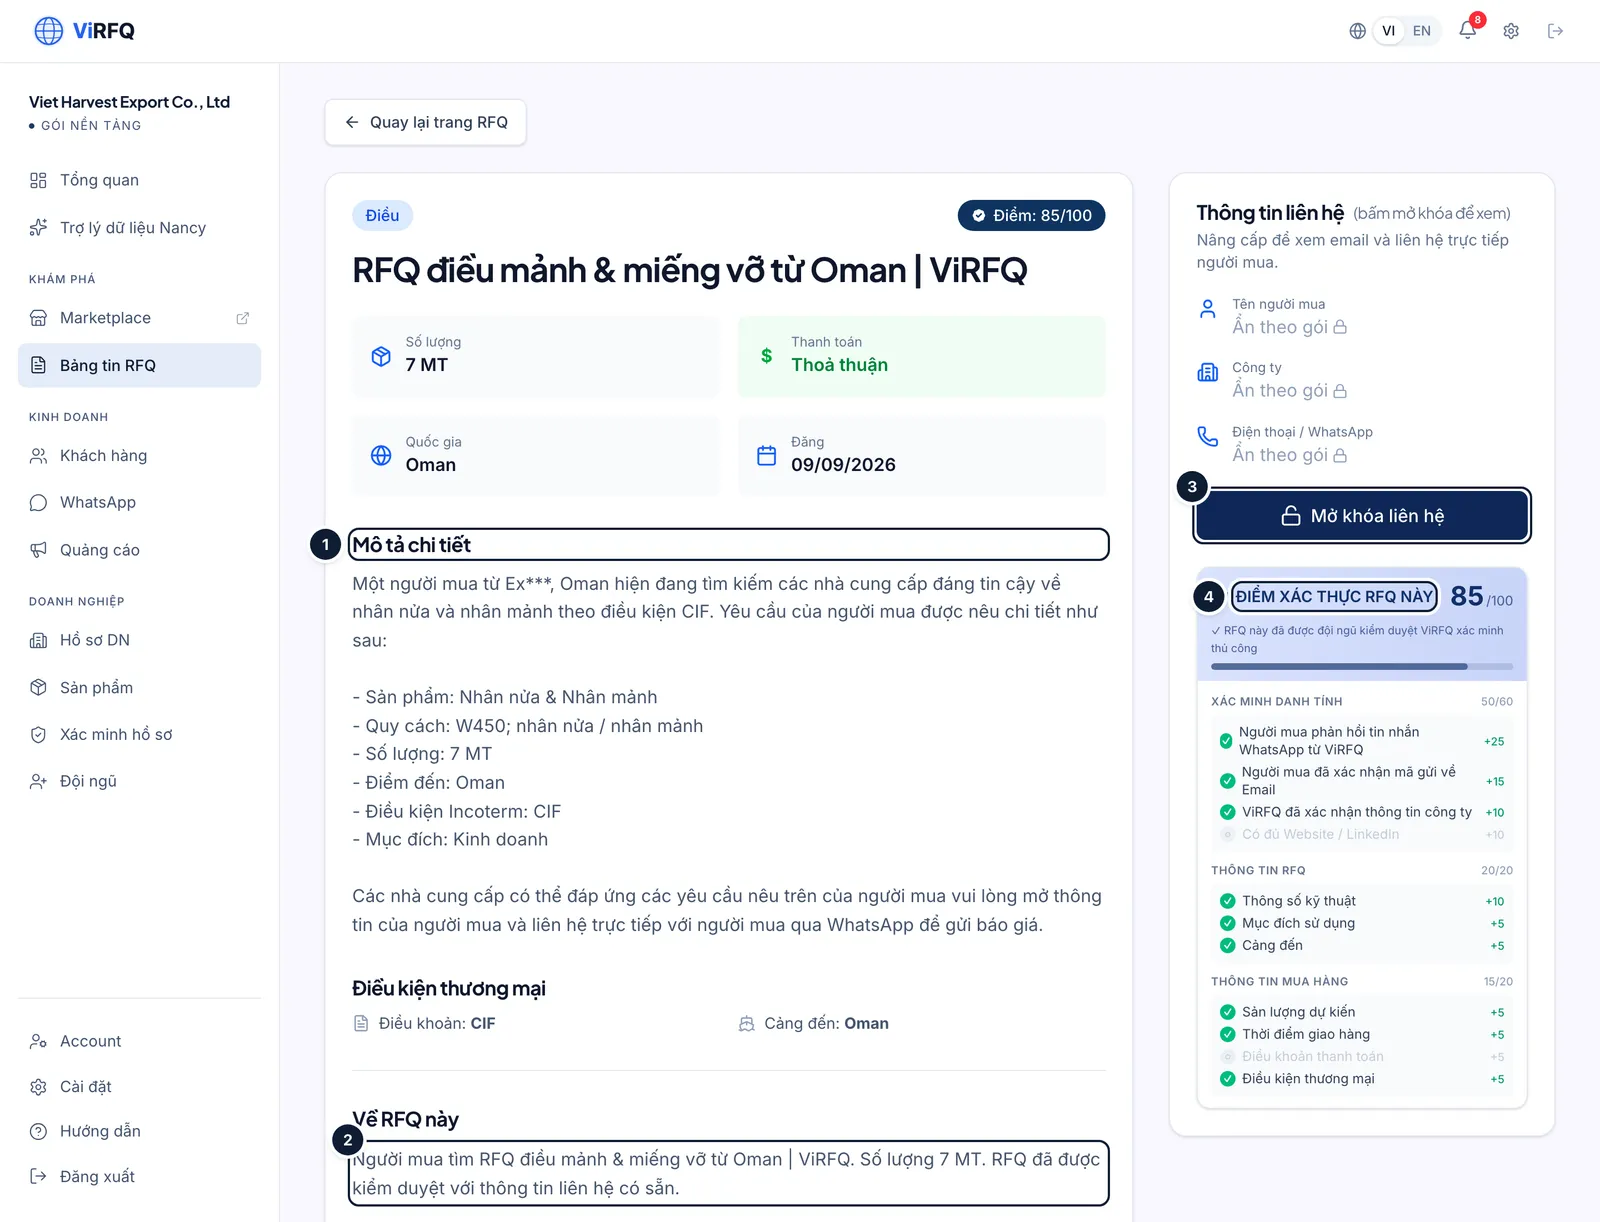
    Bước 1: Click View details on a card. The detail page has the full description (1): specifications, quantity, destination port, purpose. The right column is Contact information (2) — the buyer’s name, company and phone/WhatsApp stay hidden until you click Unlock contact (3). Below it the verification score table (4) explains every point.

    • Clicking Unlock contact uses 1 of your 100 unlocks for the month and shows the buyer’s email, phone and WhatsApp at once. An unlocked RFQ can be reopened as often as you like at no extra cost.
    • Read the description before unlocking: if the specification or quantity does not fit your capacity, save the unlock for another RFQ.
    • After unlocking, the buyer is added automatically to Customers (Data column, source RFQ). Click the WhatsApp number to open WhatsApp on your own device and message right away — that chat happens on your WhatsApp and only appears in the ViRFQ inbox if you write from the very number connected to ViRFQ.
    RFQ detail page with the full description (1), the hidden Contact information block (2), the Unlock contact button (3) and the verification score table (4)
    RFQ details: (1) description, (2) hidden contact, (3) unlock, (4) verification score.
  2. 2

    Bước 2: The unlocks left this month show in the RFQ unlocks tile on the Overview. The allowance renews at the start of every plan month (counted from the activation date); unused unlocks do not roll over.

The public board and new-RFQ alerts

  1. 1

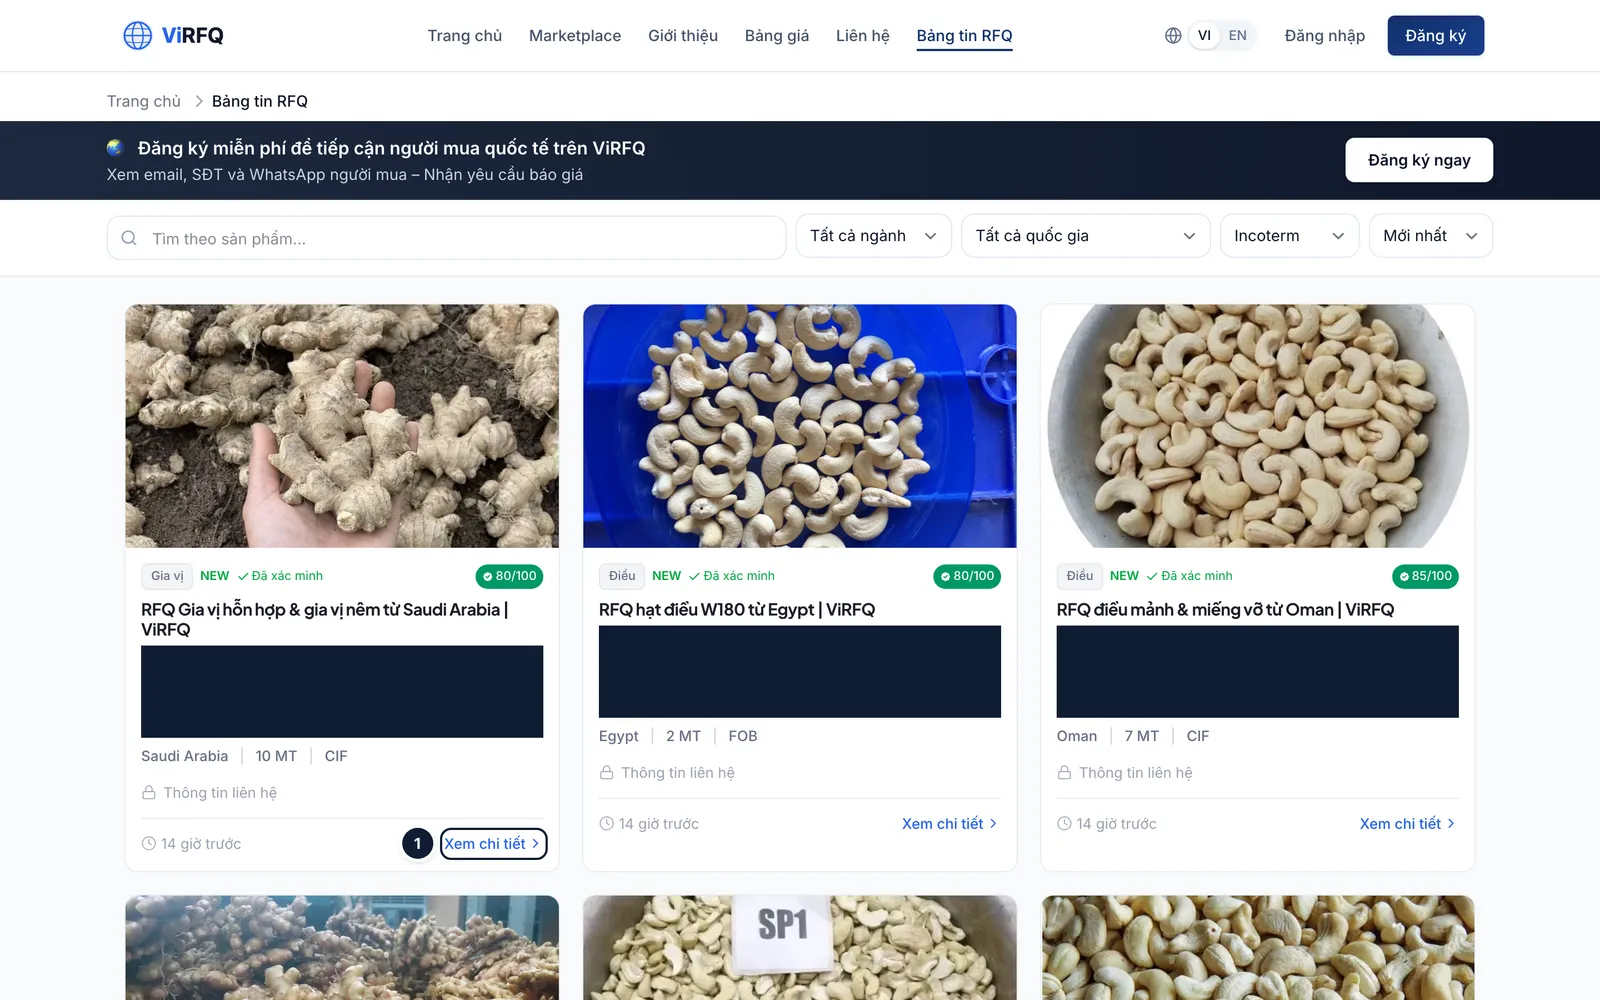
    Bước 1: The RFQ Board also has a public version at virfq.com/en/rfq for visitors who are not signed in: the description is visible, but the View contact info line (1) leads to sign-in or to buying the plan. A new RFQ appears on the public board only after 4 hours — during those 4 hours only Platform customers see it.

    • You receive an email whenever a new RFQ matches the categories declared in your Business Profile. Declare your categories correctly so you never miss one.
    The public RFQ Board for visitors who are not signed in, with the View contact info line (1) on a card
    Public board: (1) contact details open only when signed in with a plan.

Reply fast

On the Overview, the Latest RFQ Submissions block is already filtered to your categories — Reply Now takes you straight to the unlock step. Buyers usually pick the suppliers who answer within the first 24 hours.
Important

Buyer contact details may be used only to quote for that RFQ. Mass promotional messages or sharing the details with third parties violate the Anti-abuse Policy and can lead to the account being locked.

Frequently asked questions

I unlocked the contact but the buyer does not reply.
Send a short message in English with the exact specification from the RFQ, an indicative price and real product photos. If there is still silence after 2–3 days, try an email with your catalogue. Used unlocks are not refunded because ViRFQ has already verified the buyer is real.
What happens when the 100 unlocks are used up?
You can still read every RFQ; you just cannot unlock more contacts until the next plan month starts. Need more urgently? Contact ViRFQ support.
How is a "Verified" RFQ different from a normal one?
The Verified label means the ViRFQ team checked the buyer by hand (WhatsApp/email reply, company details). An RFQ below 80 points can still be genuine but is missing information — ask before quoting.

Chapter 6

Marketplace

Where buyers find Vietnamese suppliers and products.

Marketplace: where buyers find you

How buyers search for products and exporters on the Marketplace, and what to do so your profile shows up well.

The Marketplace at virfq.com/en/marketplace is where international buyers look for Vietnamese products and exporters. You do nothing extra to be listed: an approved business profile and approved product pages appear automatically. This article shows the Marketplace through a buyer’s eyes so you know what to improve.

How buyers search

  1. 1

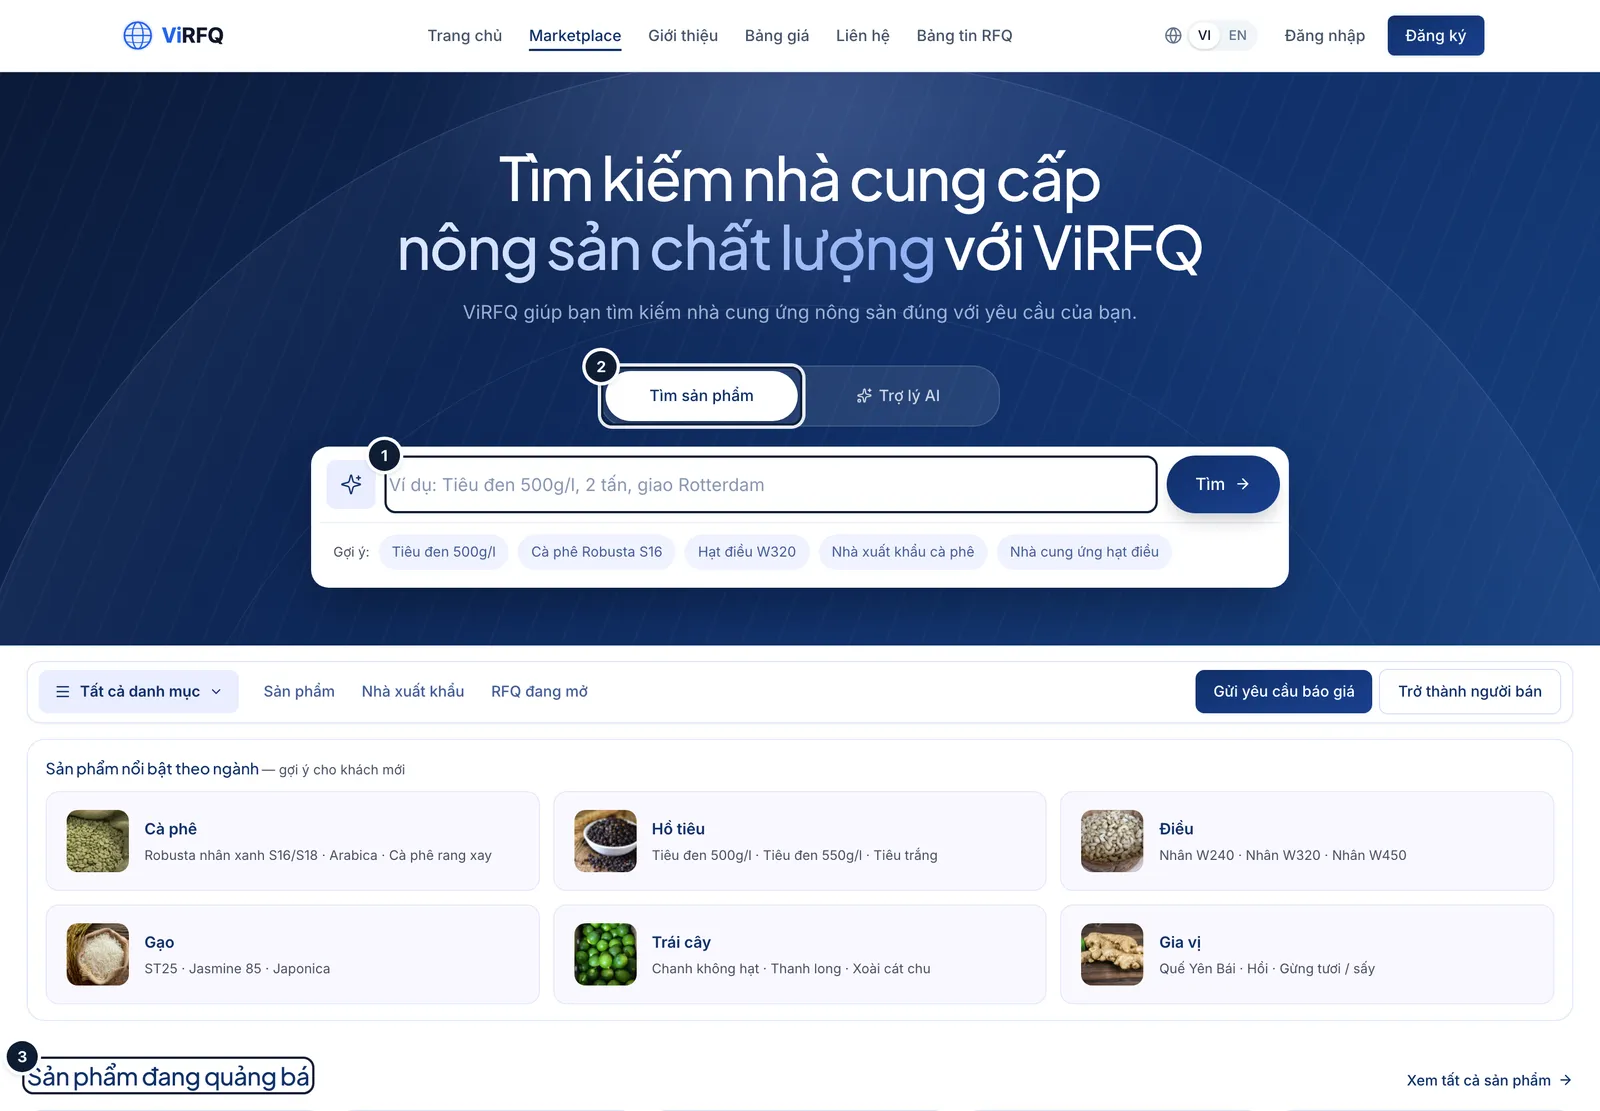
    Bước 1: The main page has a search box (1): buyers type a product, a company name or a specification and click Search (2). Results show the best-matching products and exporters. Below are the promoted products (3), exporter profiles and open quote requests.

    • Search matches names with and without Vietnamese accents, English product names and company names — so name your products the way buyers would type them.
    Marketplace page with the search box (1), the Search button (2) and the promoted products section (3)
    Marketplace: (1) search box, (2) search, (3) promoted products.
  2. 2

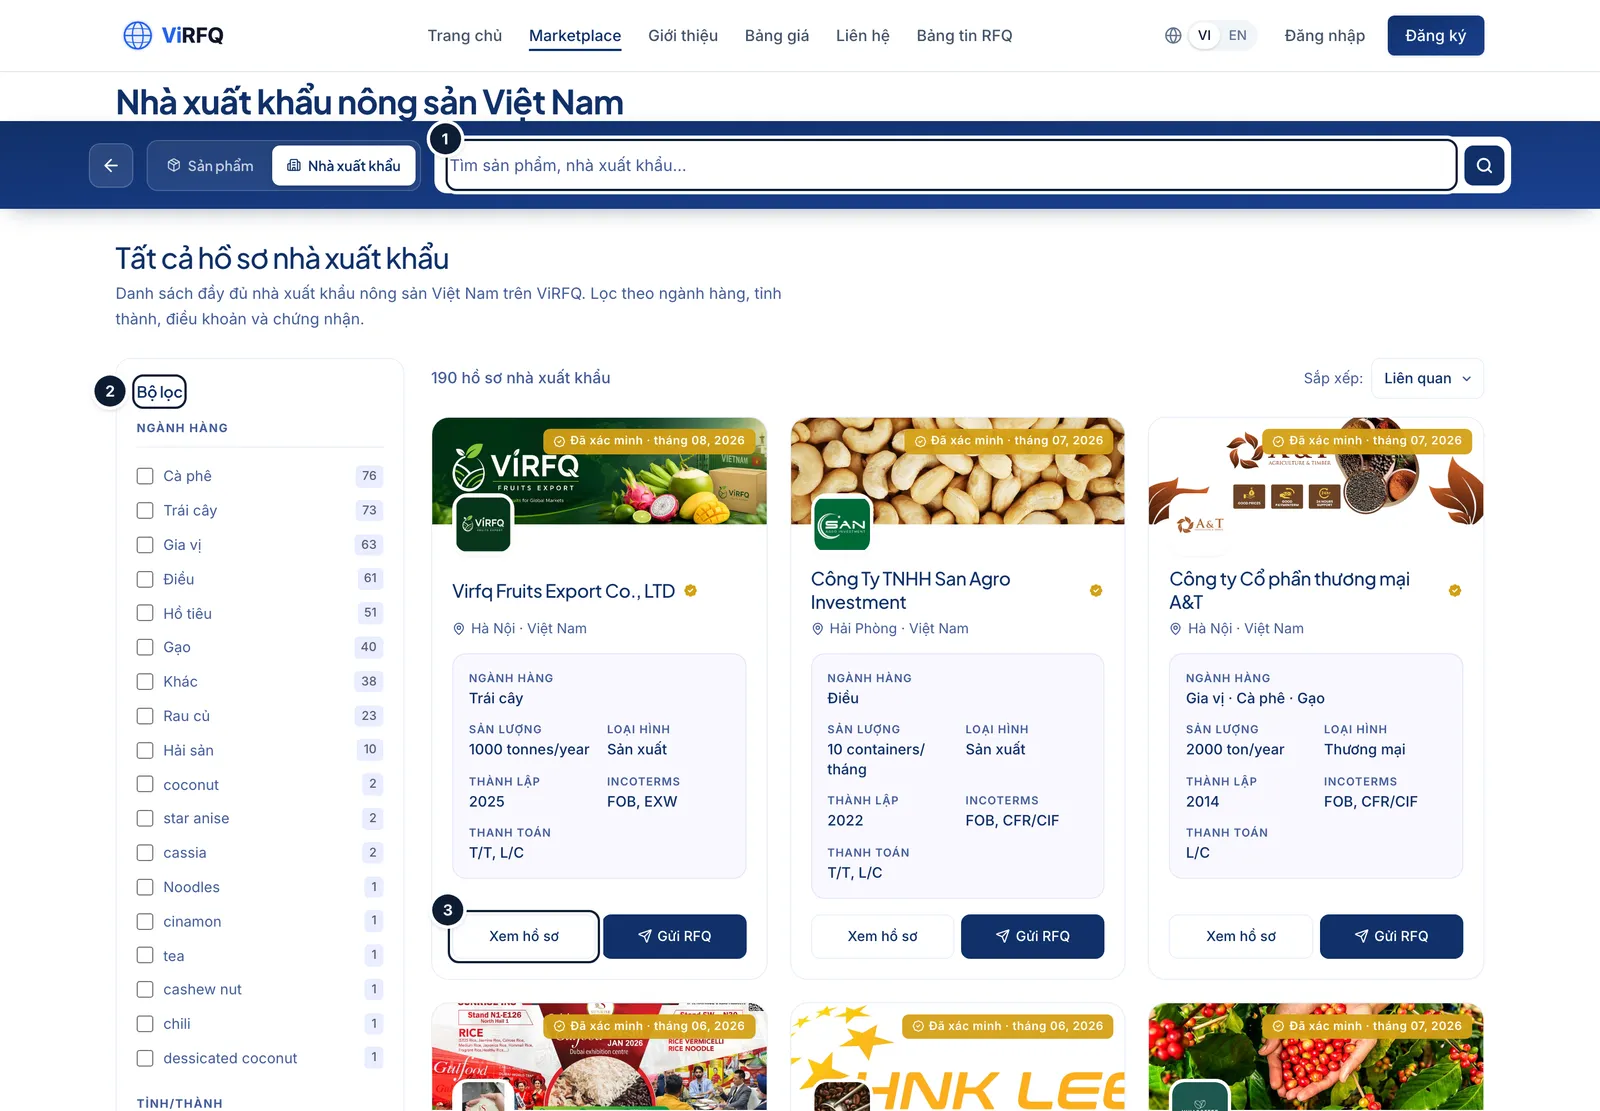
    Bước 2: The Exporters page lists every approved profile. Buyers search by name (1), use Filters (2) by category, province and Incoterms, and open View profile (3). Verified profiles show a "Verified · month…" line right on the card.

    The Exporters page on the Marketplace with the search box (1), the Filters button (2) and the View profile button (3)
    Exporters: (1) search, (2) filters, (3) view profile.
  3. 3

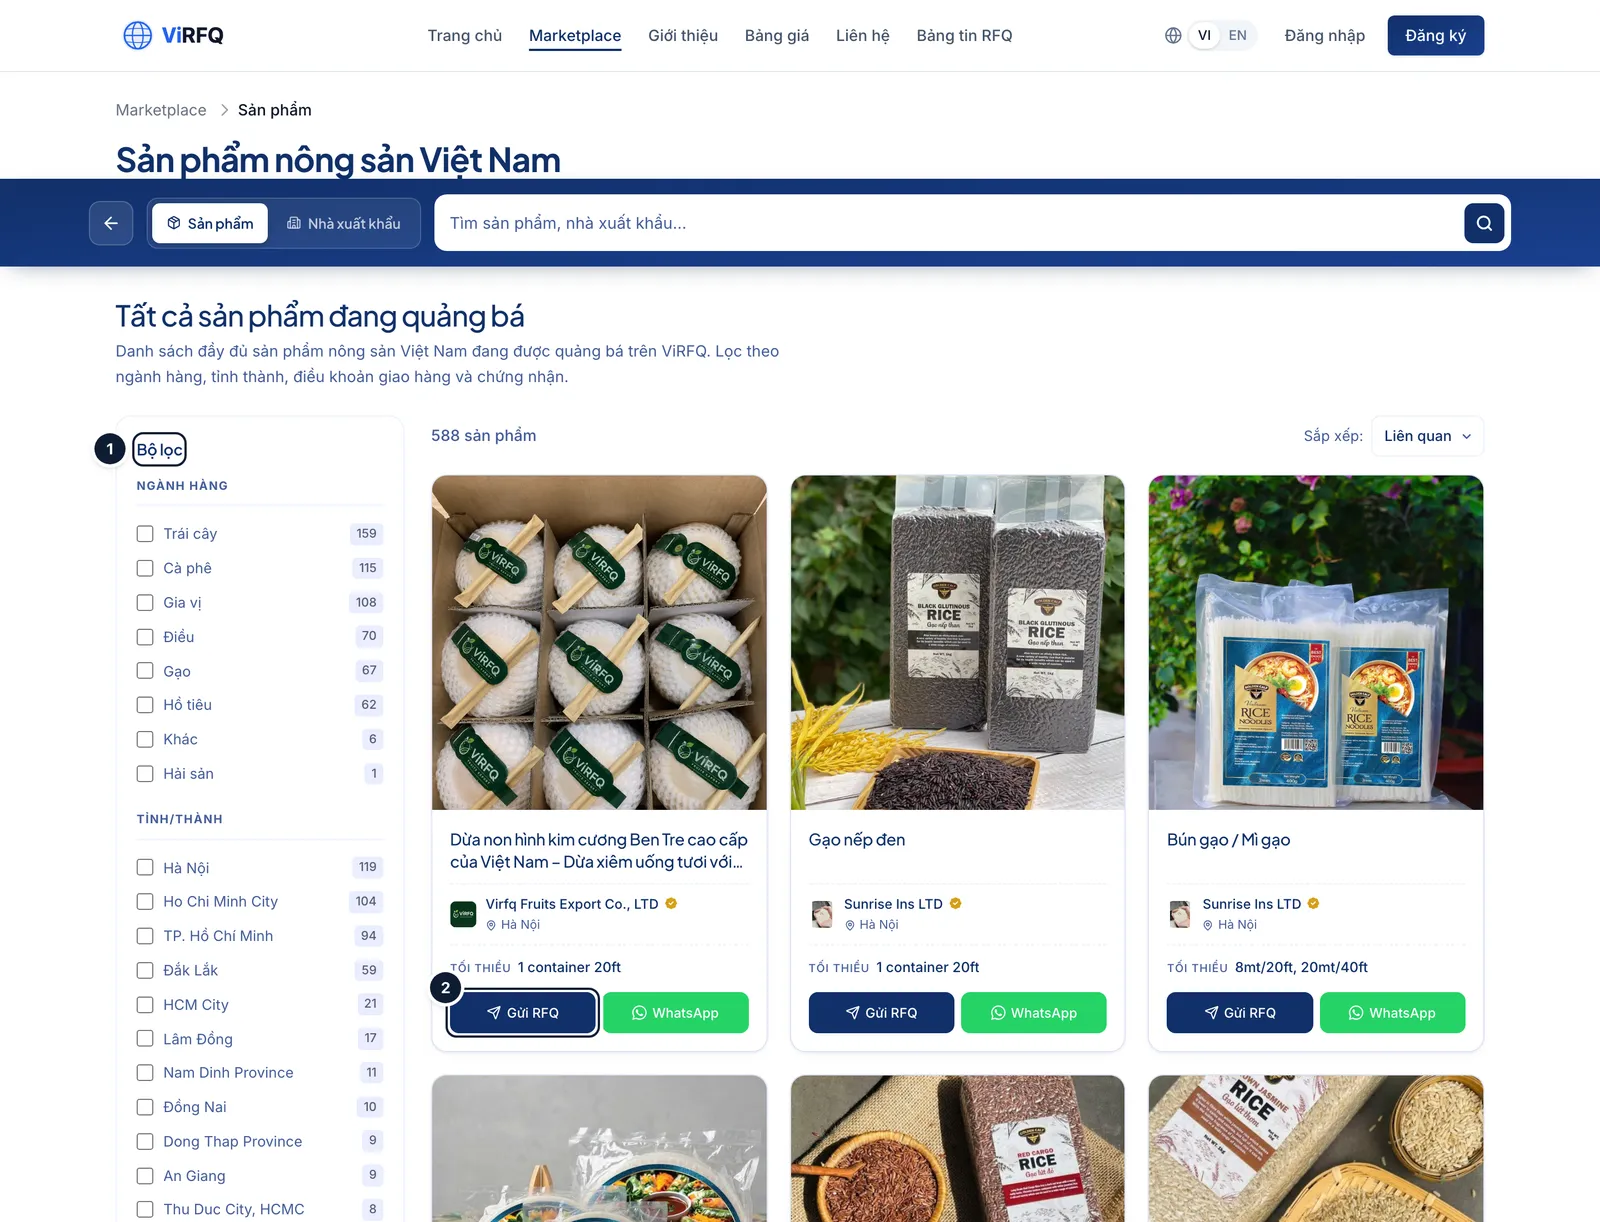
    Bước 3: The Products page is where buyers compare specifications. Filters (1) cover category, province, Incoterms, certificates and a Verified box — keeping only products from suppliers with the badge. On each card buyers click Send RFQ (2) to ask for a price or WhatsApp to message you right away.

    The Products page on the Marketplace with the Filters button (1) and the Send RFQ button (2) on a product card
    Products: (1) filters (with the Verified box), (2) buyers send an RFQ.
  4. 4

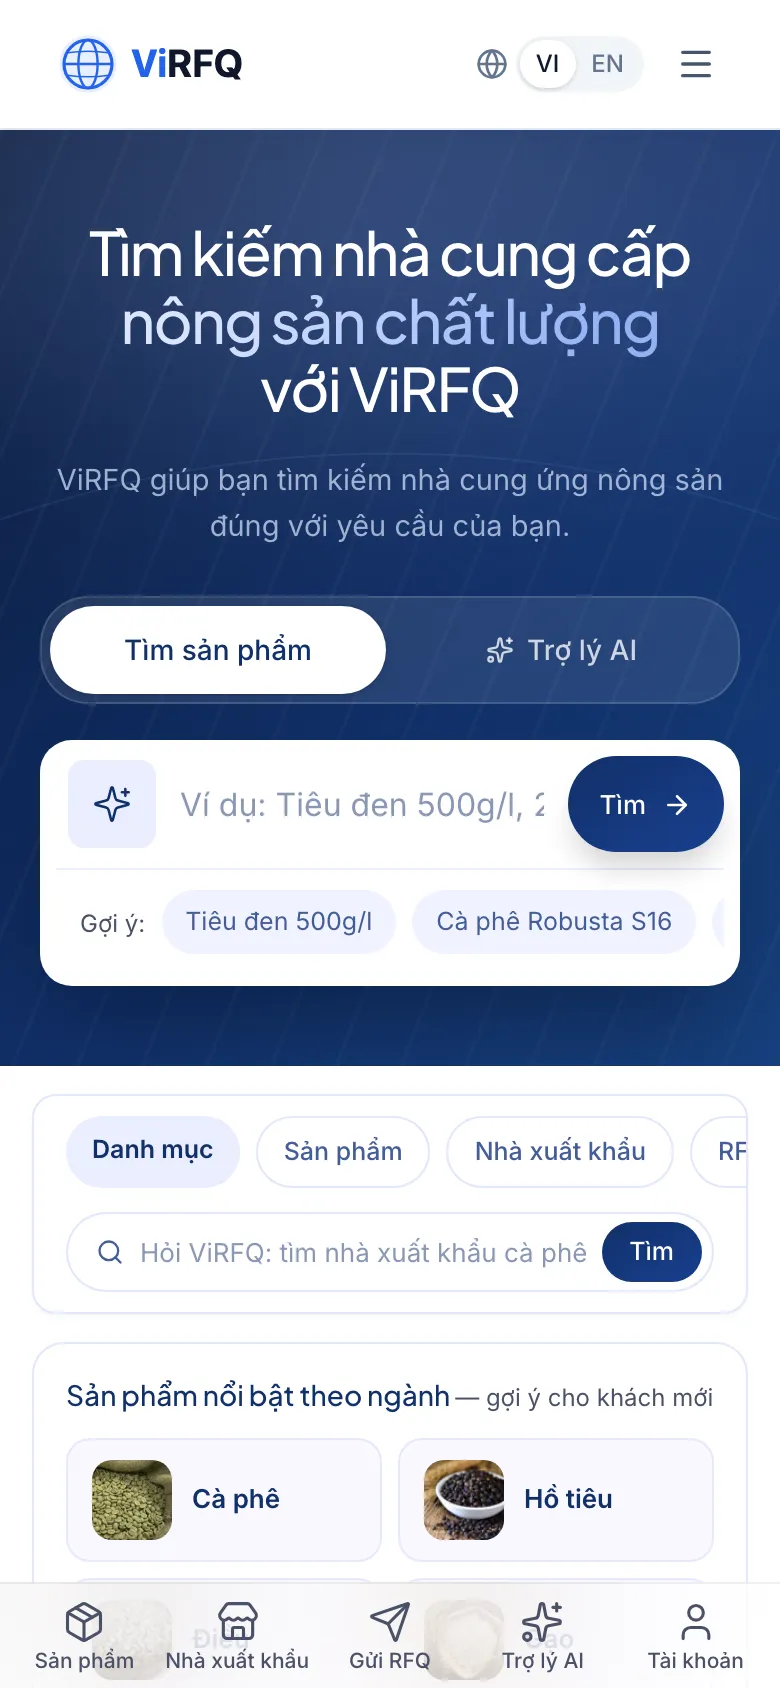
    Bước 4: On a phone the Marketplace collapses into one column with the search box on top; most international buyers browse on a phone, so product photos must be sharp and names short.

    Marketplace on a phone with the search box at the top
    Marketplace on a phone with the search box at the top

Show up better

  • Complete the profile to 100% and create at least 3 product pages with 5 photos each — complete profiles rank above empty ones.
  • Earn the Verified badge — many buyers switch that filter on first.
  • Name products by specification (for example "Cashew W320", "Black pepper 500 g/l") rather than generic names.
  • Connect a WhatsApp number — the WhatsApp button on a product card drops the buyer into your Inbox, where the assistant answers even outside working hours.

Names and descriptions show in the language you typed

On the English Marketplace, what you entered in Vietnamese is translated automatically; check the EN version of the product page after saving.

Frequently asked questions

A buyer sends an RFQ from my product page — where do I receive it?
A request sent from your product page does not go to the shared RFQ Board; it lands directly in Customers (Data column, source "Form") and you get an email with the buyer details. The RFQ Board only holds requests buyers submit through the shared ViRFQ request form to every supplier.
Does it cost anything to be listed on the Marketplace?
No. Approved profiles and products are listed free. The Platform plan adds the tools for working with buyers (contact unlocks, Nancy, the WhatsApp assistant, ads tracking).

Chapter 7

Nancy, the data assistant

Ask export data questions, find and unlock potential buyers.

Nancy, the data assistant: ask export data questions and find buyers

Ask about markets, prices and buyers using the last 18 months of customs data; reveal potential buyer names with an allowance of 300 buyer names per month.

Nancy is an assistant that analyses Vietnam’s export customs data for the last 18 months. Ask in plain language — "which country imports the most black pepper", "recent Robusta coffee prices", "which buyers in India import cashew" — and Nancy answers with real figures, tables and suggested follow-up questions. On the Platform plan questions are unlimited; only revealing buyer names has an allowance of 300 buyer names per month.

Ask a question

  1. 1

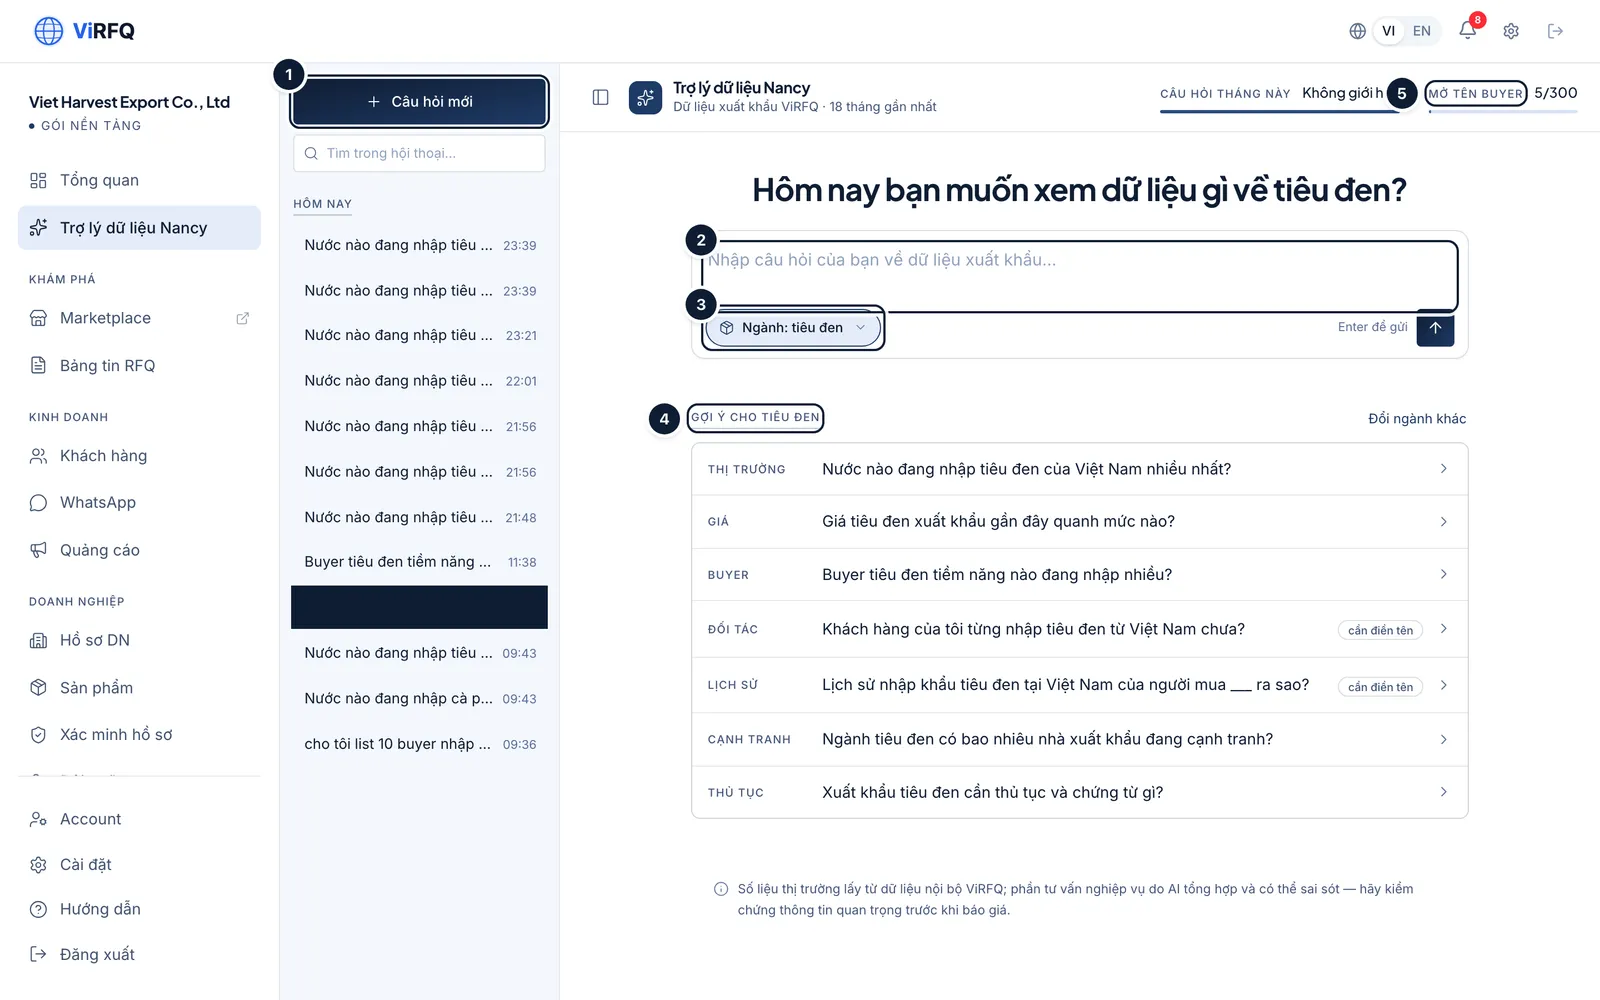
    Bước 1: Open Nancy — Data Assistant in the left column and click New question (1). Type the question in the box (2) and press Enter. The product chip (3) tells Nancy which product you are asking about — change it when needed. Not sure what to ask? Click a suggestion (4). Top right is the buyer name allowance used this month (5).

    • The left column keeps the conversation history by day; click one to reread it or continue in the same context.
    • Specific questions get better answers: name the product, the market and the period (for example "last 6 months").
    Nancy screen with the New question button (1), the question box (2), the product chip (3), the suggestion list (4) and the buyer-name allowance (5)
    Nancy: (1) new question, (2) question box, (3) product, (4) suggestions, (5) buyer-name allowance.
  2. 2

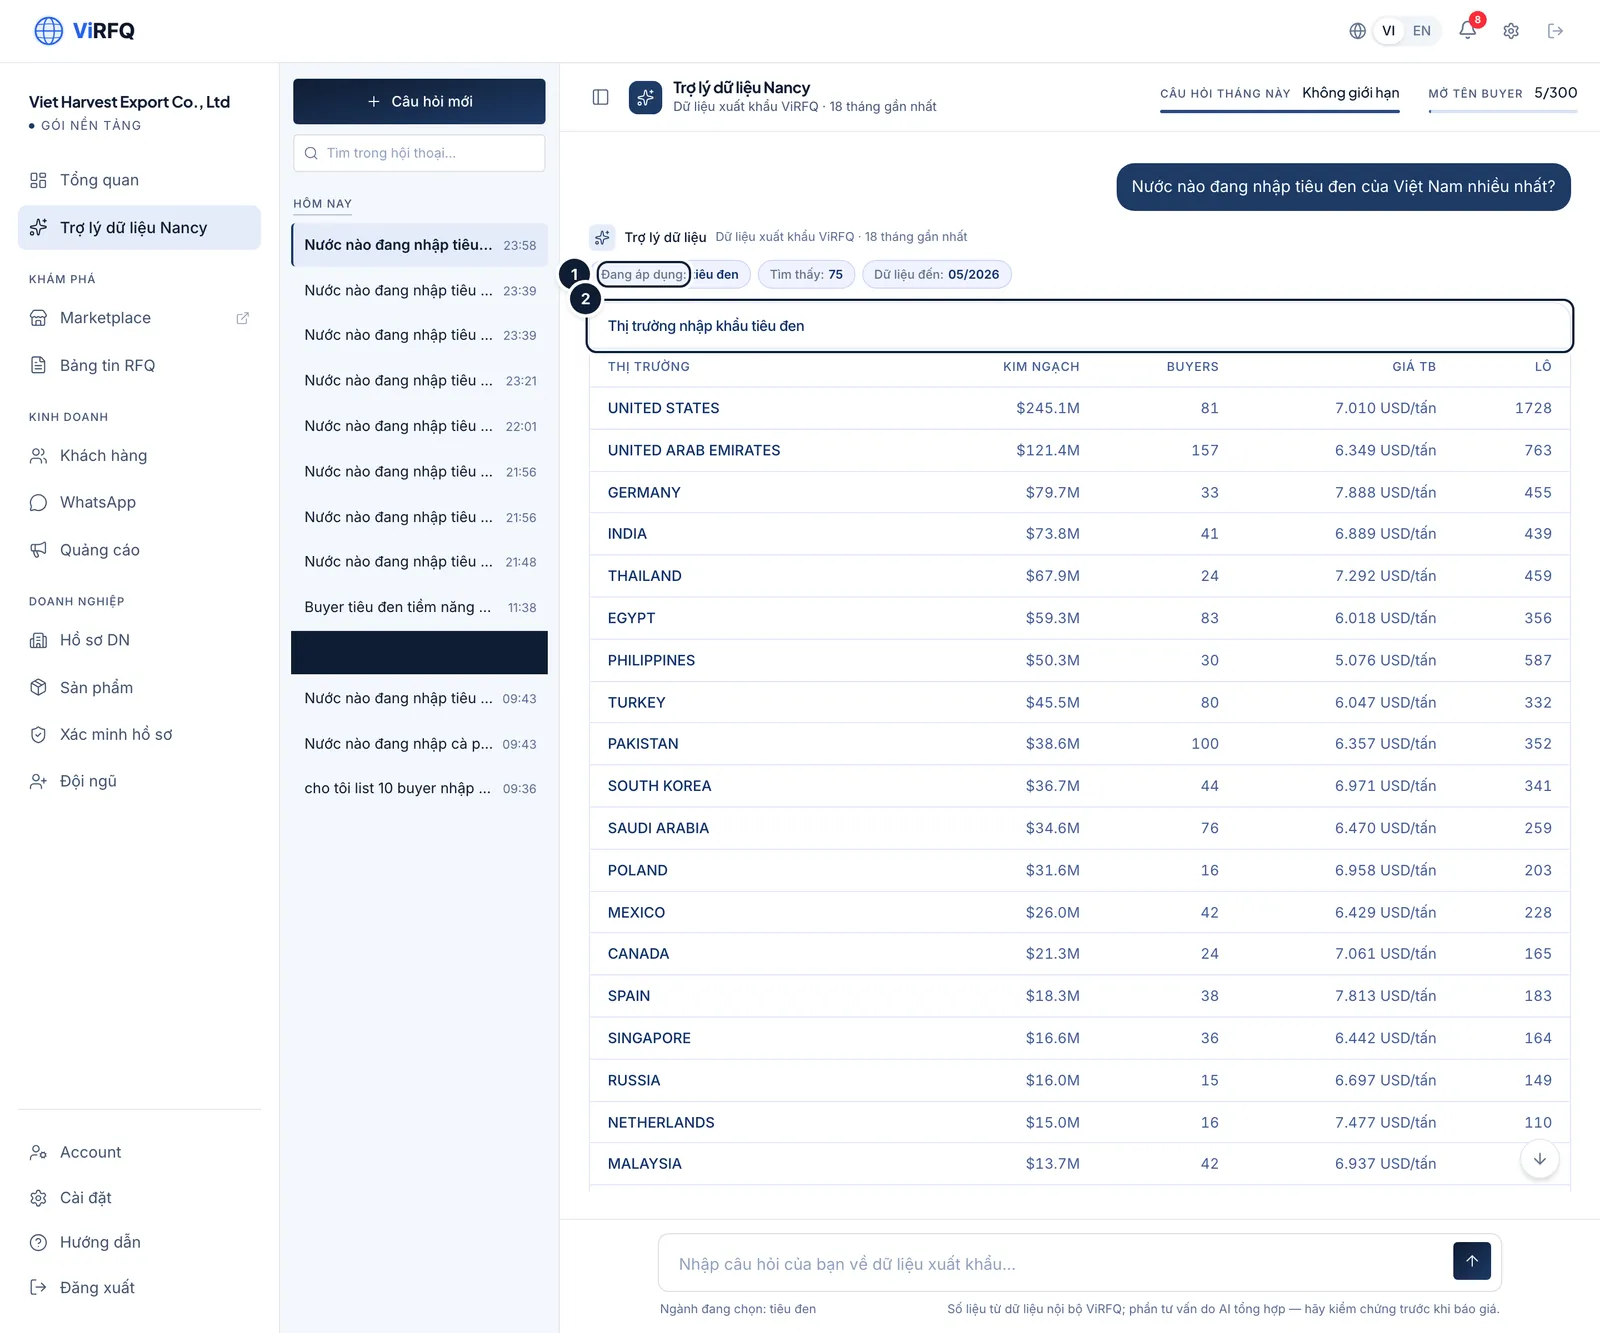
    Bước 2: Nancy answers within seconds. The Applied line (1) repeats the filters it understood (product, market, period) and the number of shipments found. The results table (2) is sorted by value. At the end of the answer there is a Copy button for pasting into a report, plus the follow-up questions Nancy suggests.

    • If Nancy misunderstood (for example the wrong market), ask again right below — Nancy keeps the context of the conversation.
    A Nancy answer with the Applied line (1) and the import markets table (2)
    An answer: (1) the filters understood, (2) the data table.
  3. 3

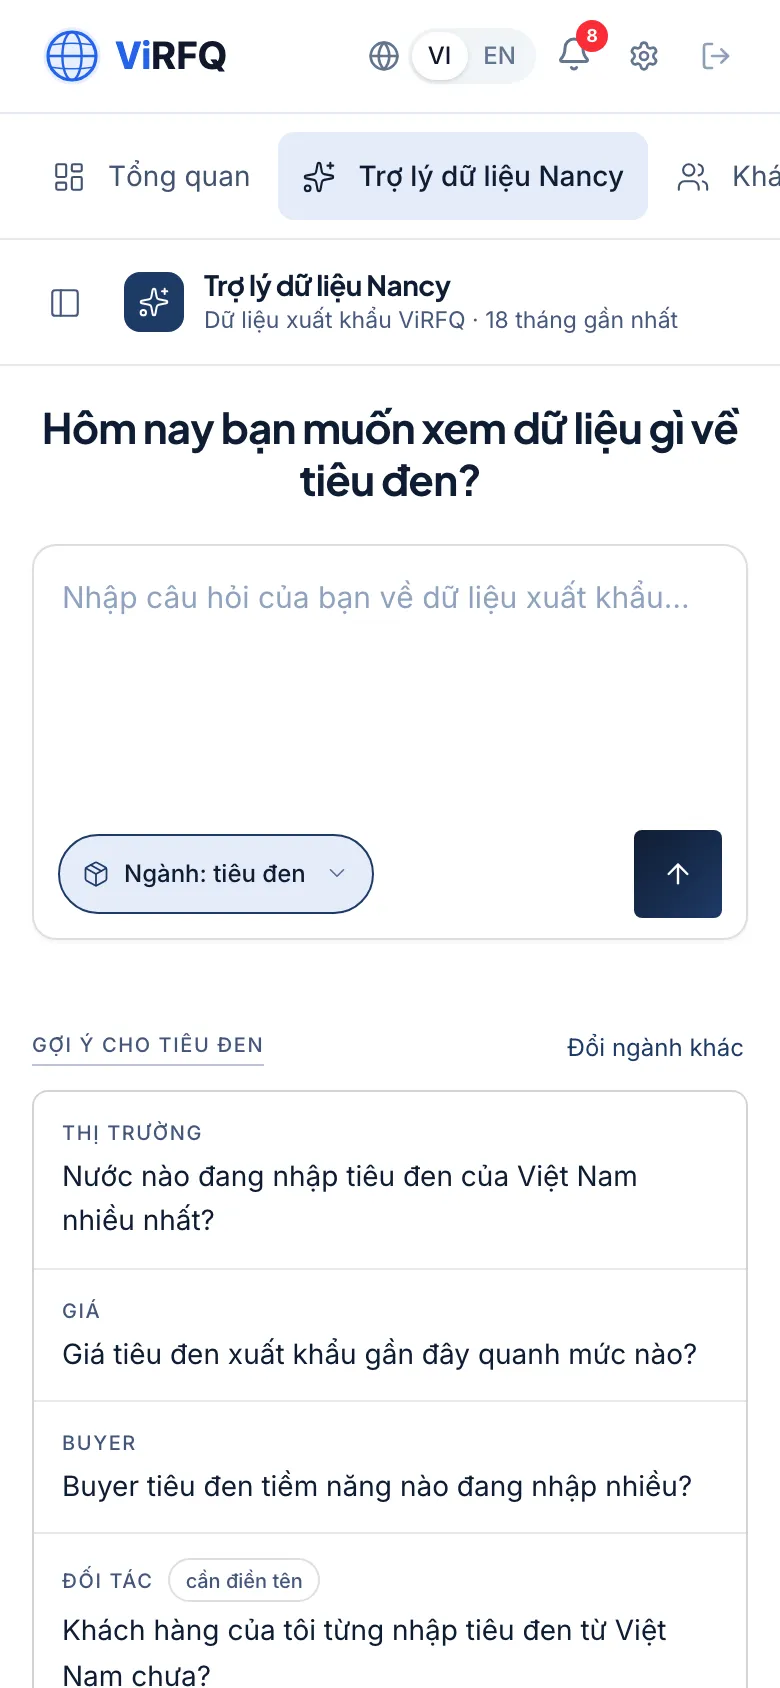
    Bước 3: On a phone the history hides behind the menu button; the question box stays fixed at the bottom.

    Nancy, the data assistant, on a phone
    Nancy, the data assistant, on a phone

Find and reveal buyer names

Ask "which buyers import a lot of [product]" or click a Buyer suggestion: Nancy lists importing companies with value, shipment count and average price — but the company name is hidden. Click the padlock icon next to a row to reveal the name: it uses 1 of the month’s 300 names. A name revealed earlier this month can be reopened at no cost. From the company name you look up the contact yourself, or ask Nancy "check the customer [name] for me" to see their import history from Vietnam.

What can Nancy read?

The data is aggregated export declarations: product, importing country, importer, quantity and value by month. Nancy does not know your prices or the buyer’s contact details — you find those after revealing the name. Figures are for reference; verify before quoting.

Tip

Before unlocking an RFQ, ask Nancy "check the customer [buyer name from the RFQ] for me" — a buyer who has imported from Vietnam before is far more likely to close.

Frequently asked questions

Nancy says "not enough data".
That product or market has too few shipments in the last 18 months. Ask more broadly (a product group instead of a specification, a region instead of one country) or change the period.
What happens when the 300 buyer names are used up?
You can still ask Nancy without limit and see the figures. The buyer-name allowance renews on the 1st of the next calendar month (UTC) — unlike RFQ unlocks, which follow the plan month.
Can sales staff use Nancy?
Yes. The buyer-name allowance is shared by the whole company, and the conversation history is shared too so the whole team can see it.

Chapter 8

Customers and pipeline

Track every deal from first contact to a closed order.

Managing customers in the pipeline

Track every deal from first contact to a closed order on the Kanban board, with notes, estimated value and a win-rate report.

Customers gathers every buyer who has contacted you — via WhatsApp, an unlocked RFQ, the form on a product page or added by hand — into one progress board (pipeline). Each customer is a card; drag it through the Data → Contacted → Prospect → Negotiating → Won columns as the deal moves on. New buyers from WhatsApp and RFQs are added automatically.

The Kanban board

  1. 1

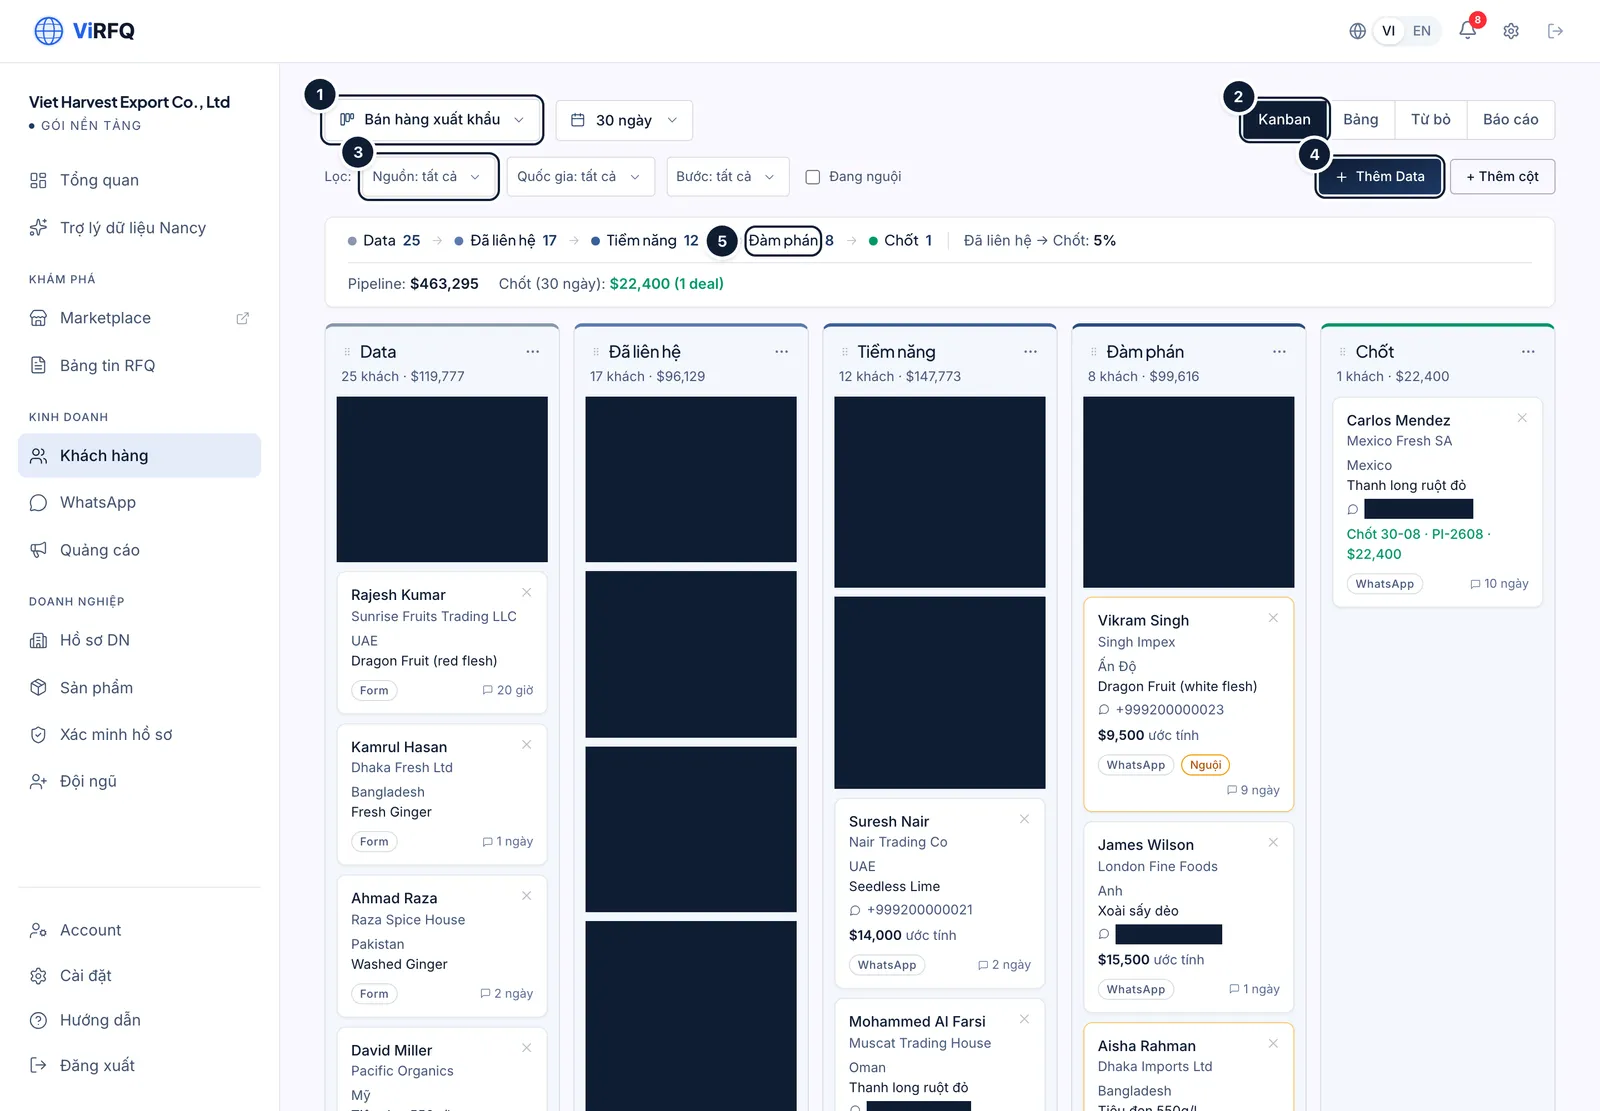
    Bước 1: Open Customers in the left column. Choose the pipeline (1) — "Export sales" by default — and the Kanban view (2). Filter by Source (3: RFQ, Form, WhatsApp, Own research), country, stage, or switch on Going stale to see buyers with no recent activity. Click Add contact (4) to add a buyer you found outside ViRFQ.

    • Each card shows the name, company, country, product of interest, estimated value and the source label. The Stale label appears when a buyer has been silent for days — message them again, or click the × on the card to mark the buyer lost with a reason.
    • The summary line above shows how many customers are at each stage, the total pipeline value and the orders won in the last 30 days.
    • Drag cards between columns (5) to update the stage. Need an extra stage? Click + Add column.
    Customer Kanban board with the pipeline selector (1), the Kanban button (2), the source filter (3), the Add contact button (4) and the Negotiating column (5)
    Customers: (1) pipeline, (2) Kanban view, (3) source filter, (4) add a contact, (5) stage columns.
  2. 2

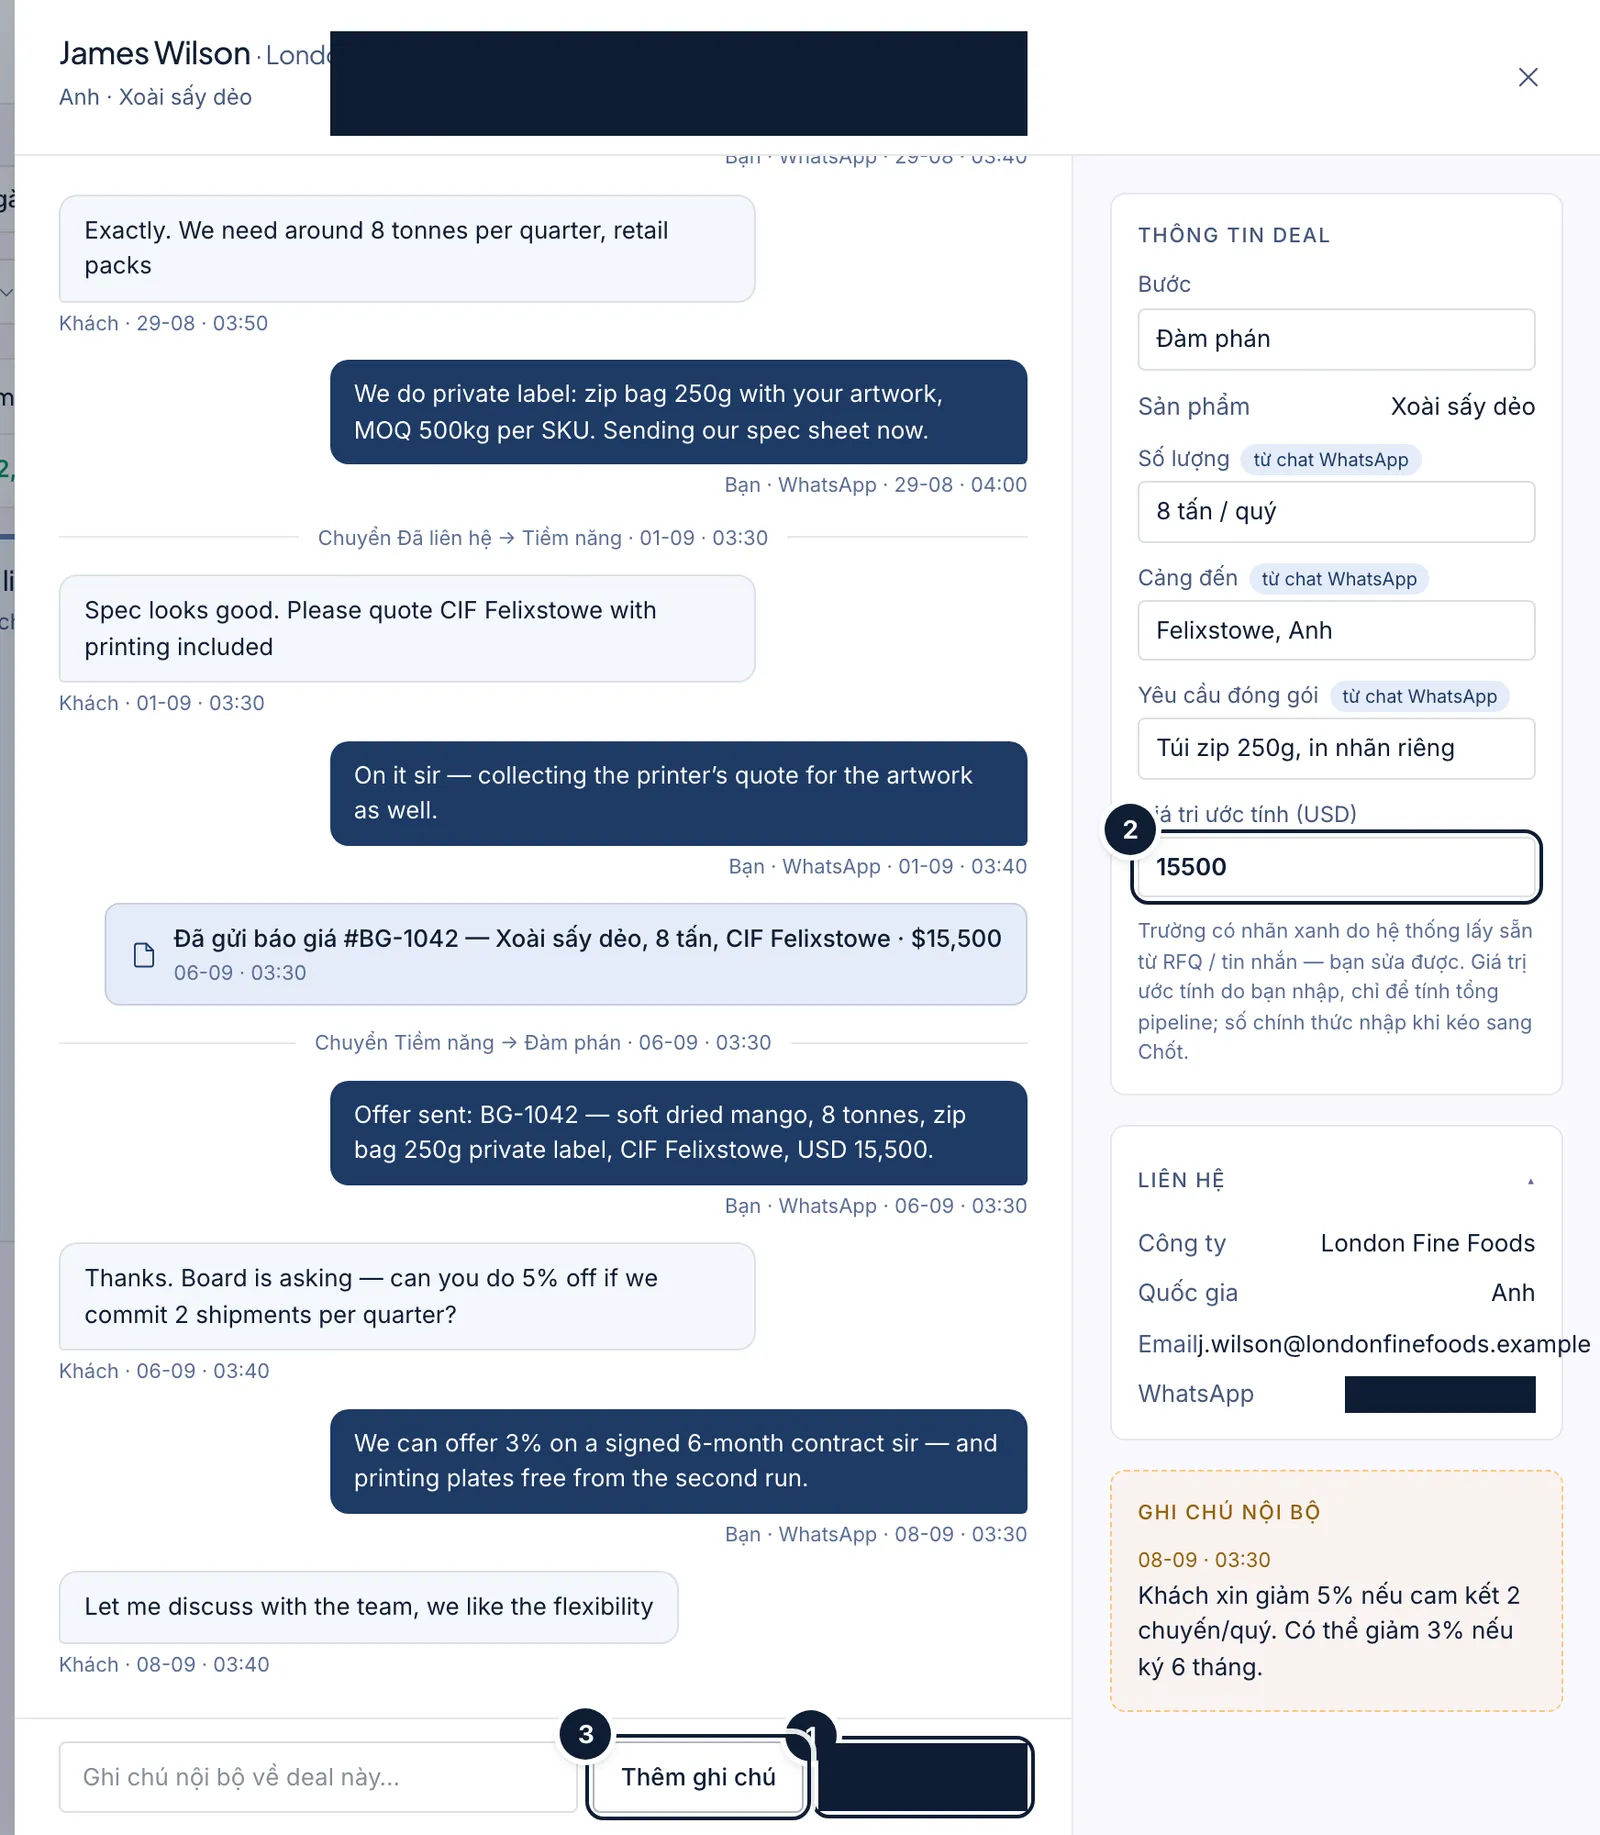
    Bước 2: Click a card to open the customer details: contact details, product and quantity taken from the chat/RFQ, current stage, history. Click Open WhatsApp (1) to message right away; enter the estimated value (2) so reports add up; Add note (3) for colleagues.

    • When you win an order, drag the card to Won and enter the order value — it feeds the "Won" tile on the Overview and the ads report.
    Customer detail panel with the Open WhatsApp button (1), the estimated value field (2) and the Add note button (3)
    Customer details: (1) open WhatsApp, (2) estimated value, (3) internal note.
  3. 3

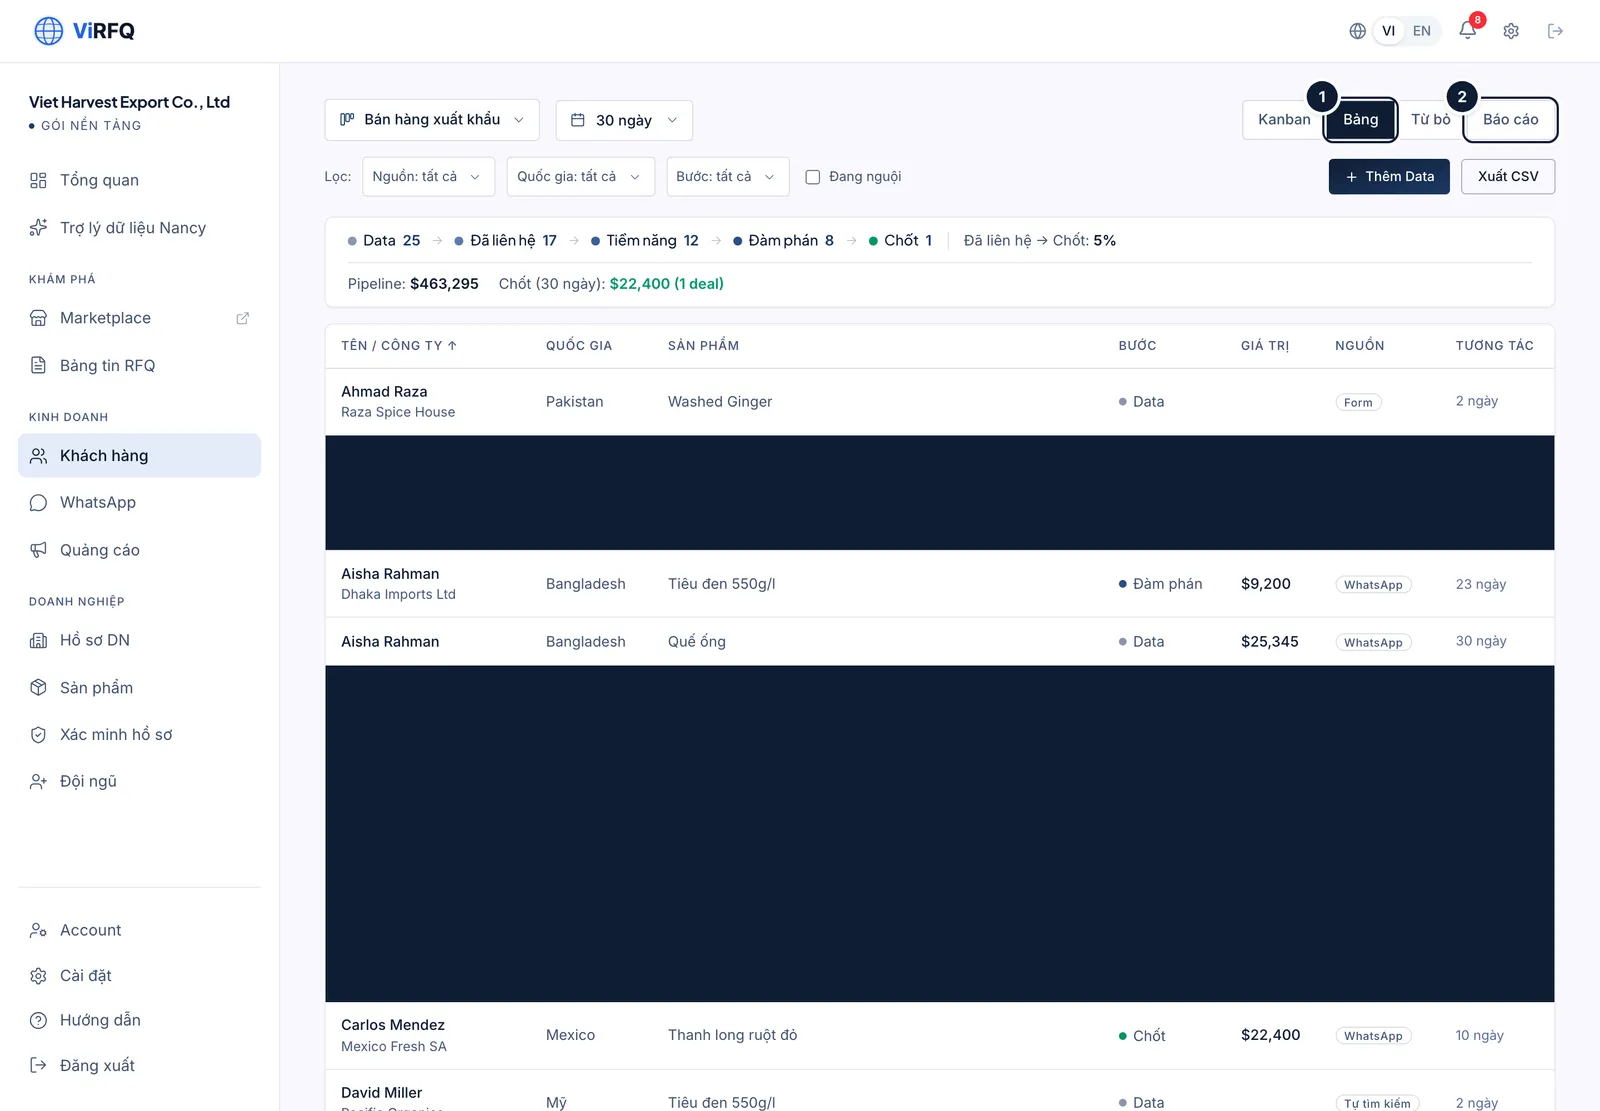
    Bước 3: The Table view (1) lists every customer as a table for quick filtering and sorting; Report (2) shows the conversion rate between stages, the stage with the biggest drop-off and the average order value.

    The Table view (1) and the Report button (2) in Customers
    Views: (1) Table, (2) Report.
  4. 4

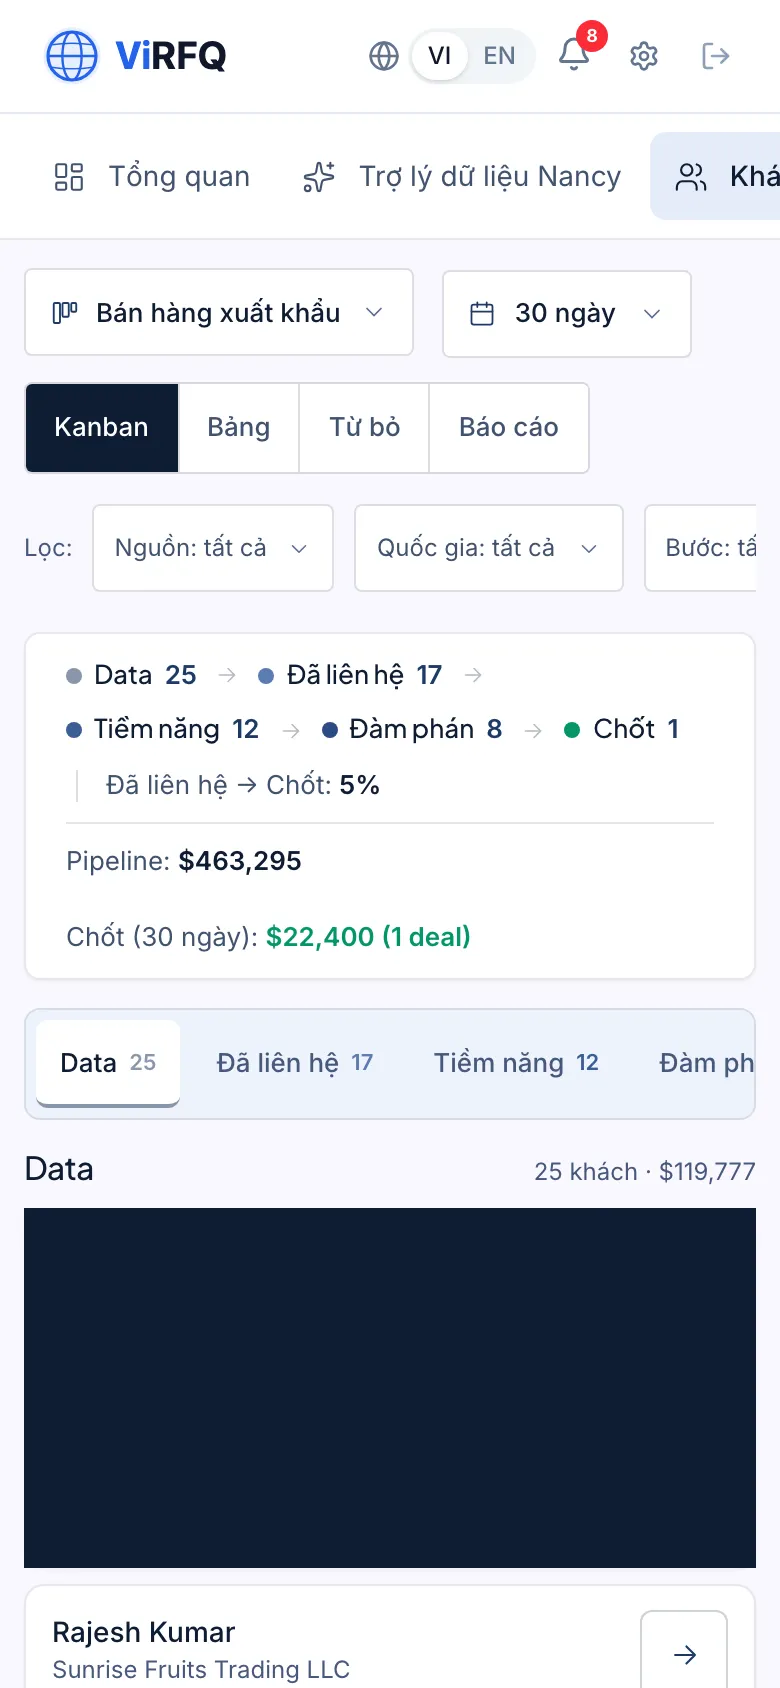
    Bước 4: On a phone the columns become a list; swipe sideways to change column.

    Customers on a phone
    Customers on a phone

Assigning customers to staff

If the company has sales staff, each customer is assigned to one person according to the "Automatic lead routing" setting under Team. Staff see only their own customers; the owner sees everyone.

Frequently asked questions

When does a WhatsApp buyer enter the pipeline automatically?
Once the assistant has collected enough to quote (product, quantity, destination port) — at that moment a card is created directly in the Contacted column with source WhatsApp. A buyer who has only said hello has no card yet: follow them in the Inbox, or click Add contact to add them yourself.
I dragged a card to the wrong column.
Drag it back. Every stage change is recorded in the card history, so nothing is lost.
Can I delete a customer?
Do not delete — click the × on the card and choose a reason to mark it Lost; the report needs to know why a customer was lost. Lost cards leave both the Kanban and the Table view and sit in the Lost tab (next to Kanban / Table / Report) — click Restore there if the buyer comes back.

Chapter 9

WhatsApp and the auto-reply assistant

Connect a number, read the inbox, let the assistant answer buyers 24/7.

WhatsApp: connect a number, the inbox and the auto-reply assistant

Connect the company WhatsApp number, read and answer buyers in the Inbox, and let the assistant reply 24/7 from the price list and knowledge you provide.

International buyers prefer WhatsApp to email. ViRFQ brings your company WhatsApp number onto the platform: every message lands in a shared Inbox, the assistant replies even at midnight using exactly the price list and information you entered, collects the requirement (product, quantity, destination port) and alerts you when the buyer is ready for a quote. Messages are translated both ways, so you read and answer in Vietnamese.

Connect the WhatsApp number

  1. 1

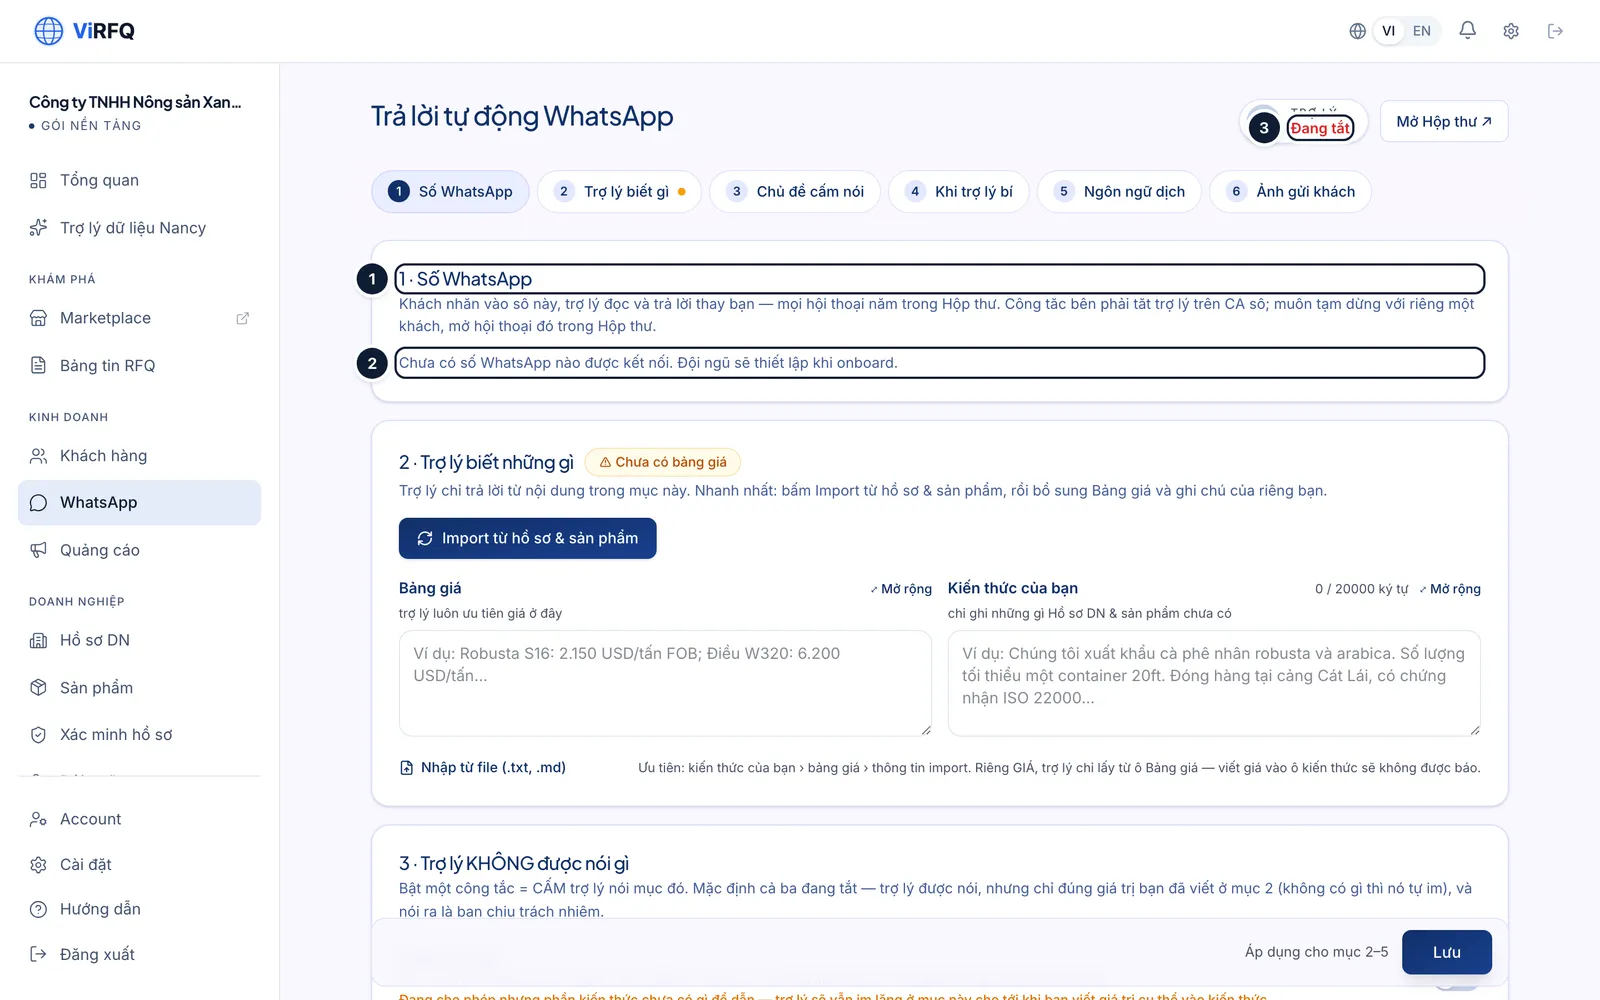
    Bước 1: Open WhatsApp › Auto-reply. Before connection, section 1 · WhatsApp number (1) reads No WhatsApp number connected yet (2) and the assistant is Off (3). The ViRFQ team connects the number together with you during onboarding after the plan is bought: you sign in to the company Facebook account in a Meta window, choose or create the WhatsApp Business account and verify the number by SMS/call — about 15 minutes.

    • Prepare: the company phone number running the WhatsApp Business app (latest version, on the phone holding the SIM) and a Facebook account with admin rights on the page/company. The connection uses coexistence mode: you keep messaging on the phone as before, and messages in both directions also appear in the Inbox. A number on personal WhatsApp must be moved to WhatsApp Business first (the number stays the same), or use a new number that runs only through ViRFQ.
    • Each company connects one number; sales staff share it.
    • Book the onboarding through the Contact support button or the hotline in the footer.
    The WhatsApp assistant settings page before a number is connected: the WhatsApp number section (1), the No WhatsApp number connected yet line (2) and the assistant status Off (3)
    Not connected: (1) number section, (2) no number yet, (3) assistant off.

The Inbox

  1. 1

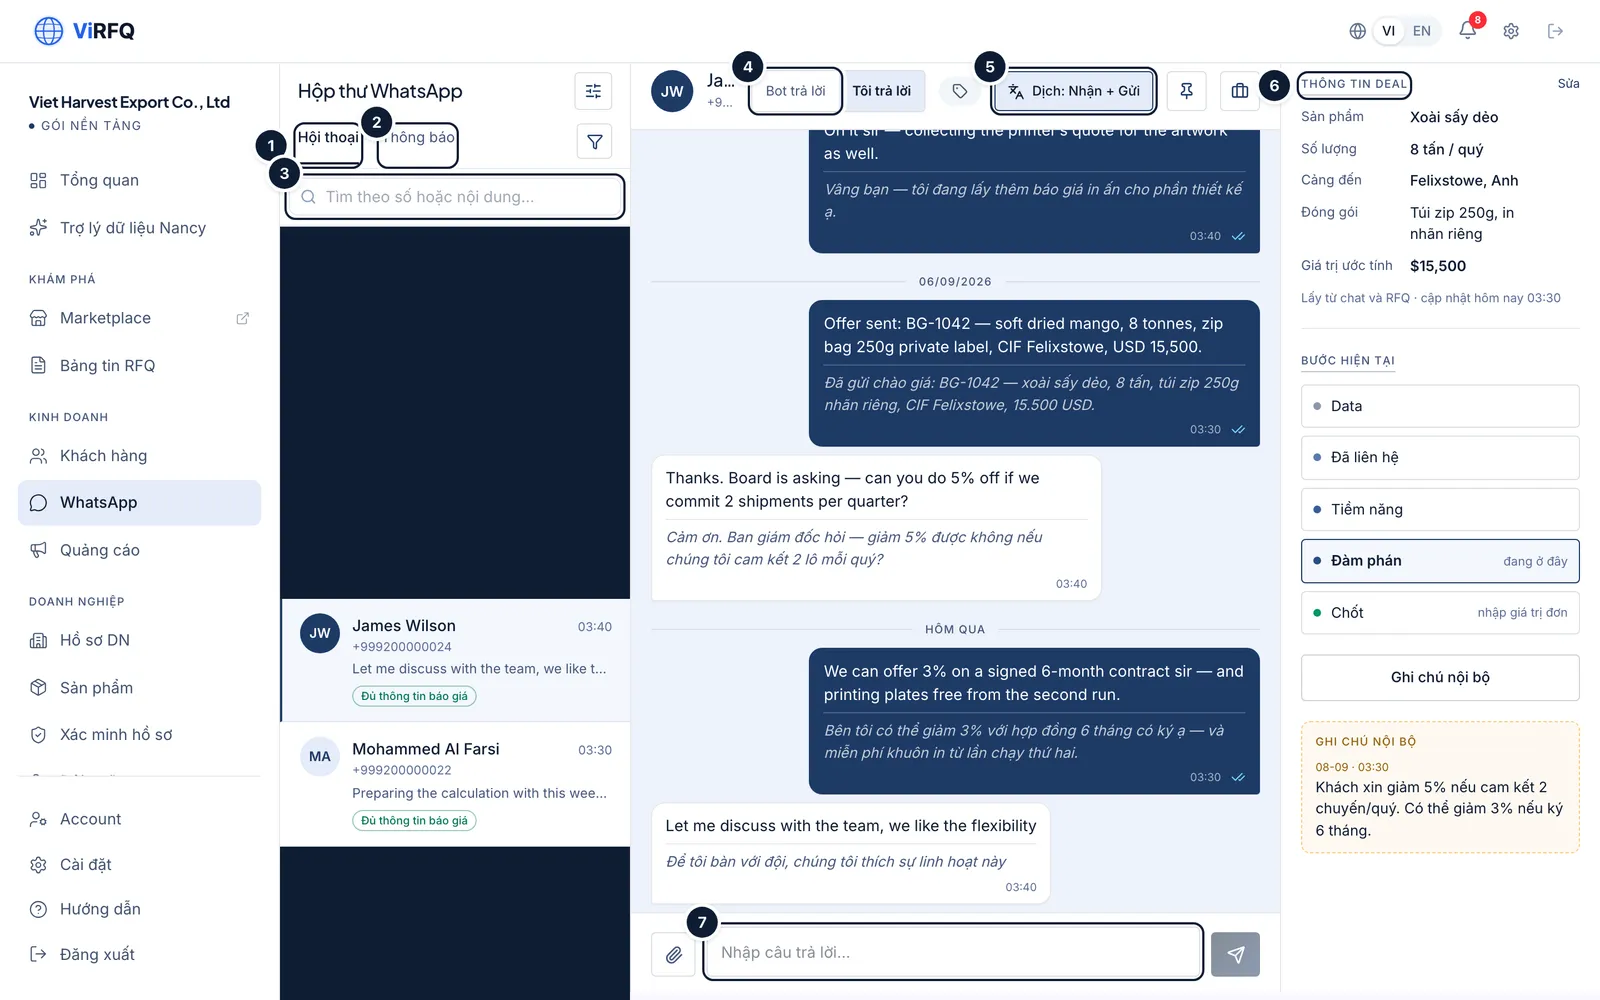
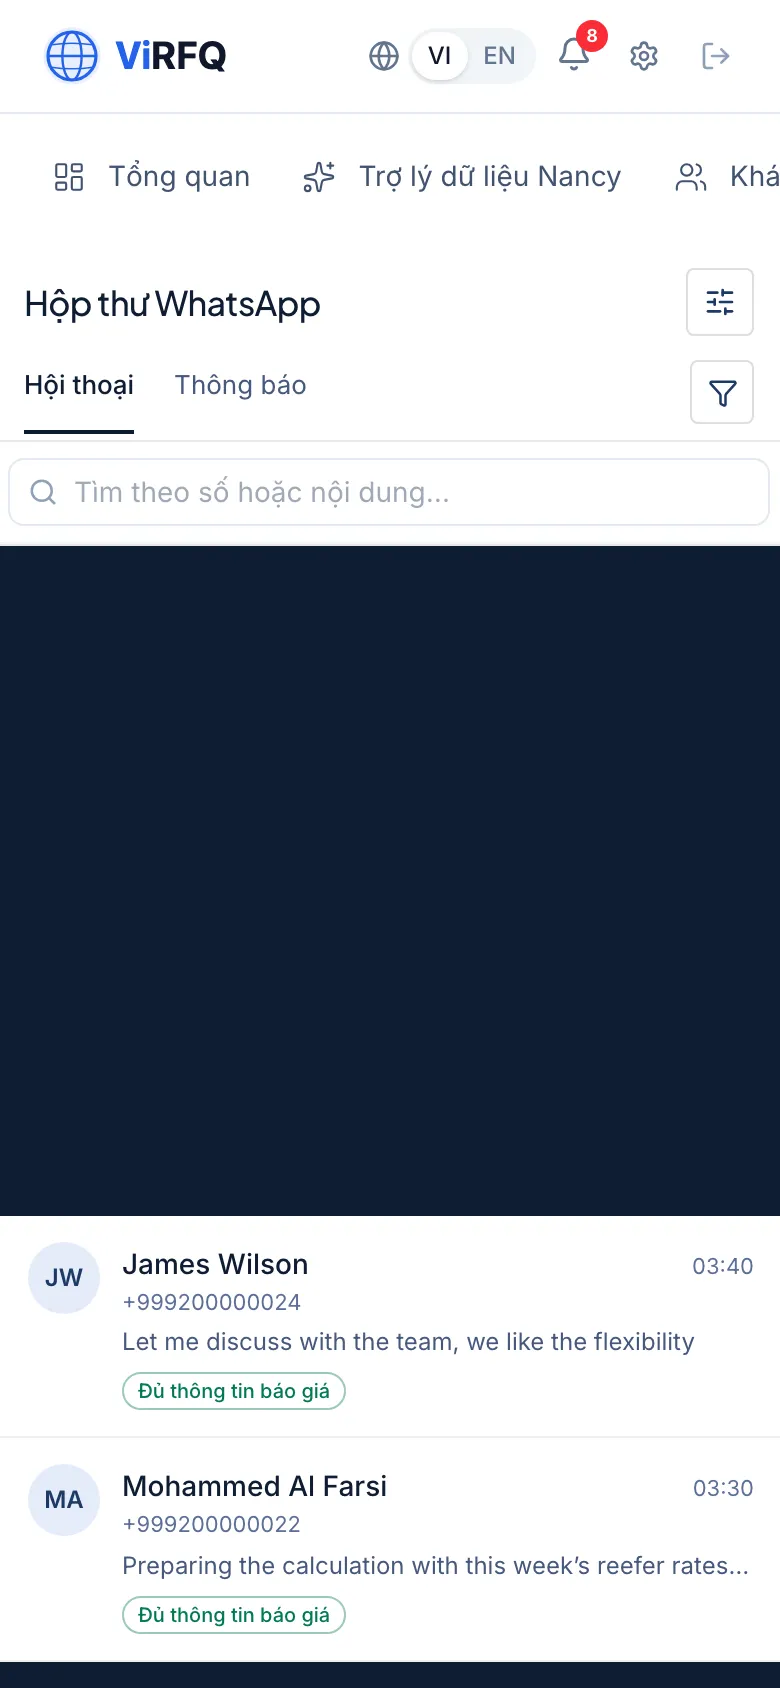
    Bước 1: The Chats tab (1) lists every conversation, newest first, with a status label (Quote-ready, Needs support, RFQ won…). The Notifications tab (2) gathers what needs your action. The search box (3) finds a number or a message. Inside a conversation the Bot replies / I reply switch (4) decides who answers this buyer; Translate: In + Out (5) turns on two-way translation. The right column is Deal info (6) extracted from the chat: product, quantity, destination port, current stage. Type into the composer (7) to answer.

    • With Translate: In + Out on, what you type in Vietnamese is translated into the buyer’s language before sending; you preview the translation first.
    • Click I reply when you want to chat yourself; the assistant stays silent until you switch Bot replies back on.
    • Pin important conversations with the pin icon; change the deal stage right in the right column — it syncs with Customers.
    The WhatsApp Inbox with the Chats tab (1), Notifications (2), the search box (3), the Bot replies / I reply switch (4), the translate button (5), the Deal info block (6) and the composer (7)
    Inbox: (1) chats, (2) notifications, (3) search, (4) who replies, (5) translate, (6) deal info, (7) composer.
  2. 2

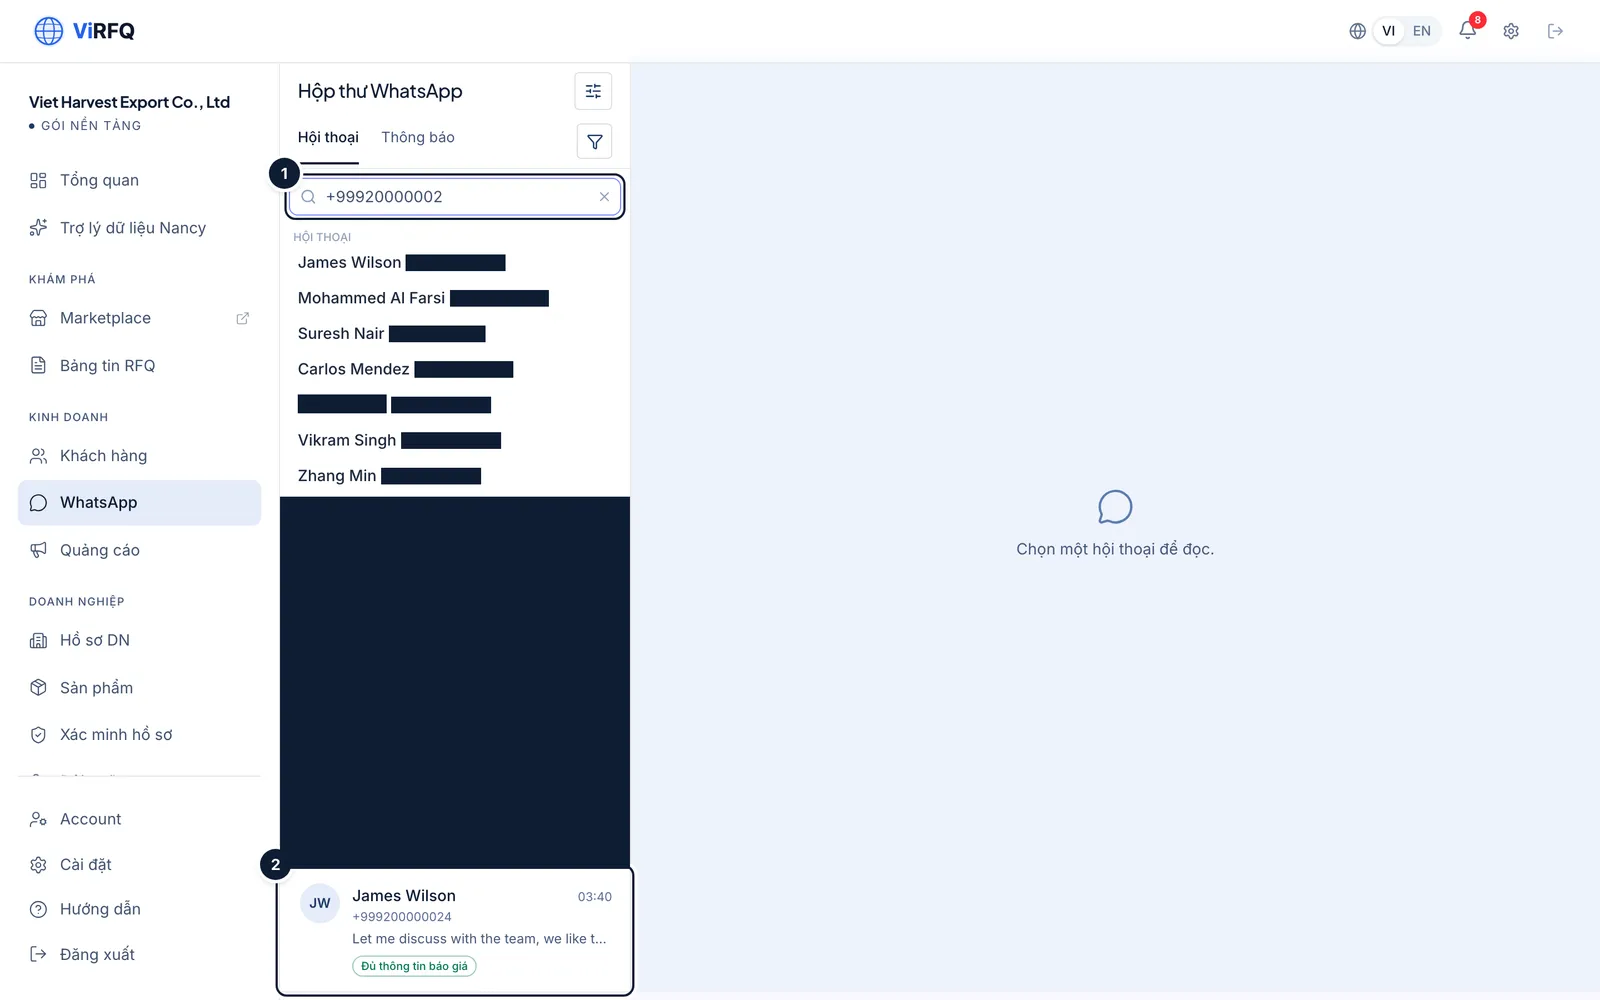
    Bước 2: Type a number or a keyword into the search box (1) to filter quickly, for example every buyer who asked about "dragon fruit". Click a row (2) to open the conversation.

    The WhatsApp Inbox filtered by a keyword in the search box (1) with one conversation row (2)
    Find a conversation: (1) search box, (2) result row.
  3. 3

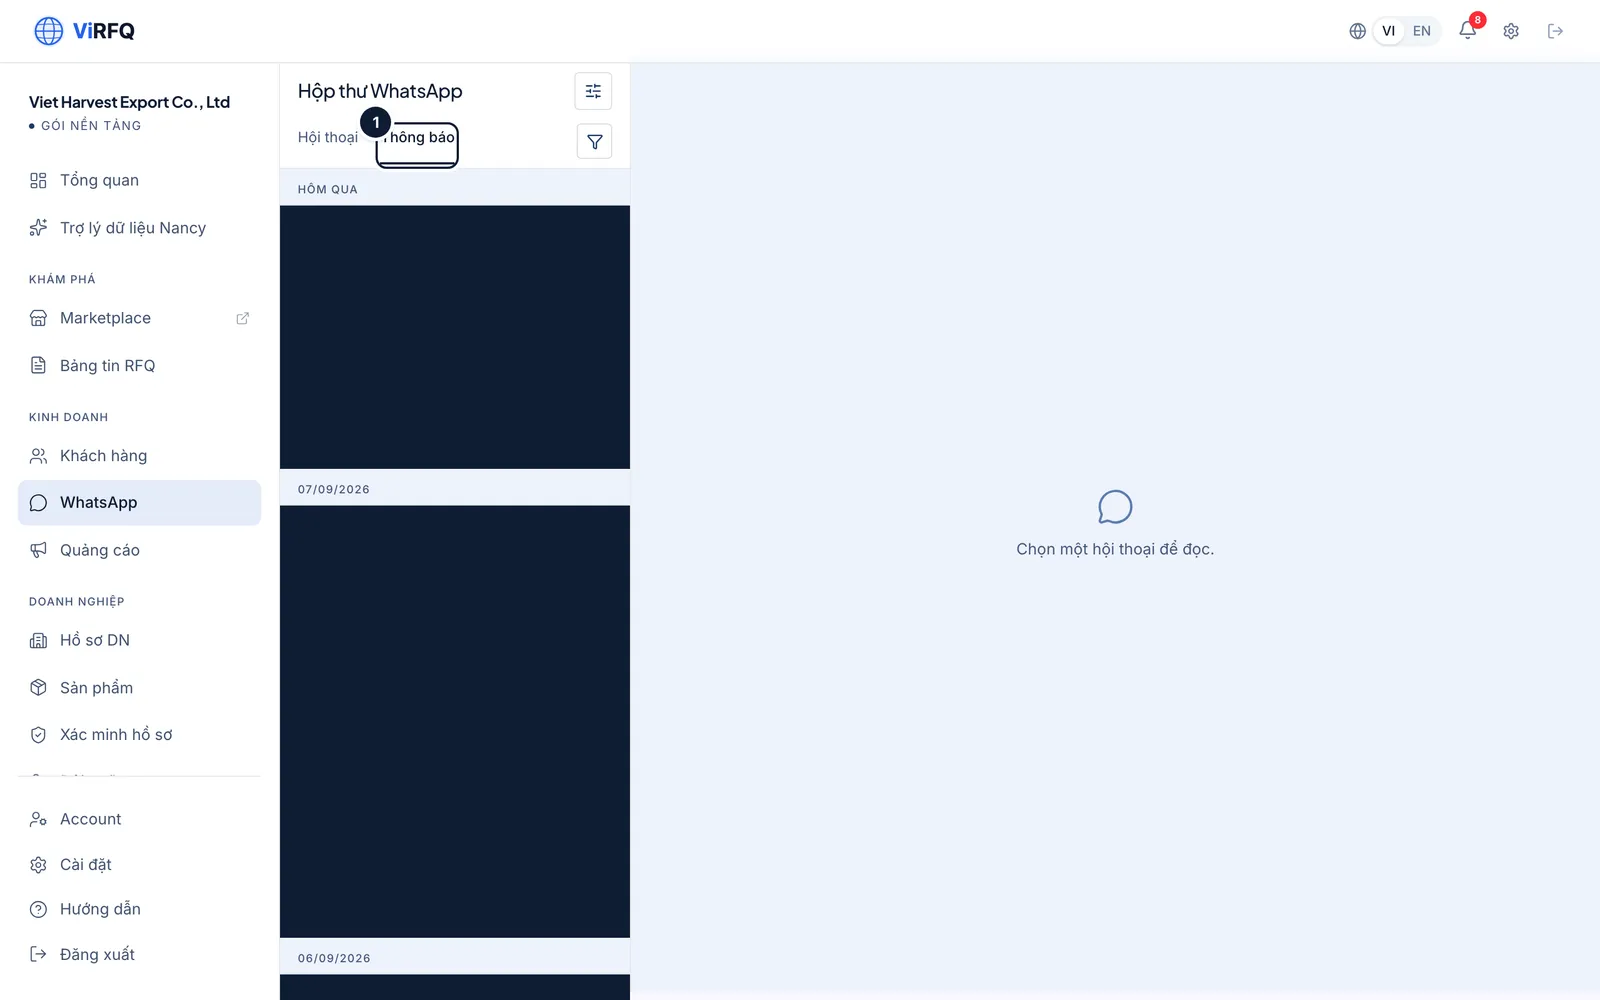
    Bước 3: The Notifications tab (1) lists the events the assistant raises for you: a buyer needs support, a buyer is ready for a quote, a buyer asked about a forbidden topic. Click a notification to jump to that conversation.

    The Notifications tab (1) in the WhatsApp Inbox
    Notifications: (1) what needs your action.
  4. 4

    Bước 4: On a phone the list and the chat are two screens; tap the arrow to go back to the list.

    The WhatsApp Inbox on a phone
    The WhatsApp Inbox on a phone

Auto-reply assistant settings

Owner only

The assistant settings page is visible to the owner account only. Sales staff use the Inbox to read and reply but cannot open this page.

  1. 1

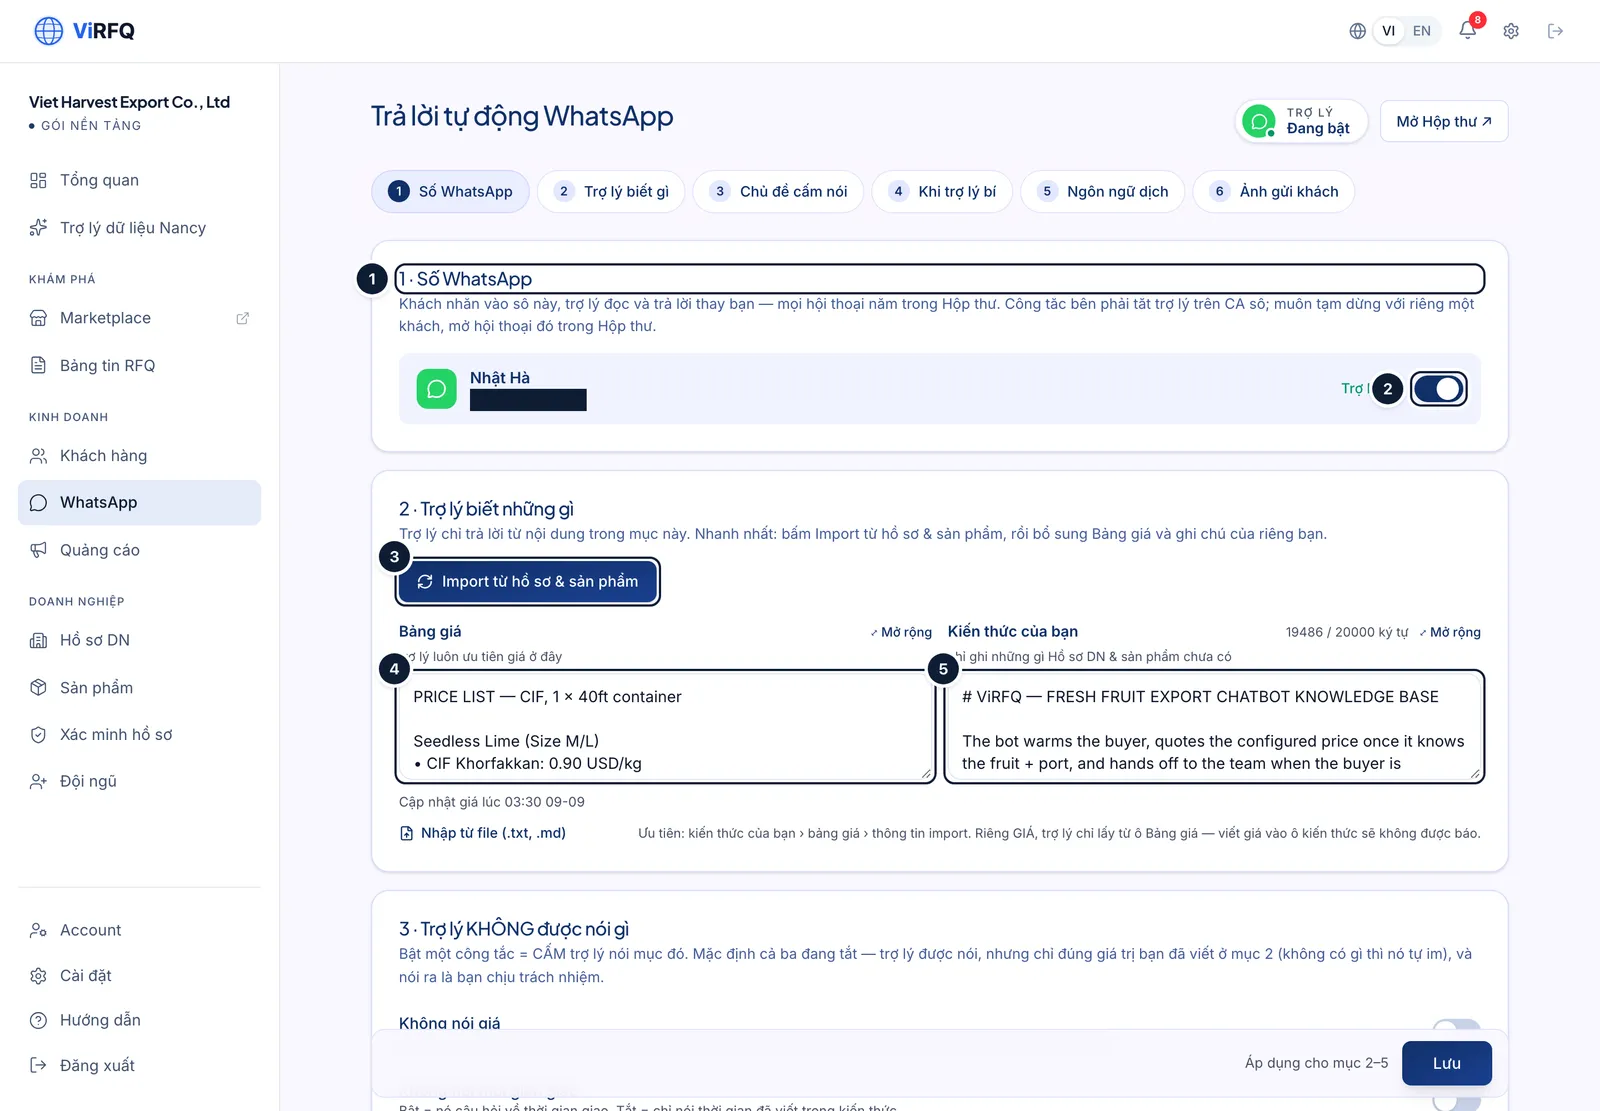
    Bước 1: In the Inbox click the settings icon, or open WhatsApp › Auto-reply. Section 1 · WhatsApp number (1) has the switch that turns the assistant on or off for the whole number (2). Section 2 · What the assistant knows: click Import from profile & products (3) to load company and product information, then fill in the Price list (4) and Your knowledge (5) — payment terms, ports, lead times, the questions buyers ask most.

    • The assistant answers only from the content of these two boxes. Priority: the knowledge you wrote › the price list › the imported information. For the assistant to quote a price, the price must be in the Price list box.
    • You can import knowledge from a .txt/.md file. Limit 20,000 characters — keep it short and to the point.
    The WhatsApp assistant settings page with the WhatsApp number section (1), the assistant switch (2), the Import from profile and products button (3), the Price list box (4) and the Knowledge box (5)
    Settings: (1) number, (2) assistant on, (3) import from profile, (4) price list, (5) knowledge.
  2. 2

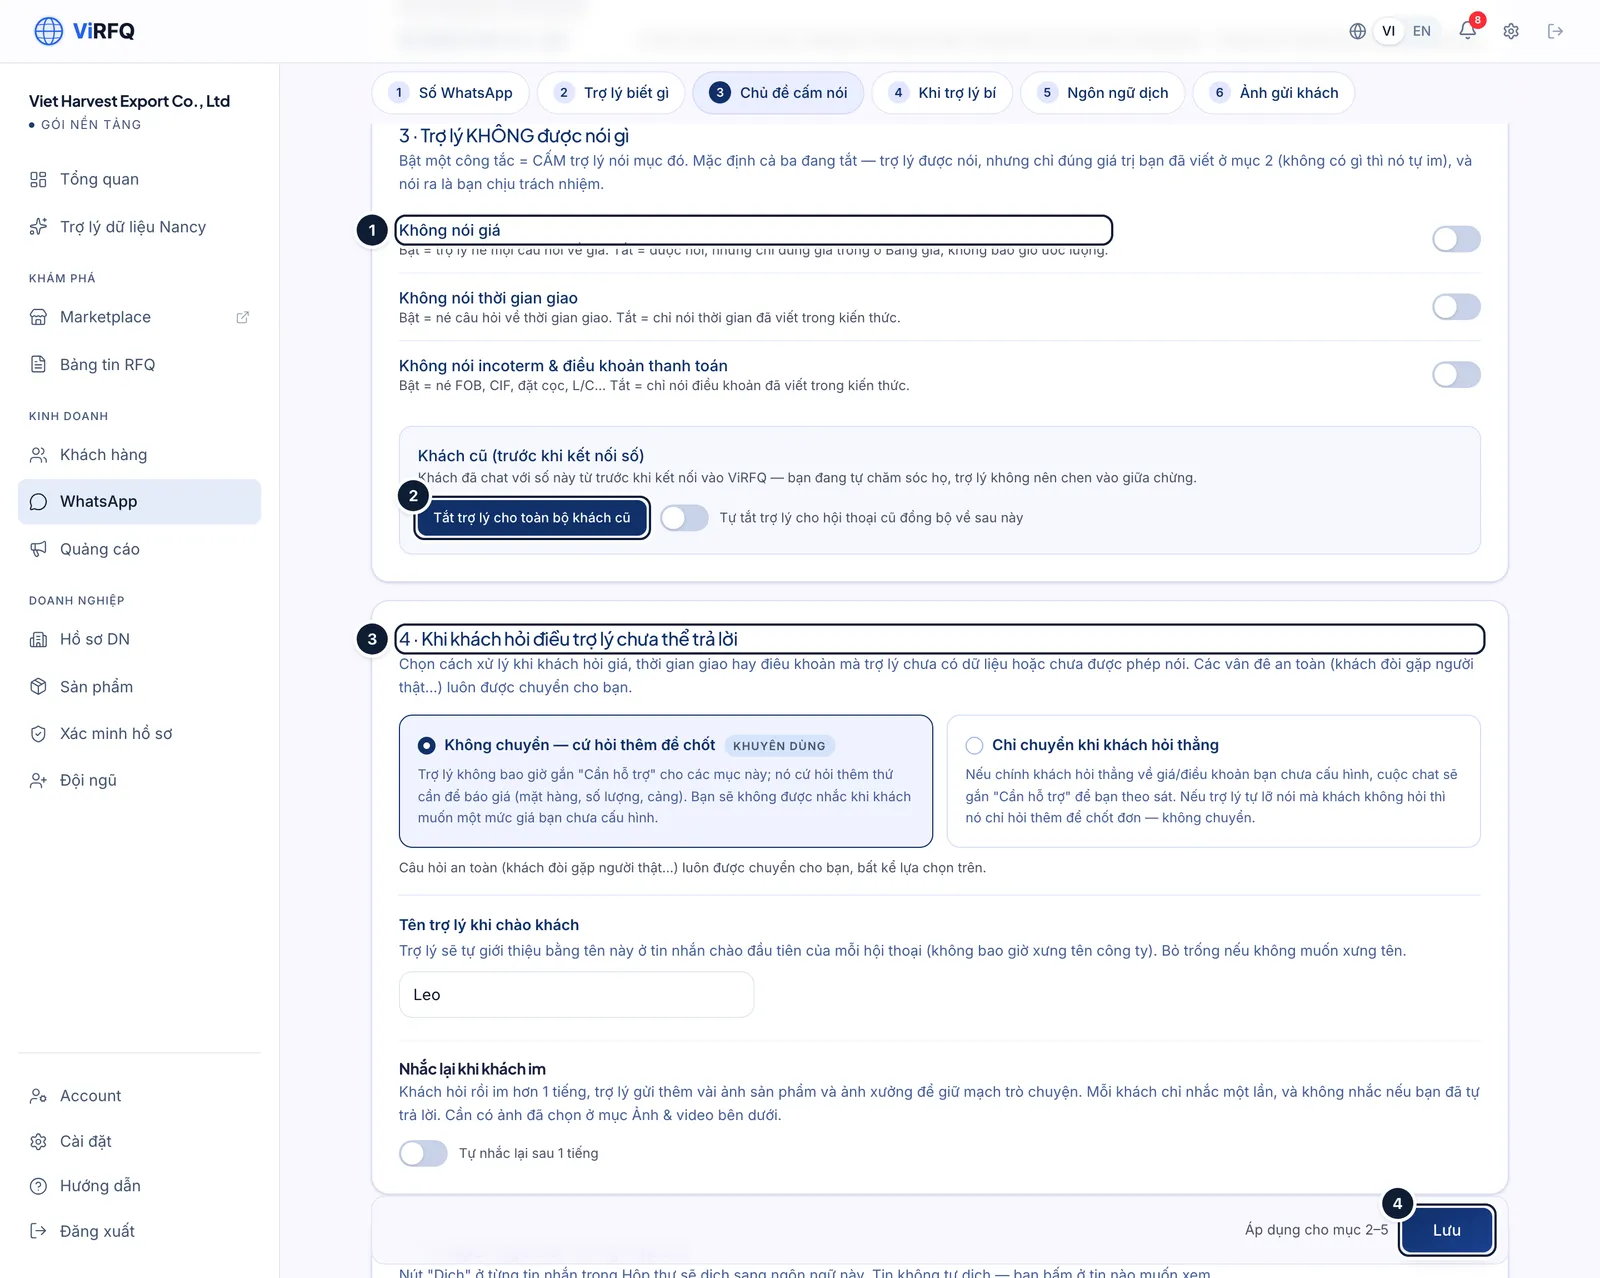
    Bước 2: Section 3 · What the assistant must NOT say: switch on No prices (1), no lead times or payment terms if you want to answer those yourself. Turn the assistant off for all old buyers (2) leaves the conversations you were already handling before the connection untouched. Section 4 (3) chooses what happens when a buyer asks something the assistant does not know: keep asking questions to close, or hand over to you immediately. Click Save (4) after changing anything.

    • Safety topics (a buyer demands a human, complaints, legal questions) are always handed over to you whatever the settings.
    The What the assistant must not say sections with the No prices switch (1), the Turn the assistant off for all old buyers button (2), the section for when a buyer asks something the assistant cannot answer (3) and the Save button (4)
    Assistant limits: (1) no prices, (2) off for old buyers, (3) when the assistant is stuck, (4) save.
  3. 3

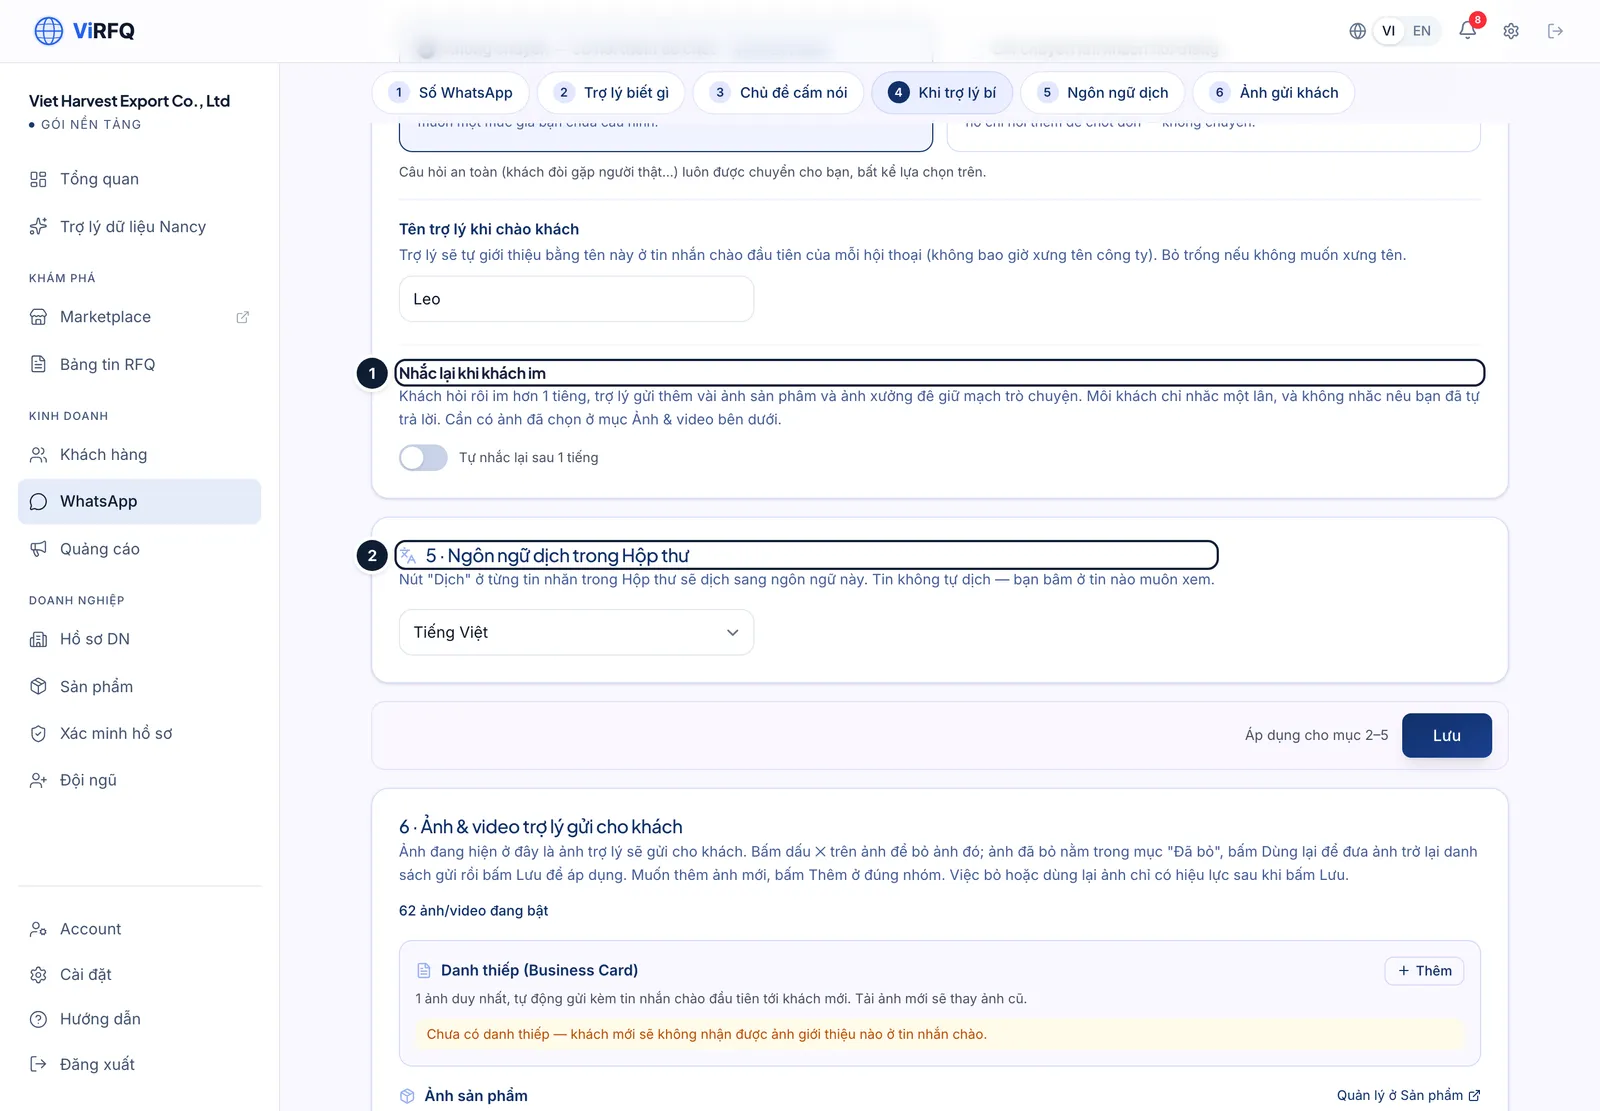
    Bước 3: The Follow up when a buyer goes quiet block (1) lets the assistant send a reminder after a few hours of silence — on or off as you like. Section 5 · Translate language (2) sets the language you want to read in the Inbox; whatever language a buyer writes in is translated into it.

    The Follow up when a buyer goes quiet block (1) and the Translate language section (2) on the assistant settings page
    Follow-ups and language: (1) follow up when quiet, (2) translate language.
  4. 4

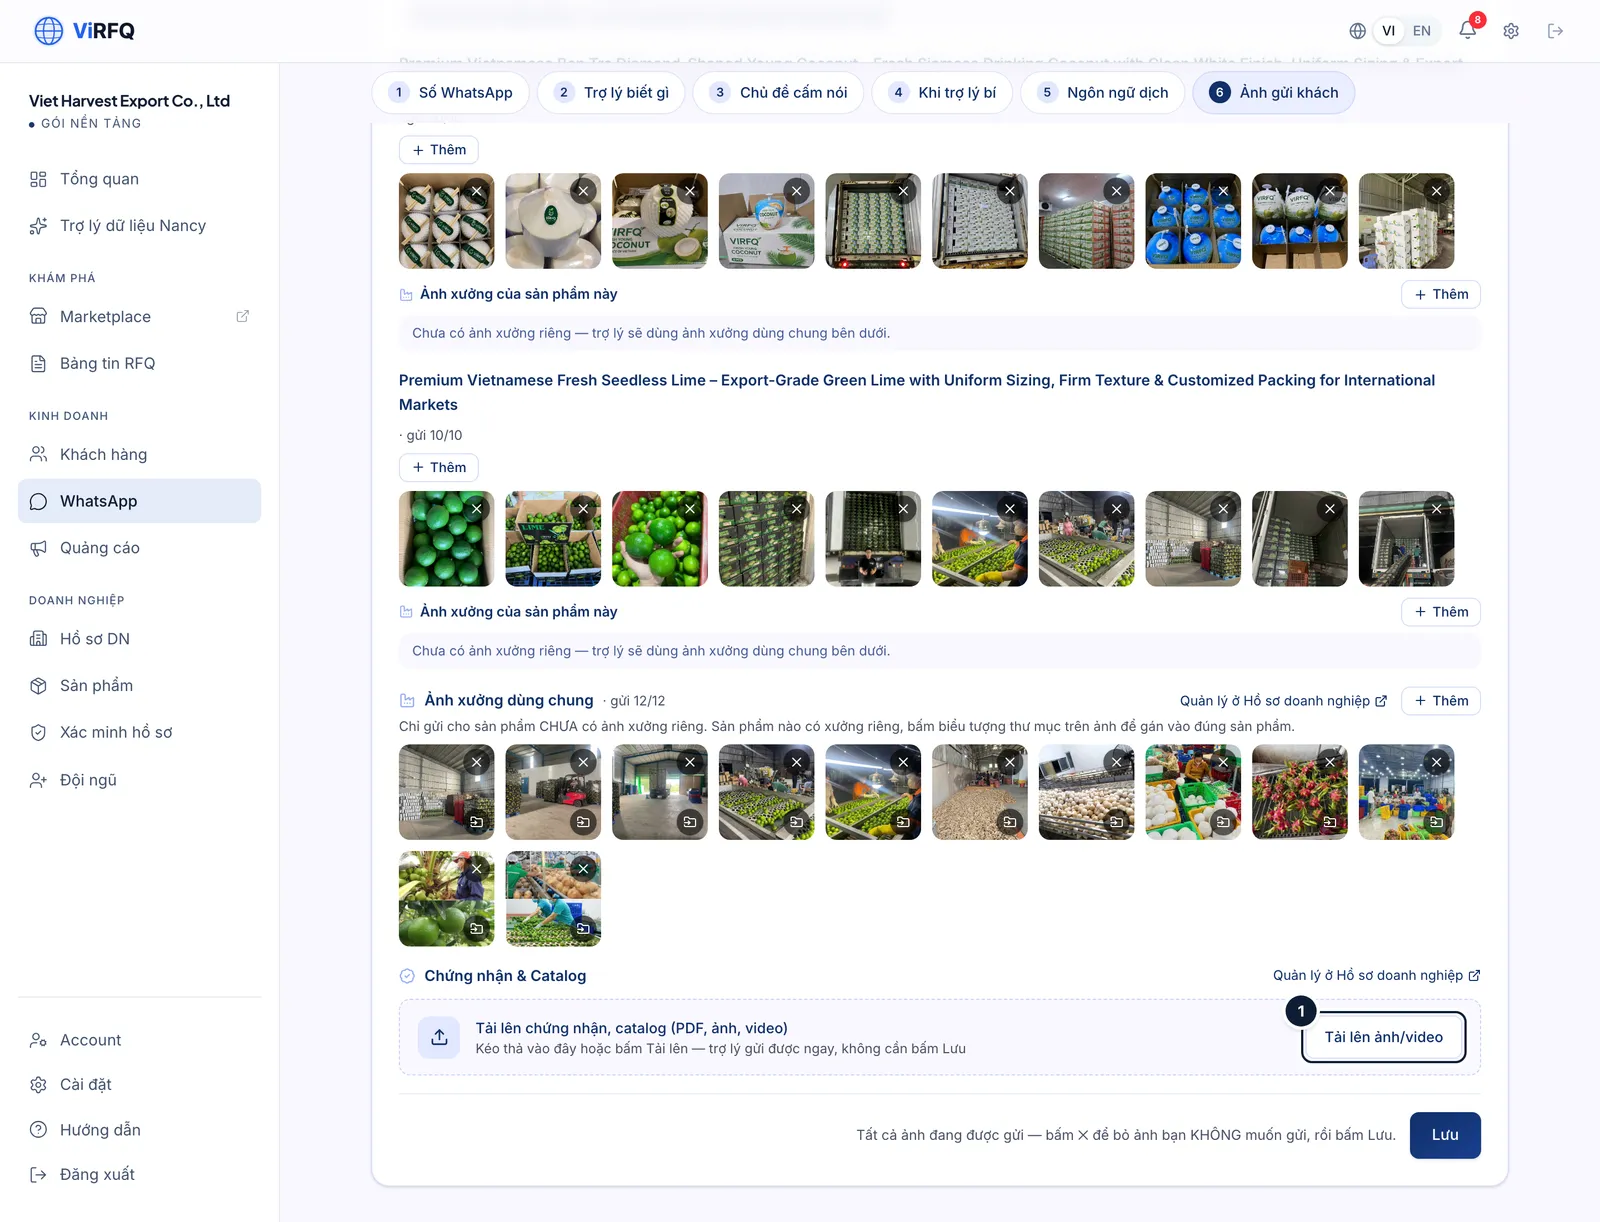
    Bước 4: Section 6 · Photos & videos: click Upload photo/video (1) to add factory photos, product photos, packing videos — the assistant sends the right one when a buyer asks. Photos attached to a product are managed under Products; factory photos come from the Business Profile.

    The Photos and videos the assistant sends section with the Upload photo/video button (1)
    Media for buyers: (1) upload.

The "Quote-ready" label is your cue

Once a buyer has given the three facts product, quantity, destination port, the assistant labels the chat "Quote-ready" and flags it in Notifications and in the "Needs your action today" block on the Overview. The assistant does not switch itself off: it keeps answering the buyer’s next questions until you click I reply in the conversation — do that when you start quoting.

Important

The assistant works only while the Platform plan is active. After expiry, messages still reach the Inbox but are no longer answered automatically.

Frequently asked questions

A buyer wrote but the assistant did not reply.
Check in this order: the switch in section 1 is on; that conversation is not in "I reply" mode; the buyer is not among the "old buyers" you switched off; the plan is still active. If none of that helps, contact support.
I want to use the WhatsApp number already on my phone.
Yes. If that number runs the WhatsApp Business app, the team connects it in coexistence mode: you keep chatting on the phone while messages in both directions also show in the Inbox and the assistant replies when switched on. A number on personal WhatsApp is moved to WhatsApp Business first (same number), then connected.
What if the assistant quotes the wrong price?
The assistant only takes prices from the Price list box. Correct the price list and click Save; later conversations use the new price. To be safe, switch on "No prices" and quote yourself.

Chapter 10

Meta Ads

Connect your ad account and see how many buyers your ad spend brings.

Meta Ads: connect your ad account and see how many buyers your ad spend brings

Connect the company Meta ad account so ViRFQ links ad spend to WhatsApp messages, pipeline customers and won orders.

The most effective way to get buyers messaging you is running Click-to-WhatsApp ads on Facebook/Instagram for your product pages. You run the ads on your own Meta account and pay Meta directly — ViRFQ does not hold any ad budget. The Platform plan includes campaign setup support and a tracking page: connect the ad account, ViRFQ matches every WhatsApp message to the ad that produced it, then follows it into the pipeline and to won orders.

Connect the ad account

  1. 1

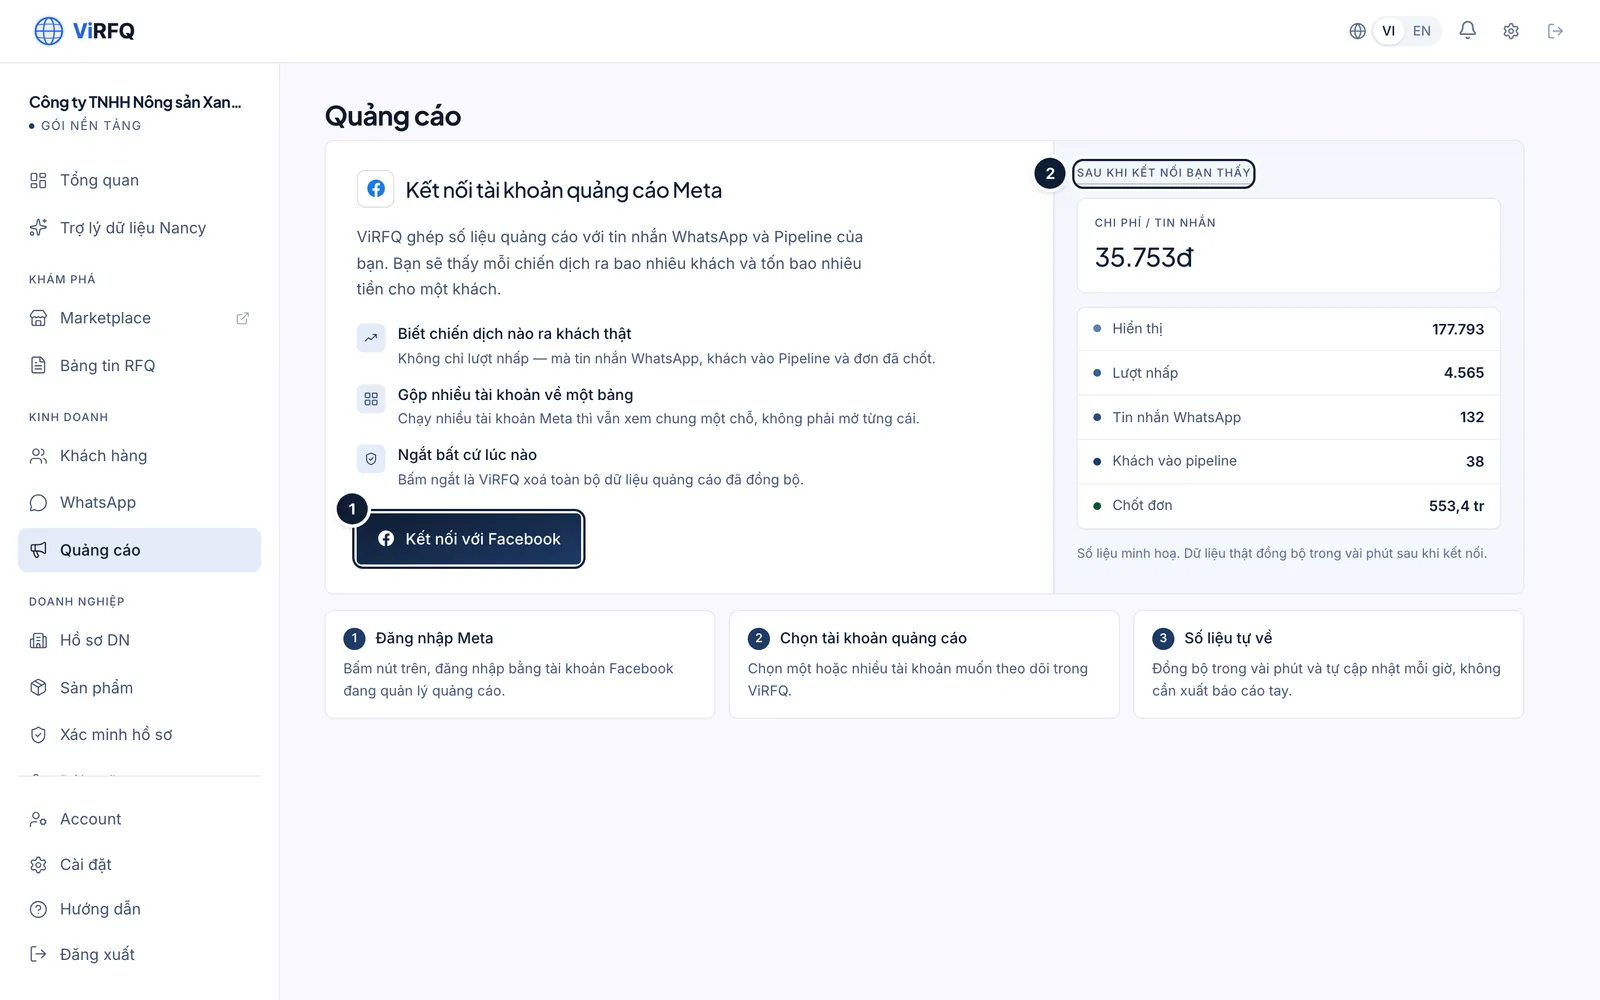
    Bước 1: Open Ads in the left column. The first time, click the connect button (1): sign in to the Facebook account that administers the ad account, allow ViRFQ to *read* ad data, then choose the ad account to track. ViRFQ only reads figures — it never creates, edits or spends anything in your account. If the Ads page shows no connect button, the feature has not been switched on for your account yet — click Contact support and the team will enable it.

    • Several ad accounts can be connected; figures are shown combined or per account.
    The Meta ad account connection screen with the start-connection button (1)
    Connect Meta Ads: (1) sign in and grant read access.

Reading the Ads page

  1. 1

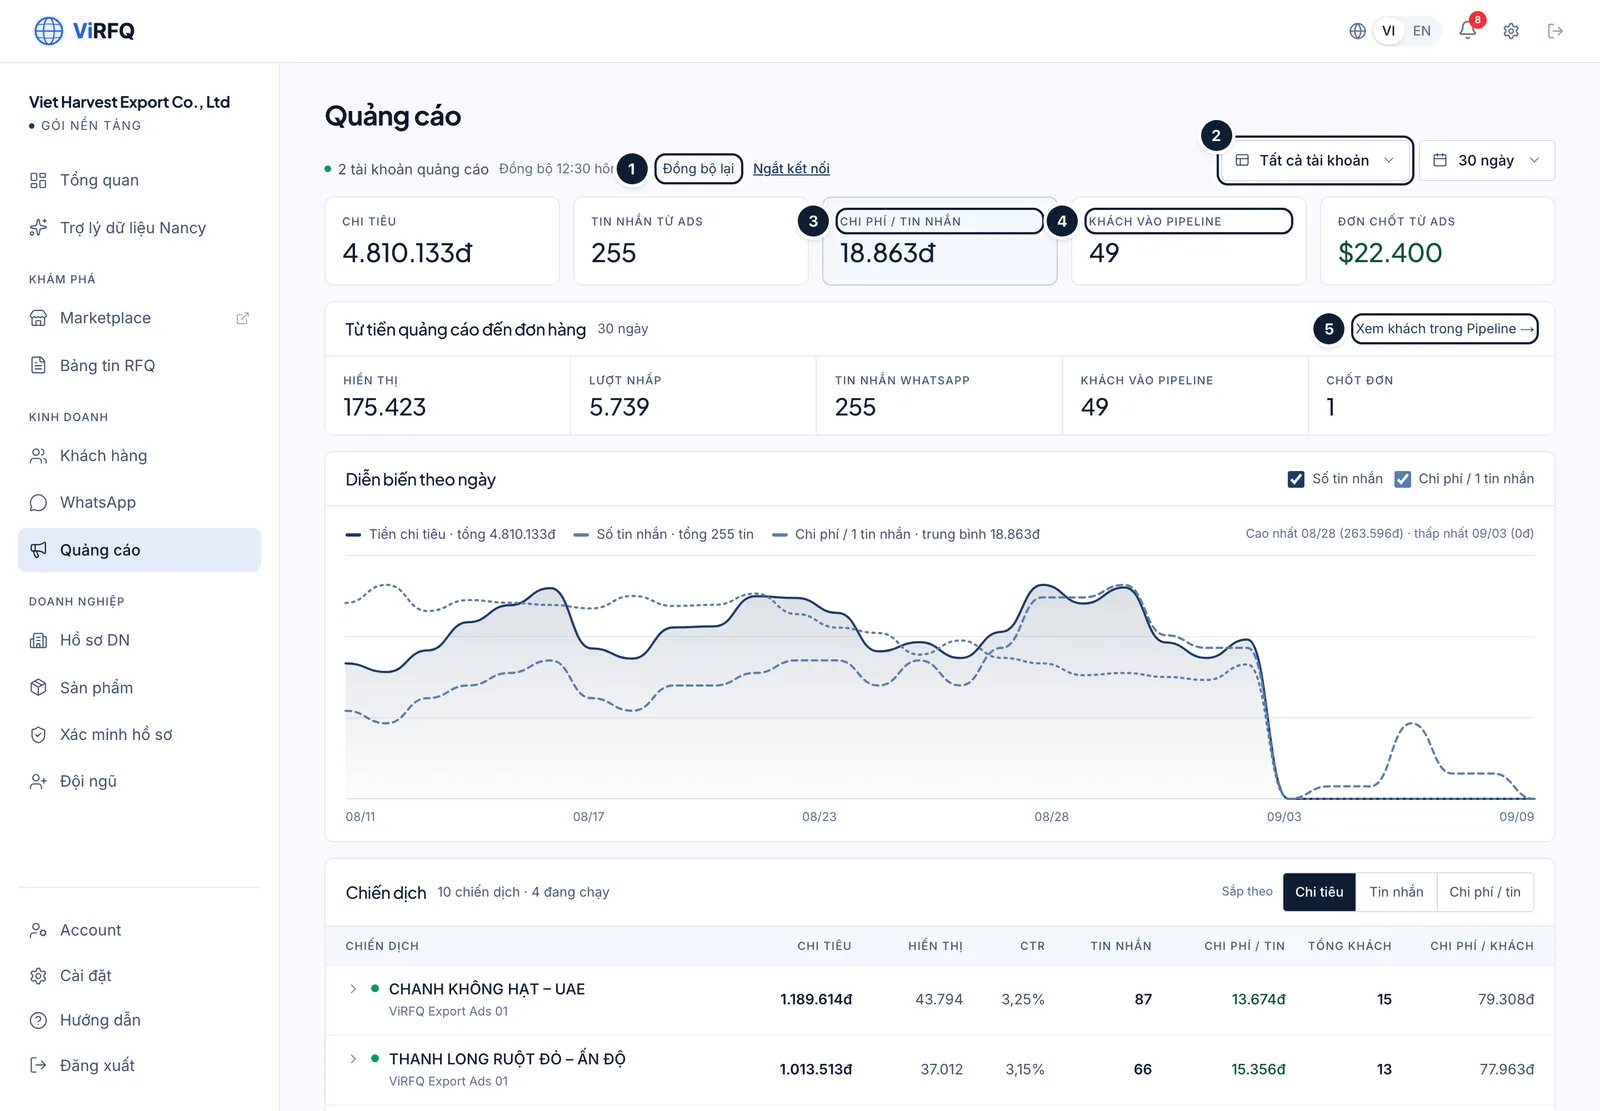
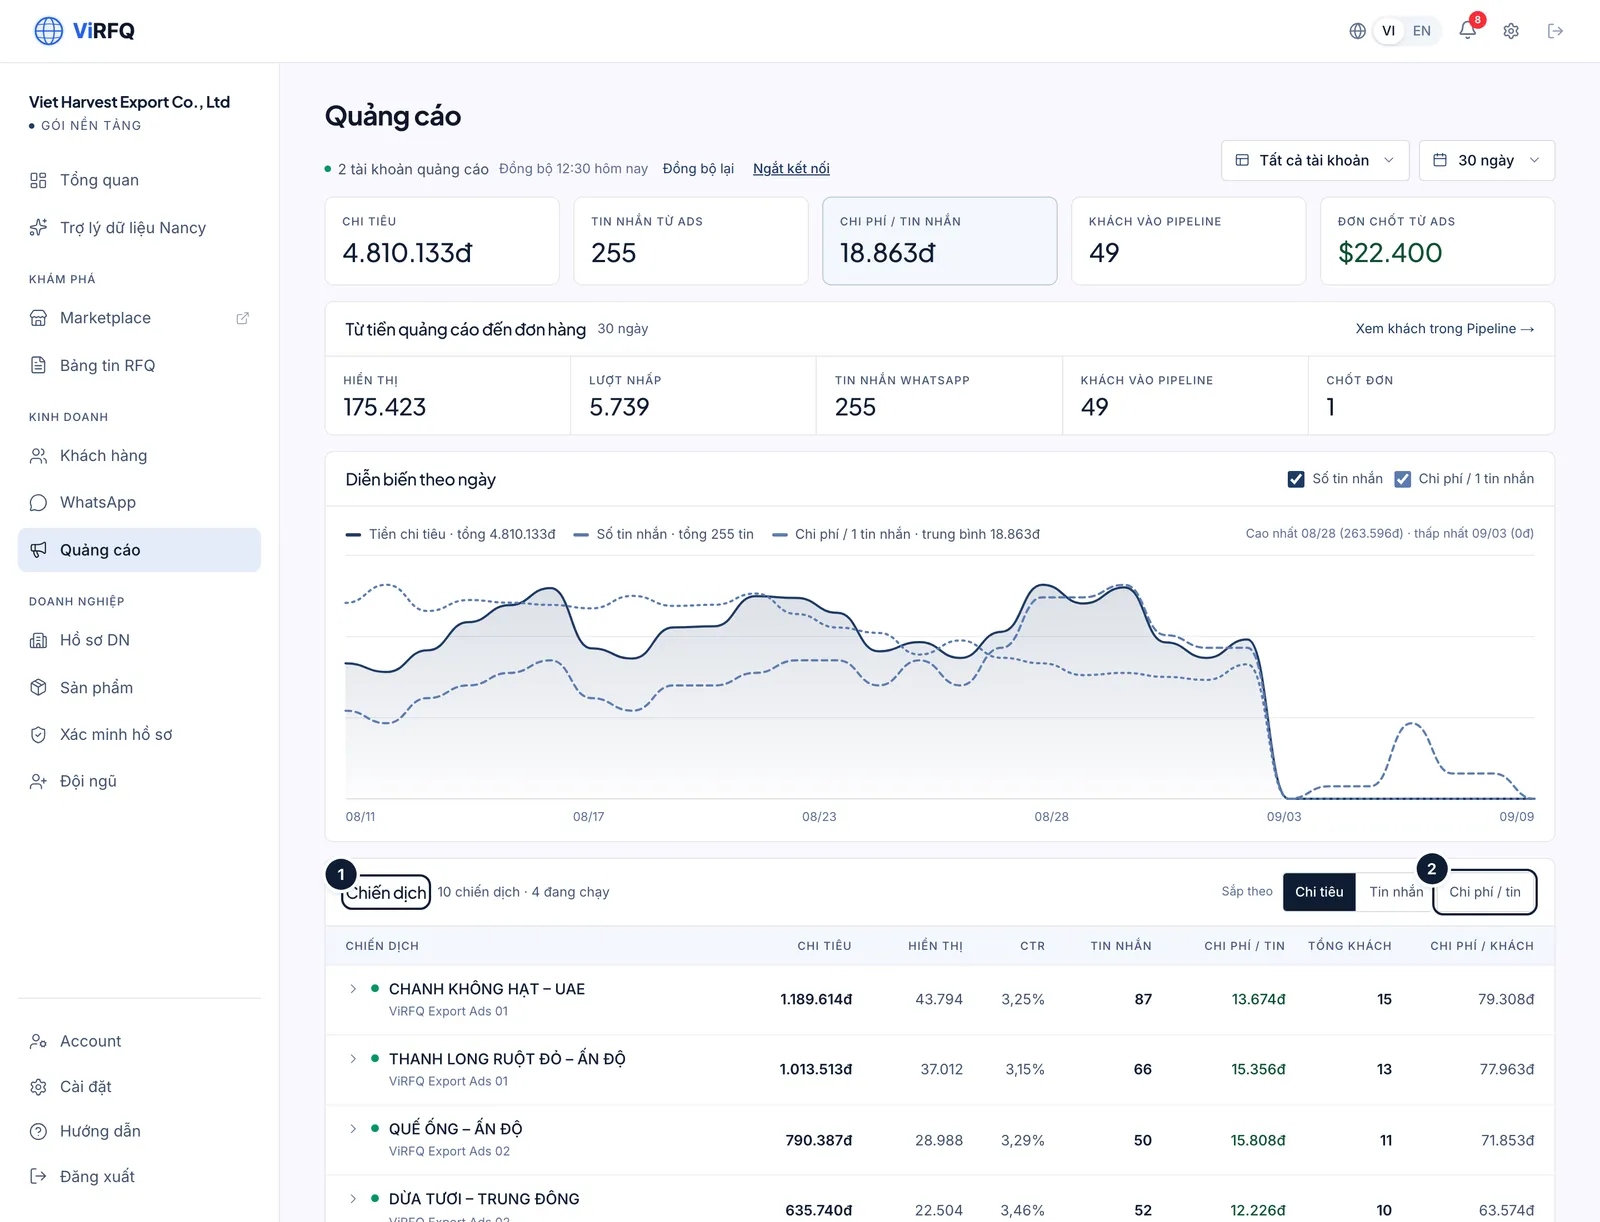
    Bước 1: After connecting, figures sync on a schedule; click Sync again (1) for fresh numbers. Choose the account (2) and the period. Five tiles: Spend, Messages from ads, Cost per message (3), Customers in pipeline (4) and Orders won from ads. Click View customers in Pipeline (5) to open exactly the buyers that came from ads.

    • The From ad spend to orders block is a funnel: impressions → clicks → WhatsApp messages → customers in pipeline → orders won. Look at which step drops the most to know whether to fix the ad or the way you reply.
    • The daily chart compares spend with messages; a day with high spend and few messages hints that the ad or the product page is not convincing.
    The Ads page with the Sync again button (1), the account selector (2), the Cost per message tile (3), the Customers in pipeline tile (4) and the View customers in Pipeline link (5)
    Ads: (1) sync, (2) account, (3) cost per message, (4) customers in pipeline, (5) view customers.
  2. 2

    Bước 2: The Campaigns table (1) lists every campaign with spend, impressions, CTR, messages, cost per message, customers and cost per customer. Sort by Cost / message (2) to see which campaign is cheapest; click the arrow to see each ad set.

    The Campaigns table (1) on the Ads page with the sort-by-cost-per-message button (2)
    Campaigns: (1) table, (2) sort by cost per message.

Need someone to set up the campaign?

The Platform plan includes WhatsApp ad setup support: the ViRFQ team advises on campaign structure, audience and creative for your product pages. Book through the Contact support button.

Messages count only from the moment your WhatsApp number joined ViRFQ

Right after connecting, the "Messages from ads" tile may show 0 even though the ads ran earlier — ViRFQ only sees messages from the moment your WhatsApp number was connected.

Frequently asked questions

Does ViRFQ run the ads for me and collect the budget?
No. You run and pay Meta directly on your own account. ViRFQ helps with setup and provides the tracking page.
What do I lose if I disconnect?
Disconnecting revokes read access and deletes all synced ad data from ViRFQ (campaigns, spend, messages attributed to ads). Your Meta account and running ads are not affected. You can reconnect at any time; ViRFQ syncs again from Meta, but the deleted history may not come back in full.
Why do the message counts on ViRFQ differ from Meta Ads Manager?
ViRFQ counts real messages that reached the Inbox and were matched to an ad; Meta counts click/open-chat events even when the buyer never wrote. The ViRFQ number reflects real buyers.

Chapter 11

Account, plan and team

Buy the plan, pay, invoices, security and staff accounts.

Buying the Platform plan, payment, invoices, security and staff accounts

Choose a Platform plan term, pay by bank transfer or card, get invoices, change your password and create accounts for sales staff.

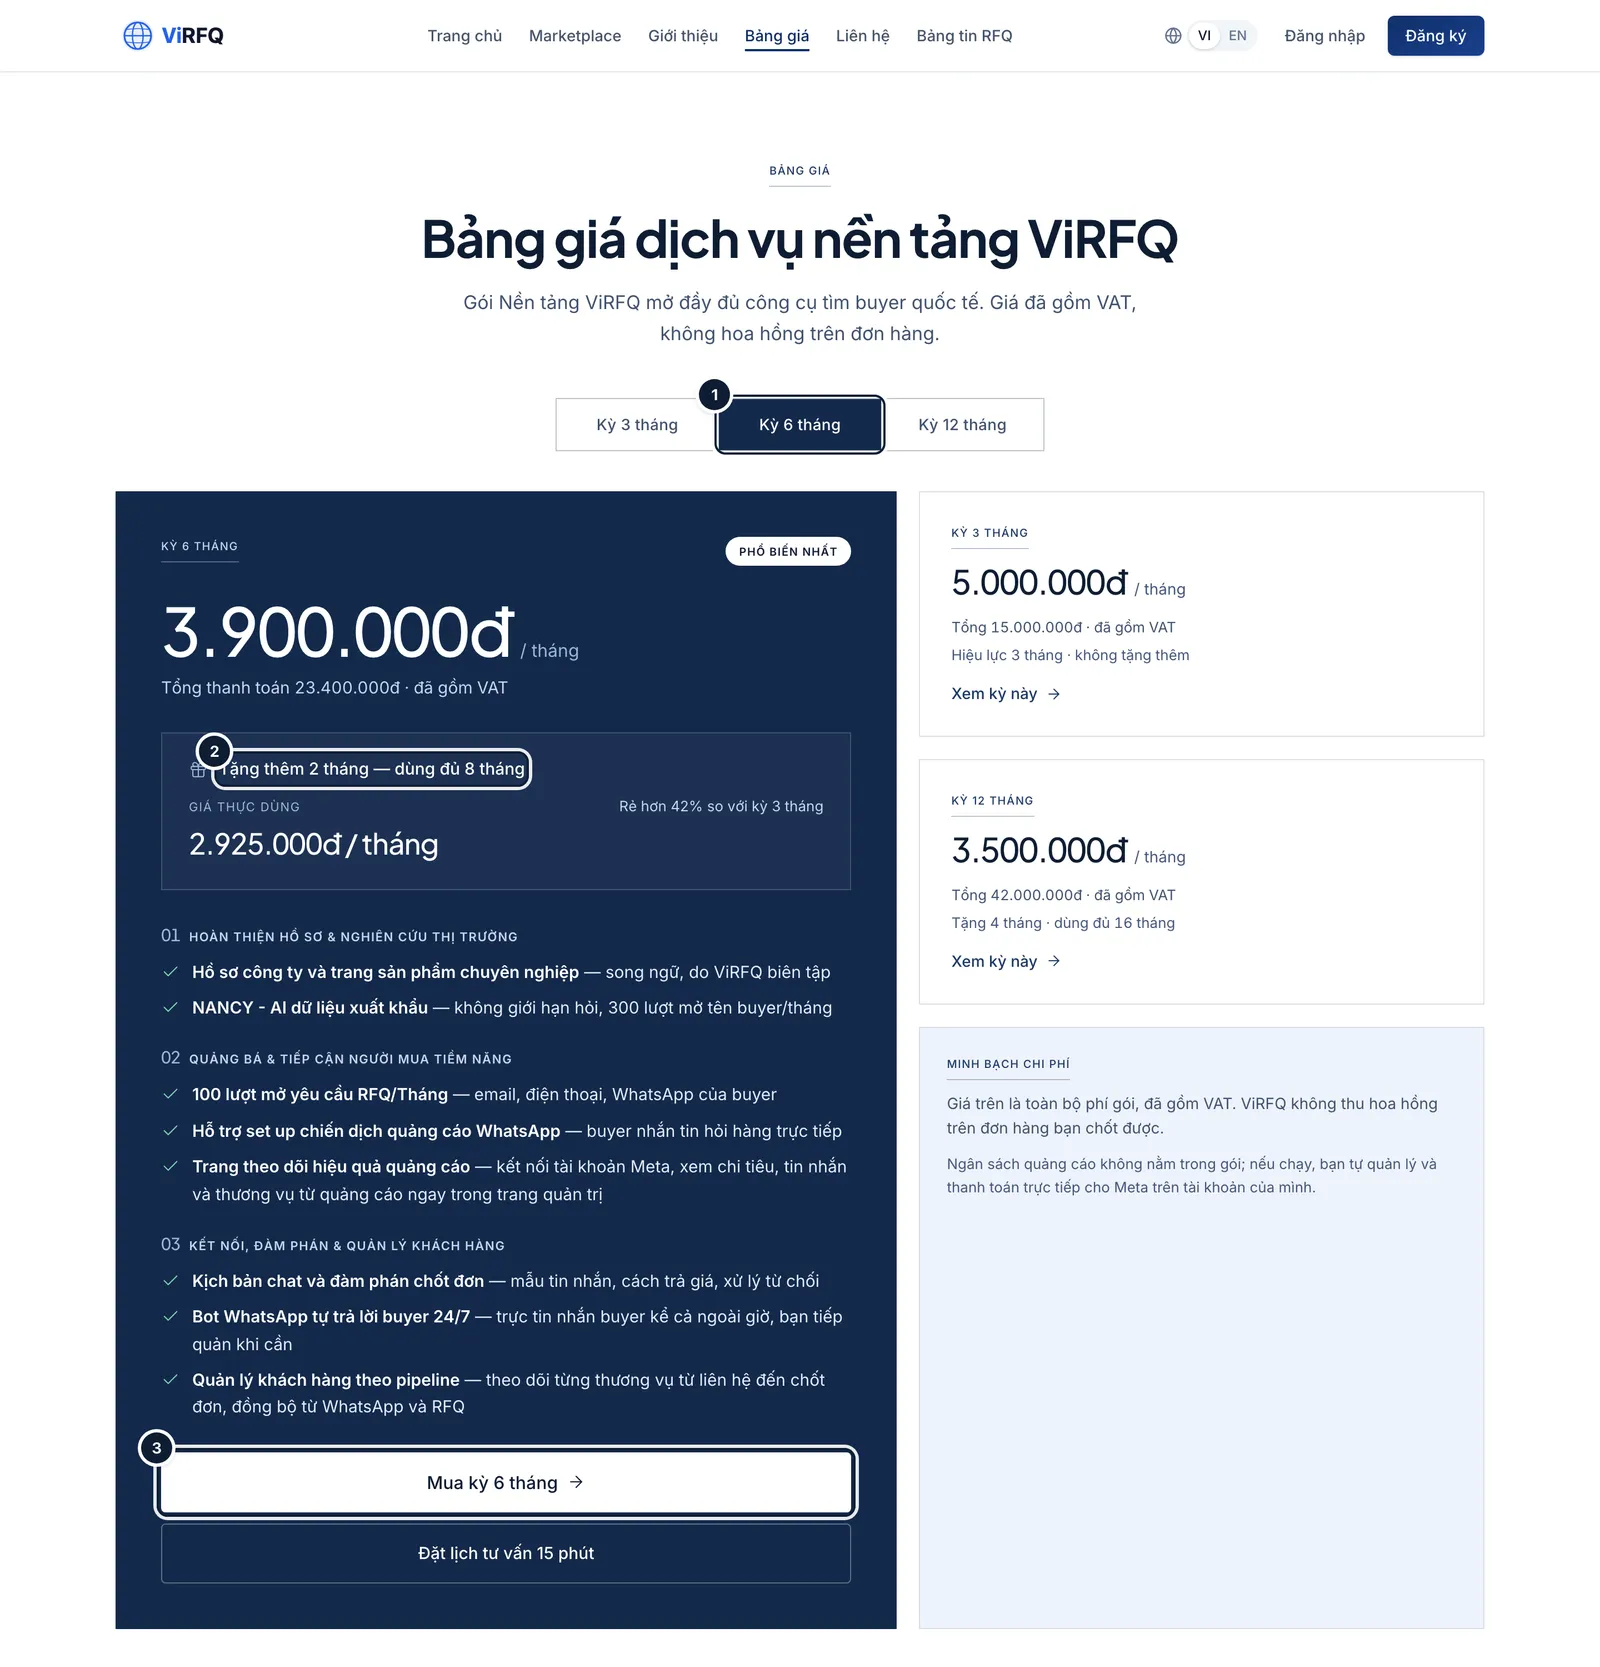
ViRFQ sells a single plan — the Platform plan — in three terms. It opens every tool: 100 RFQ contact unlocks per month, the Nancy data assistant, profile and product pages, the WhatsApp assistant that answers buyers, Meta ads tracking, the customer pipeline and 4-hour early access to new RFQs. Prices include VAT; there is no commission on orders.

Choose a term

TermPrice per monthTotal (VAT included)BonusValid for
3-month term5,000,000 VND15,000,000 VND—3 months
6-month term3,900,000 VND23,400,000 VND+2 months free8 months
12-month term3,500,000 VND42,000,000 VND+4 months free16 months
  1. 1

    Bước 1: Open virfq.com/en/pricing. Click a term card (1) to see the price and the bonus months (2). Click Buy the 6-month term (3) — or the term you chose — to go to checkout. If you are not signed in, the system takes you through sign-in and back to the same plan.

    • The plan does not renew itself and never charges automatically. Buying a new term while the plan is still active extends the current expiry date.
    The pricing page with the term selector (1), the +2 months free line (2) and the Buy the 6-month term button (3)
    Pricing: (1) choose a term, (2) bonus months, (3) buy.

Payment

  1. 1

    Bước 1: The checkout page repeats the chosen term (1) and the total including VAT (2). Choose how to pay: Bank transfer (3) for companies in Vietnam, or International card (4).

    • Bank transfer: scan the VietQR code with your banking app or transfer manually to the account shown on screen. Keep the transfer description unchanged — it is the code the system uses to recognise you. Once the money arrives the plan activates automatically, usually within minutes.
    • International card: paid through Stripe; the plan activates as soon as the card is accepted.
    • Need help during payment? Click Contact support right on the page.
    The checkout page with the chosen term (1), the total including VAT (2), the Bank transfer button (3) and International card (4)
    Checkout: (1) term, (2) total, (3) bank transfer, (4) international card.

Your plan, payment history and invoices

  1. 1

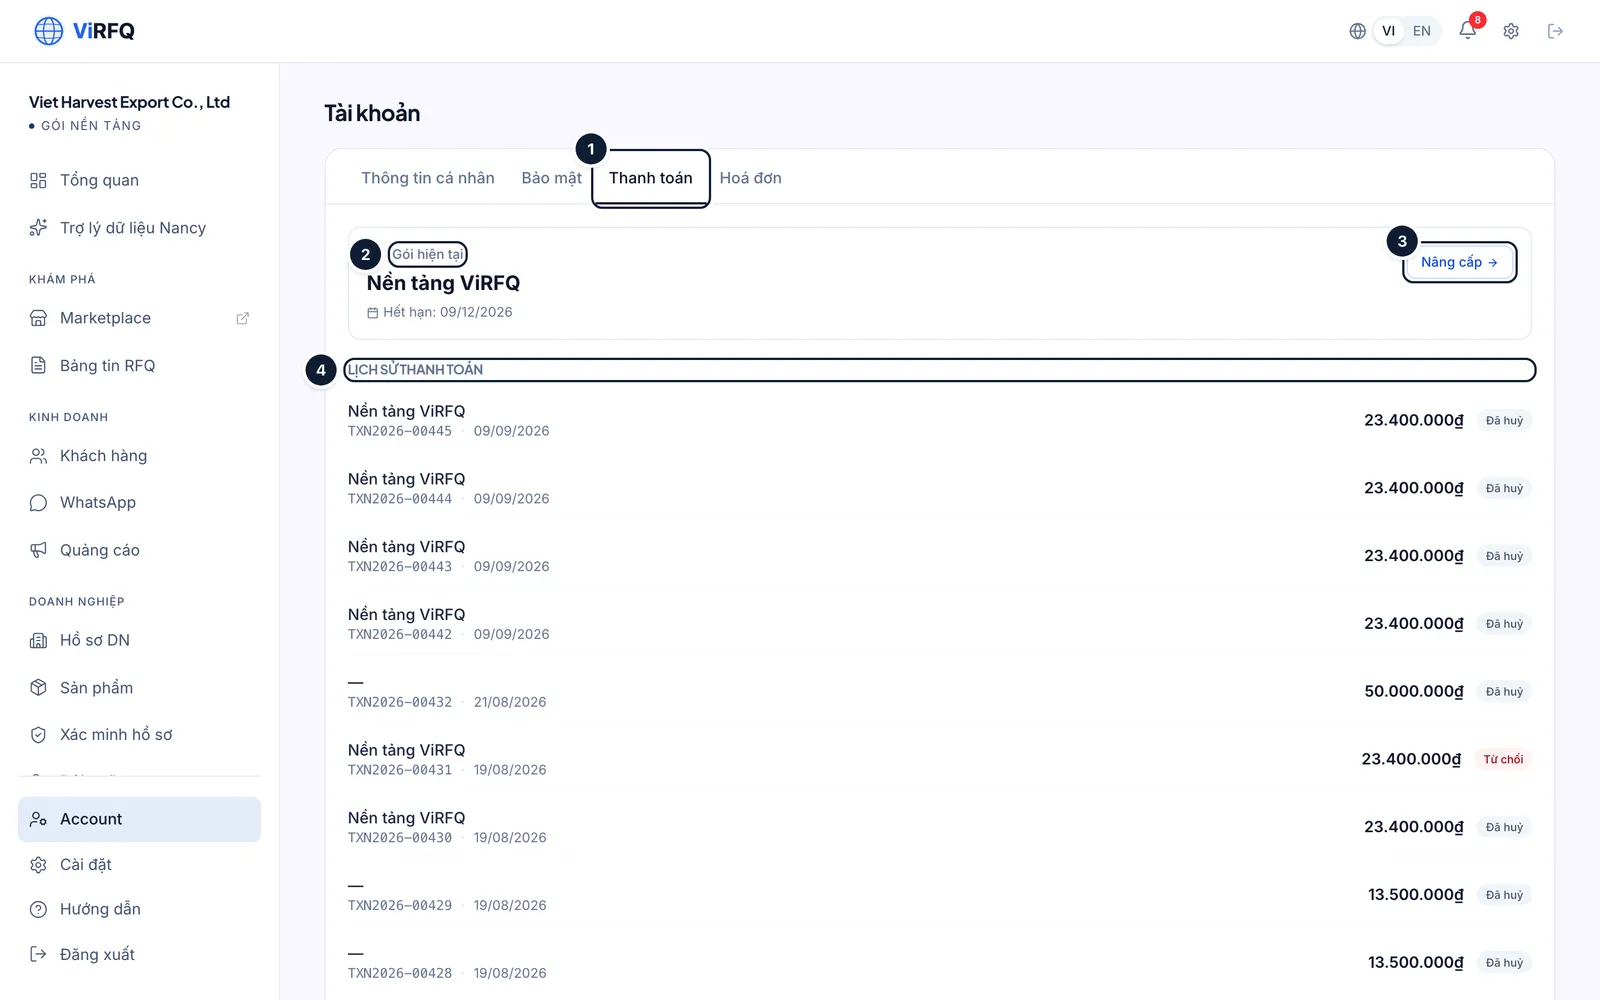
    Bước 1: Open Account in the left column, then the Payment tab (1). The Current plan block (2) shows the plan and expiry date; Upgrade (3) takes you back to pricing to buy a new term. Below is the Payment history (4) with the transaction code and status of every payment.

    The Payment tab (1) on the Account page with the Current plan block (2), the Upgrade button (3) and the Payment history (4)
    Account › Payment: (1) tab, (2) current plan, (3) upgrade, (4) history.
  2. 2

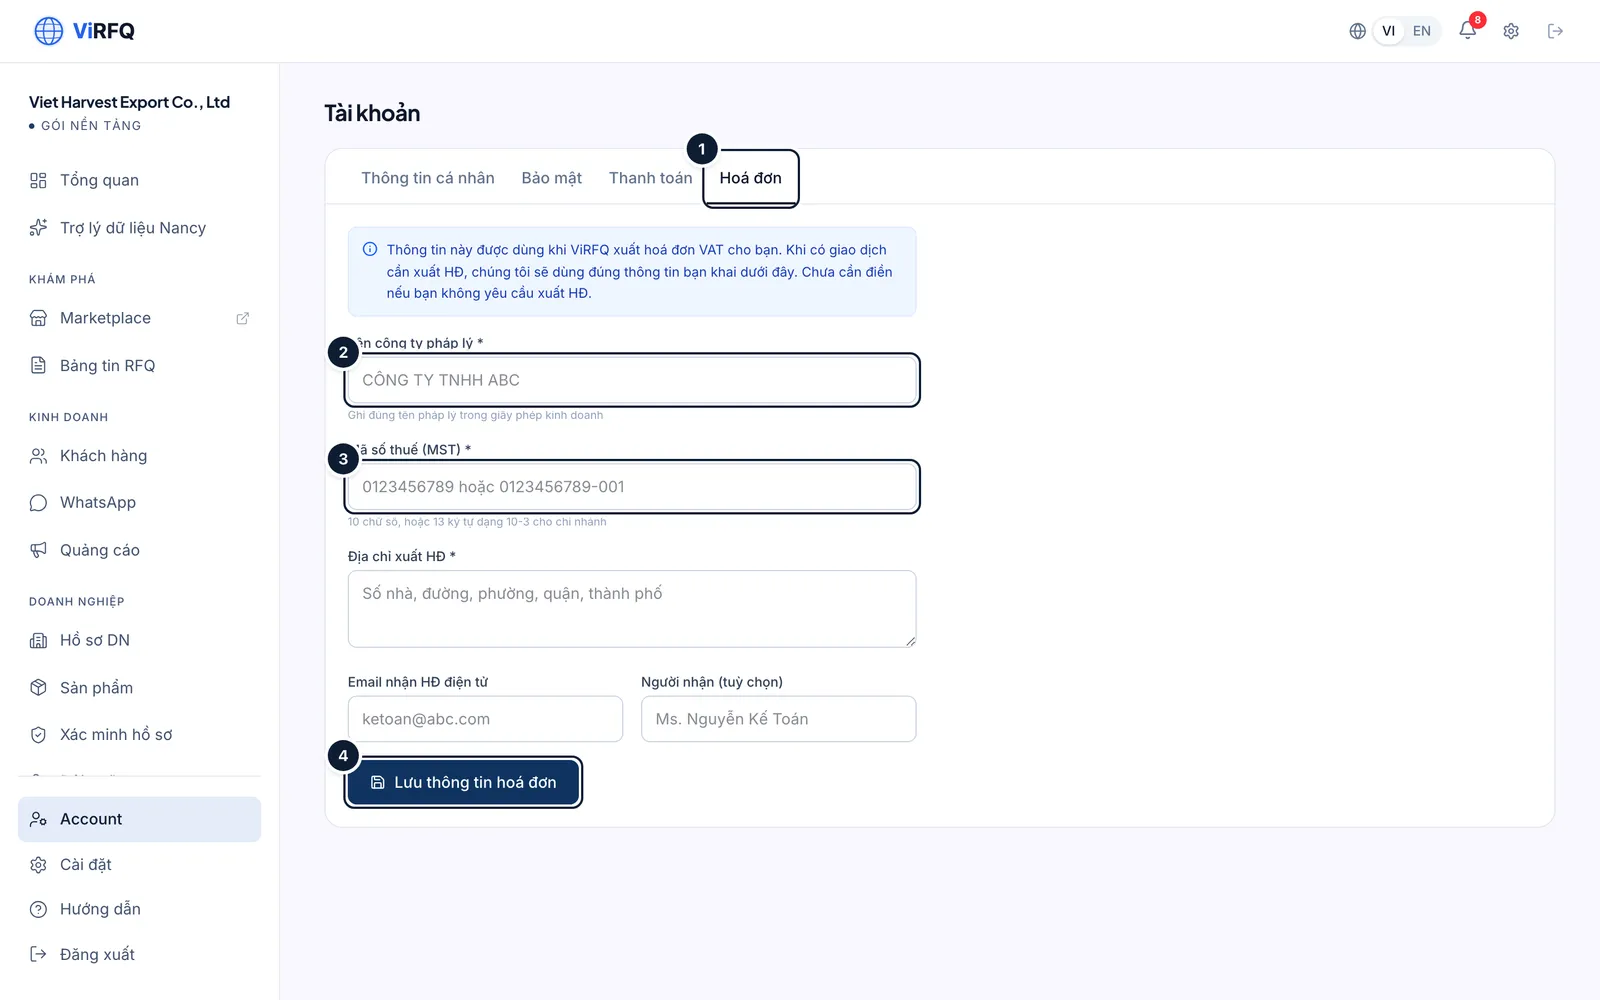
    Bước 2: To receive e-invoices, open the Invoice tab (1), fill in the legal company name (2), tax code (3), billing address and accounting email, then click Save invoice details (4). Invoices for later payments are issued with these details.

    The Invoice tab (1) with the legal company name field (2), tax code (3) and the Save invoice details button (4)
    Account › Invoice: (1) tab, (2) legal name, (3) tax code, (4) save.

Personal details and security

  1. 1

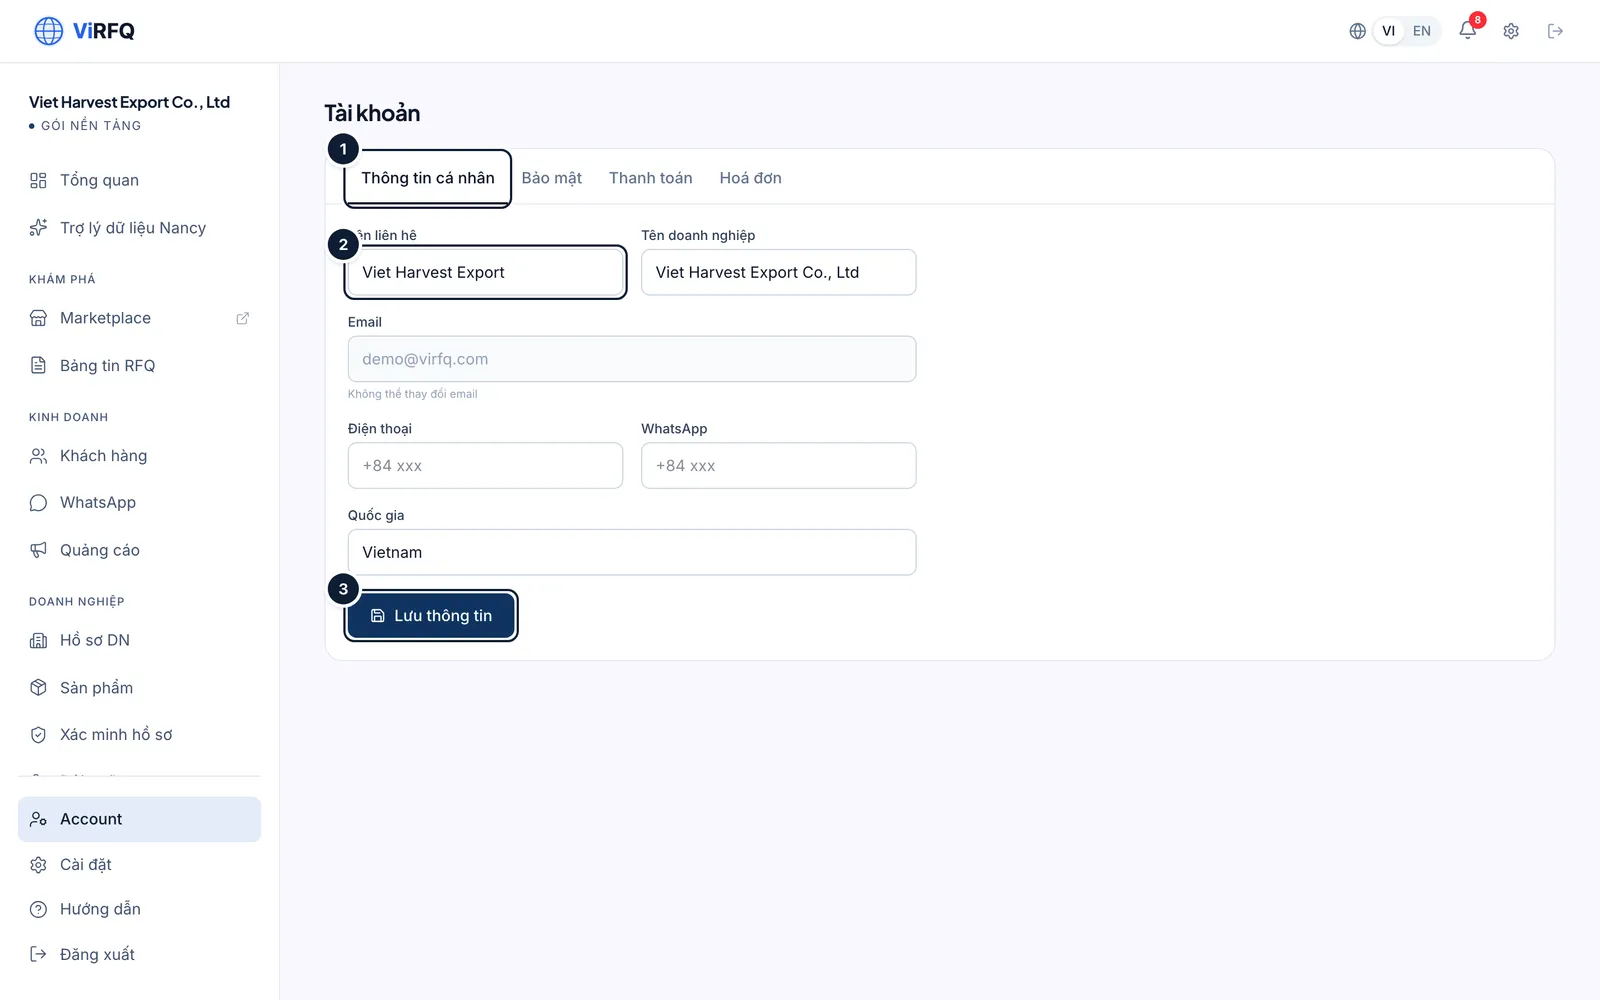
    Bước 1: Personal info tab (1): edit the contact name (2), company name, phone, WhatsApp and country, then click Save (3). The login email cannot be changed — contact support if needed.

    The Personal info tab (1) with the contact name field (2) and the Save button (3)
    Account › Personal info: (1) tab, (2) contact name, (3) save.
  2. 2

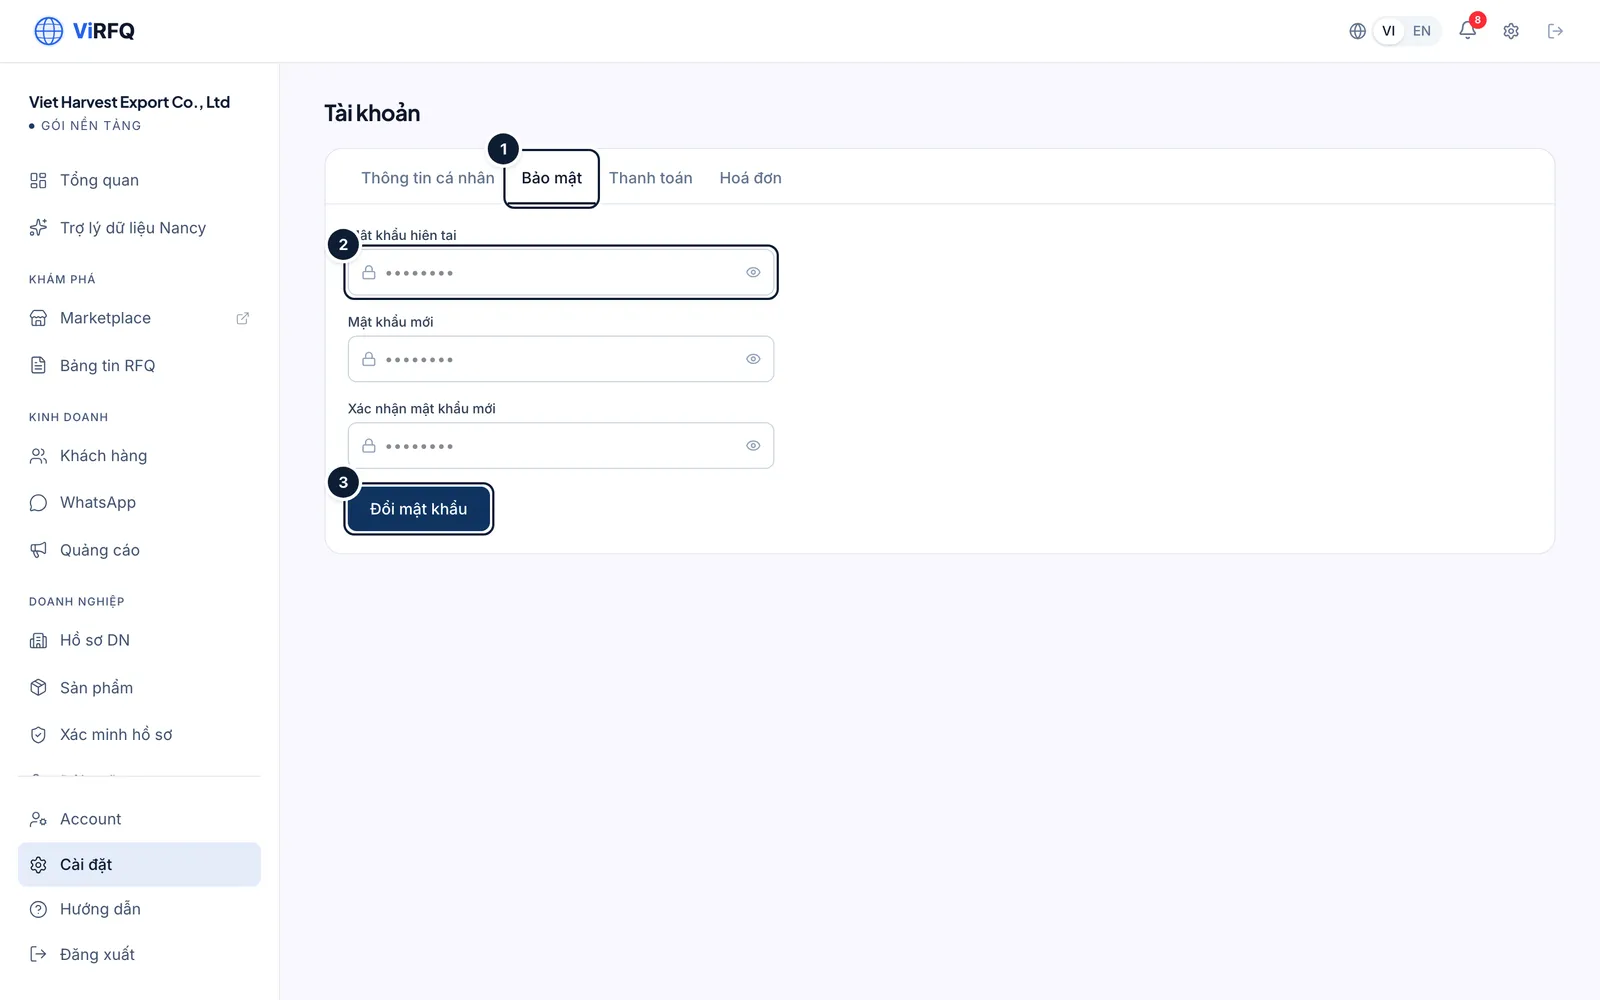
    Bước 2: Security tab (1): enter the current password, the new password twice (2) and click Change password (3). Every other device is signed out.

    The Security tab (1) with the password fields (2) and the Change password button (3)
    Account › Security: (1) tab, (2) passwords, (3) change.

Staff accounts (Team)

The Platform plan includes 3 seats including the owner — so you can create 2 more accounts for sales staff. Staff sign in with their own email and share the plan and company data, but see only the customer-facing sections: Overview, Nancy, RFQ Board, Customers and the WhatsApp Inbox. Money, company profile, products and assistant settings are visible to the owner only.

  1. 1

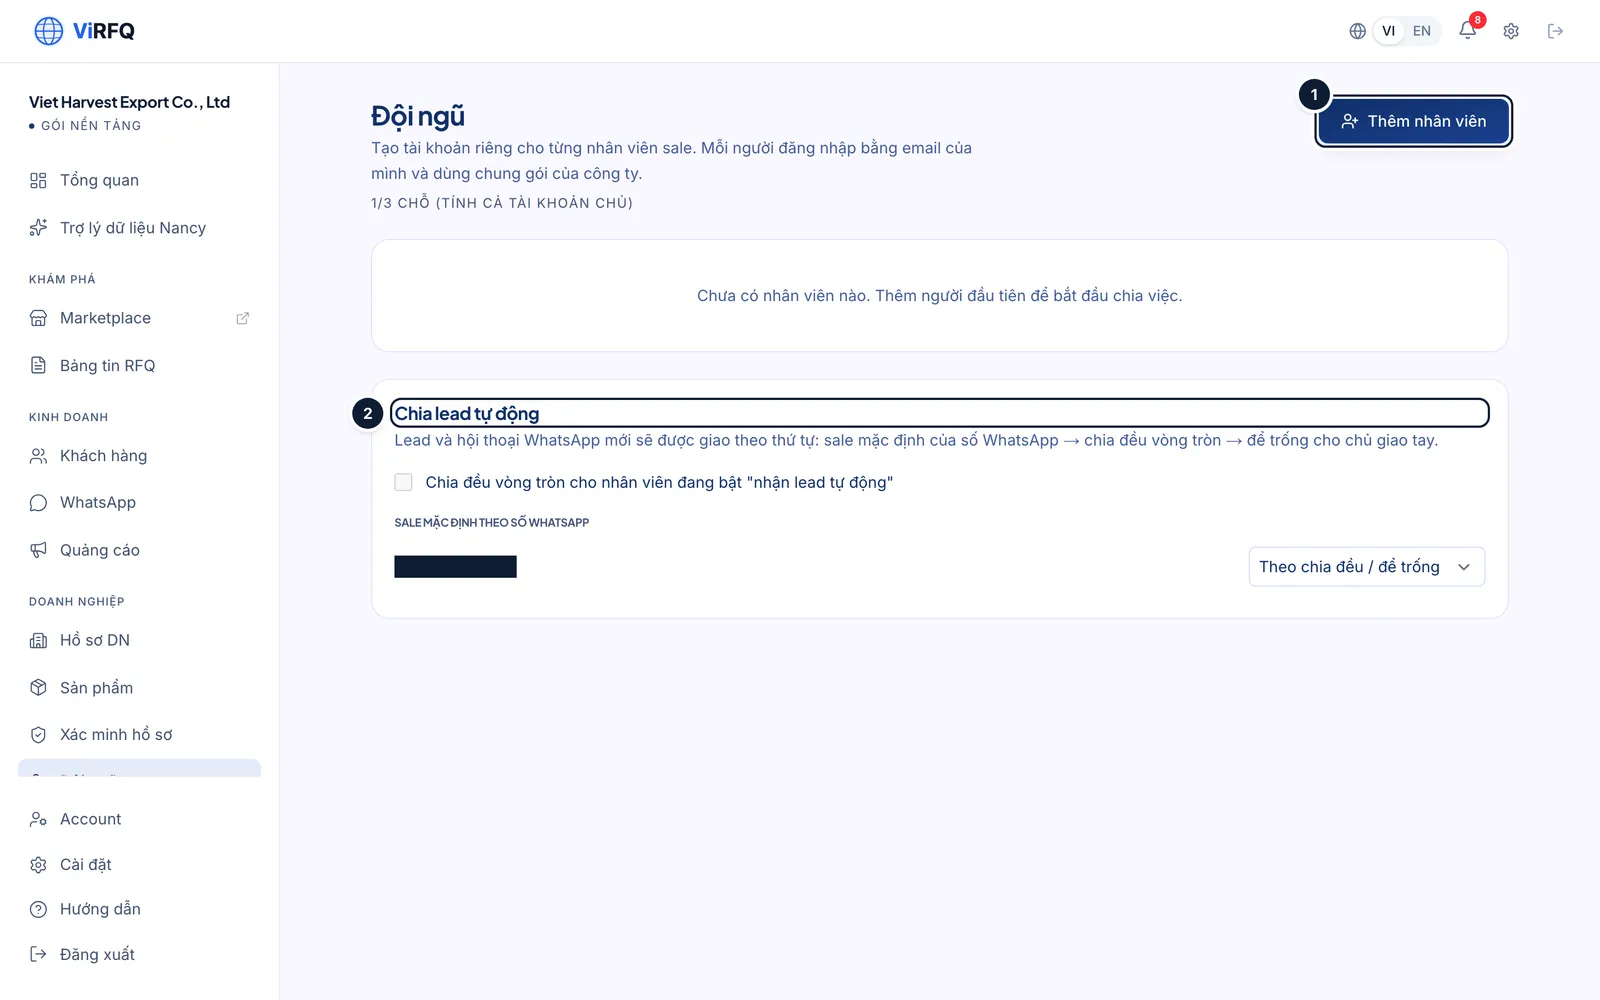
    Bước 1: Open Team in the left column. Click Add staff (1). The Automatic lead routing block (2) decides who new buyers are assigned to: the default salesperson of the WhatsApp number, round-robin, or nobody so the owner assigns by hand.

    The Team page with the Add staff button (1) and the Automatic lead routing block (2)
    Team: (1) add staff, (2) automatic lead routing.
  2. 2

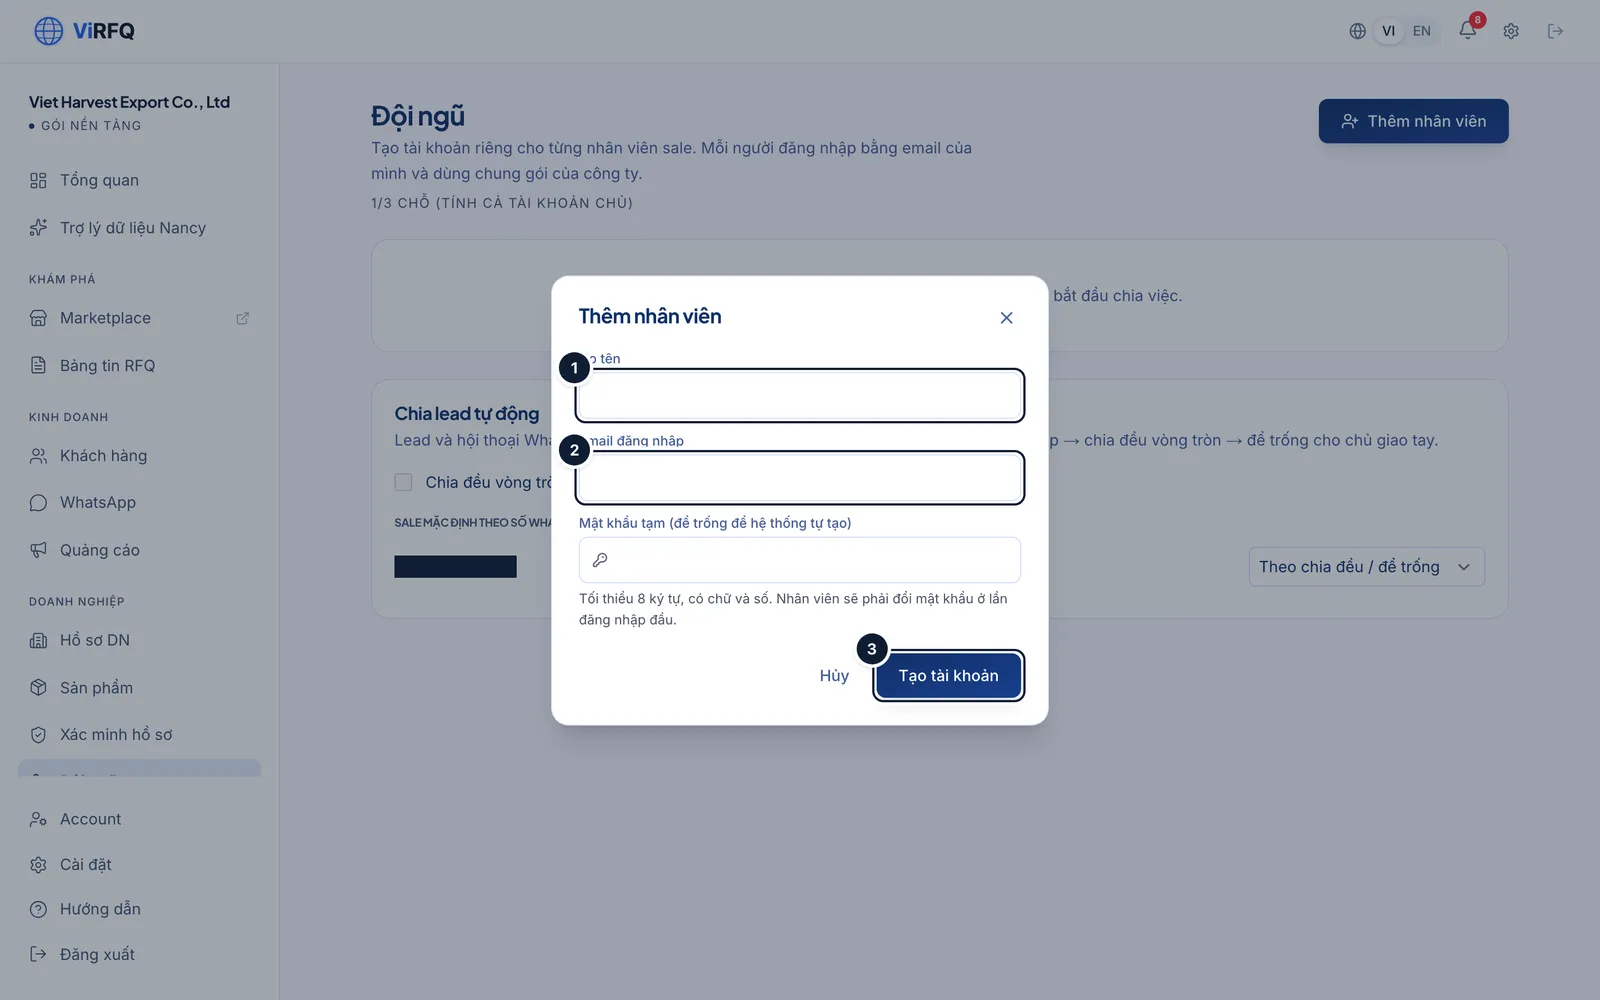
    Bước 2: Enter the staff member’s full name (1) and login email (2). Leave the temporary password empty to let the system generate one. Click Create account (3) — the temporary password is shown once only; copy it and send it to the staff member privately.

    The Add staff dialog with the full name field (1), the login email (2) and the Create account button (3)
    Add staff: (1) full name, (2) email, (3) create the account.
  3. 3

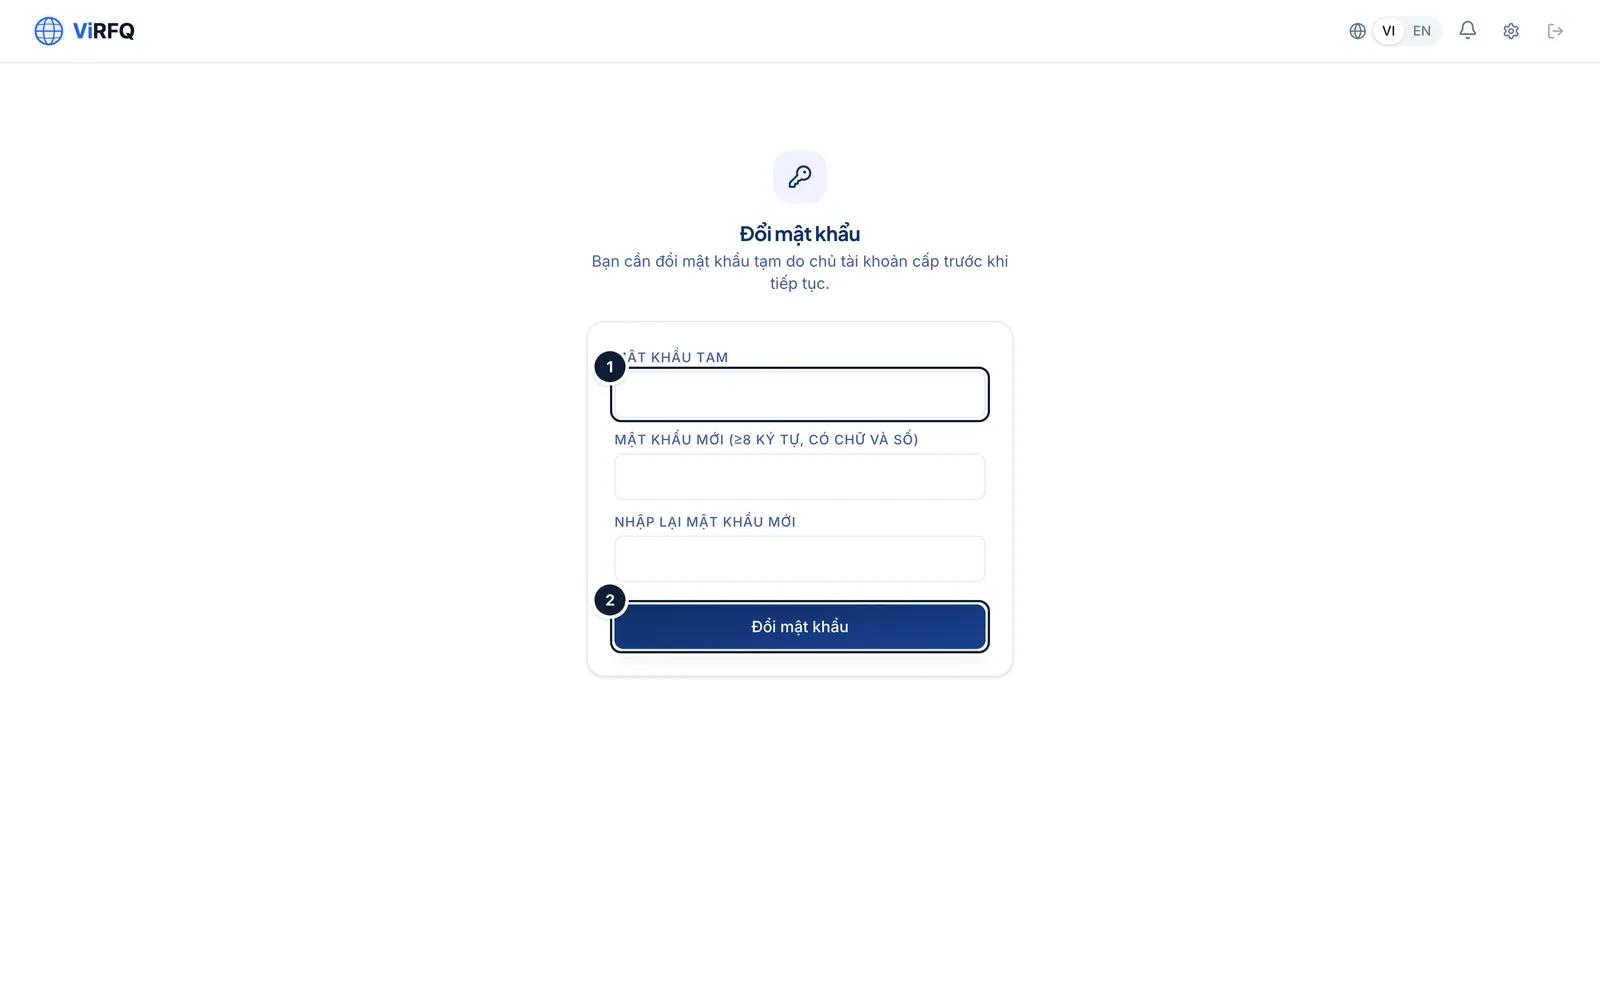
    Bước 3: On first sign-in the staff member must change the temporary password: enter the temporary and the new password (1) and click Change password (2). Only then does the dashboard open.

    The mandatory password change screen on a staff member’s first sign-in with the password fields (1) and the Change password button (2)
    Staff first sign-in: (1) temporary and new password, (2) change.
  4. 4

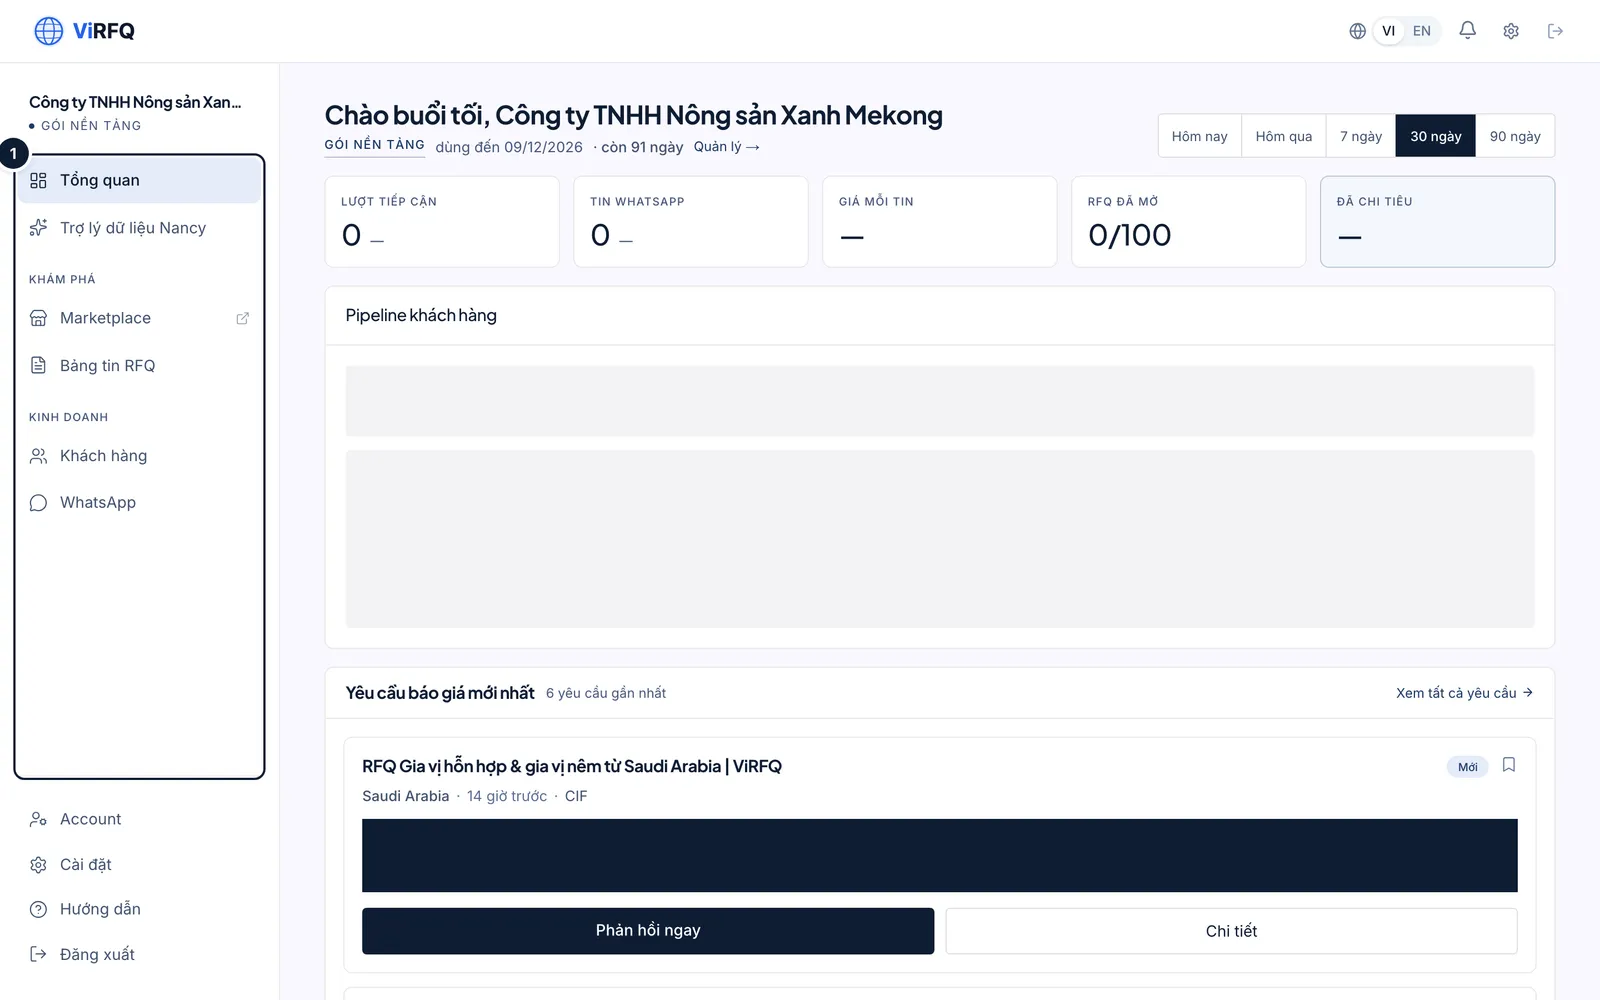
    Bước 4: Staff then see a reduced dashboard: the sidebar (1) only has the customer-facing sections. The owner can deactivate a staff member at any time on the Team page; that person’s customers and conversations are handed to someone else or back to the owner.

    The dashboard of a staff account with the reduced sidebar (1)
    A sales staff view: the sidebar (1) has no money or profile sections.

Important

Each company can connect one WhatsApp number only. Staff share that number; buyers are distributed by the "Automatic lead routing" setting, not one number per person.

Frequently asked questions

I transferred the money but the plan is not active yet.
Normally the plan activates within minutes of the money arriving. After 30 minutes, check that the transfer description carried the right code, then send the payment proof to ViRFQ support for manual activation.
What do I lose when the plan expires?
Remaining RFQ unlocks, the Nancy allowance and the WhatsApp auto-reply pause. Profile, products, conversations and customers stay intact; buying a new term brings everything back at once.
Is there a refund?
See the Payment and refund policy in the footer. To discuss, contact support within 7 days of activation.

Chapter 12

For buyers and frequently asked questions

Submit a quote request, RFQ verification and quick answers.

For buyers, frequently asked questions and how to get support

How buyers submit a quote request on ViRFQ, general questions about the platform and the support channels.

This chapter is for buyers (importers) who want quotes from Vietnamese exporters, and collects the general questions both sides ask. Exporters can read it to understand which steps a buyer goes through before an RFQ appears on the board.

Buyers submit a quote request

  1. 1

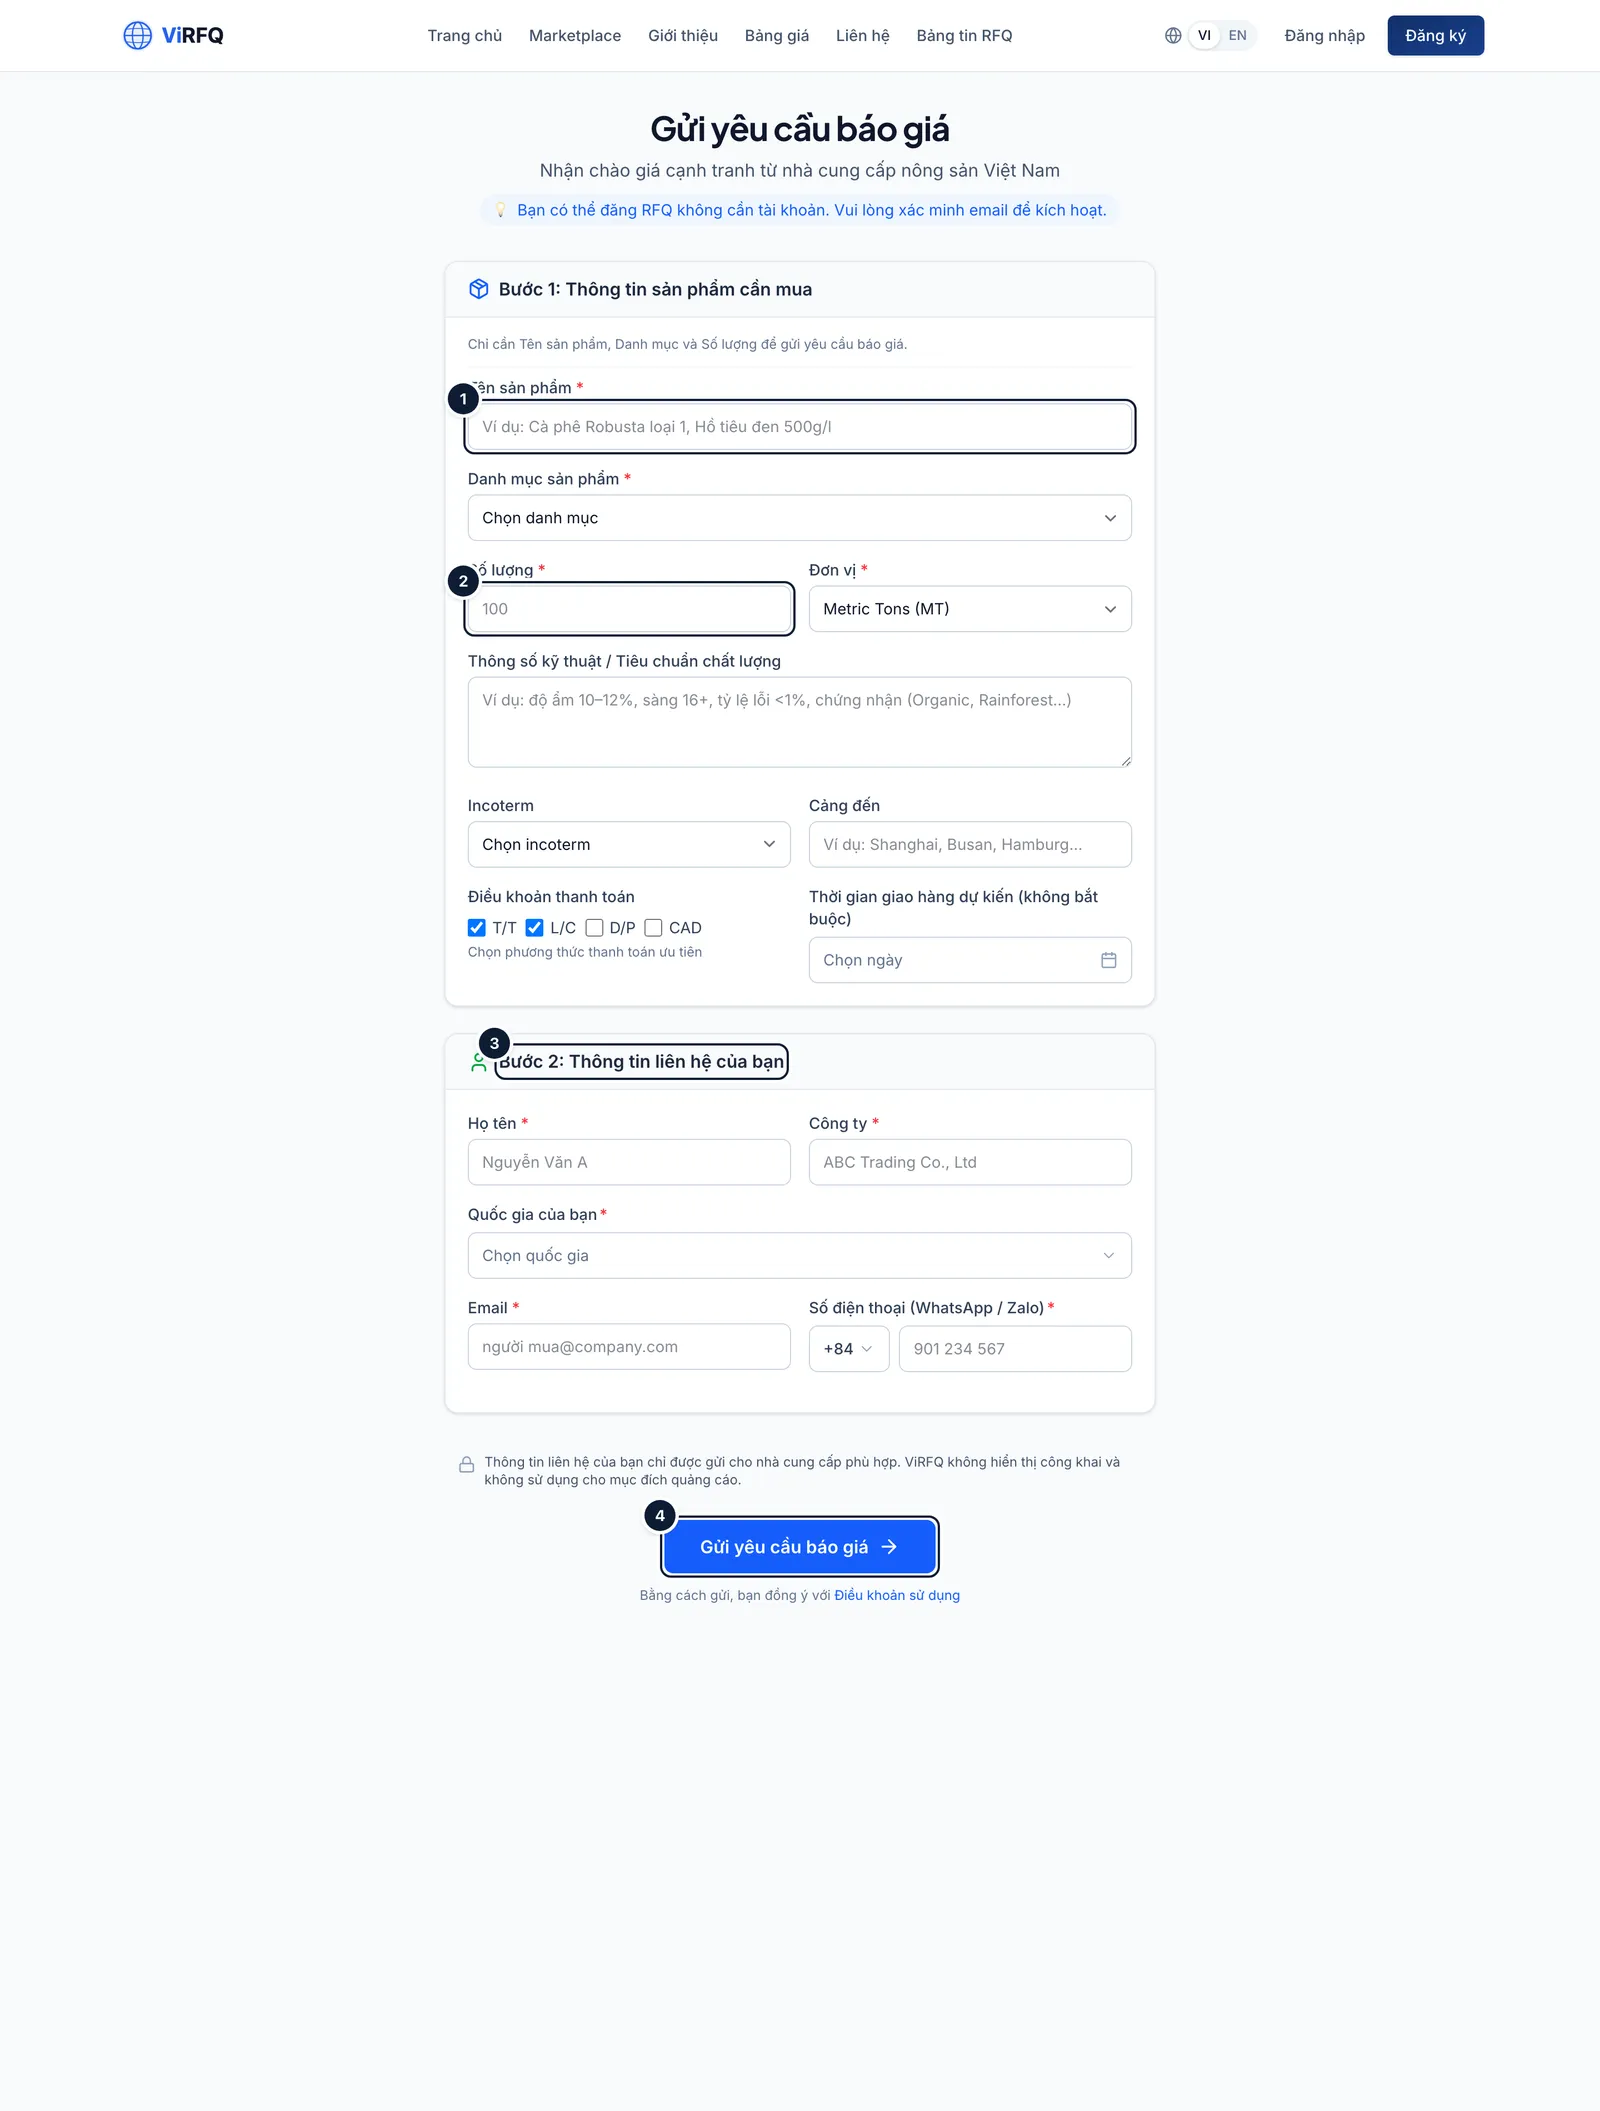
    Bước 1: The buyer opens virfq.com/en/submit-rfq — a shared request sent to every matching exporter. Step 1: product name (1), category, quantity (2) and unit, specifications, Incoterm, destination port, payment terms, delivery time. Step 2 (3): full name, company, country, email and WhatsApp number. Click Request a quote (4). No account is needed.

    • After submitting, the buyer receives an email with a code to verify the request. ViRFQ also sends a WhatsApp message to confirm. Only verified and scored RFQs appear on the board for exporters.
    • The buyer’s contact details are never public — only exporters with a plan who deliberately unlock them can see them.
    • This differs from the Send RFQ button on a single product page: that request goes to that exporter only (into their Customers with an email alert), needs no verification code and never appears on the shared board.
    The quote request form with the product name field (1), quantity (2), the contact details section (3) and the Request a quote button (4)
    Submit an RFQ: (1) product, (2) quantity, (3) contact, (4) submit.
  2. 2

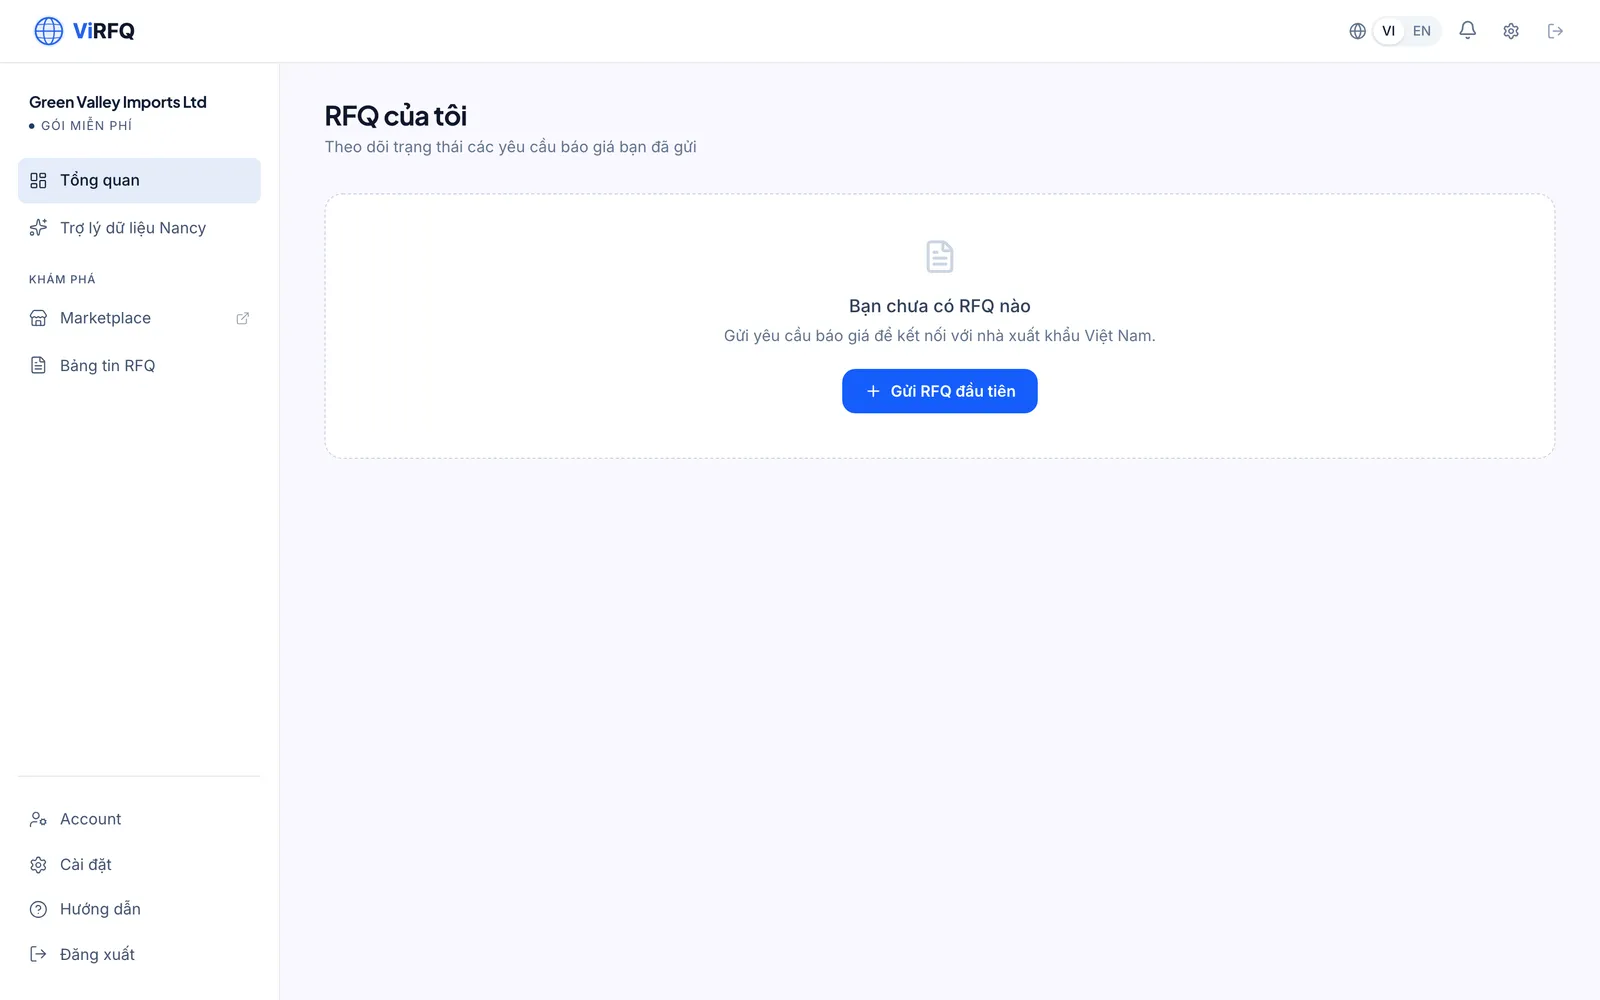
    Bước 2: A buyer who creates an account (choose the Buyer role at registration) gets a dashboard listing the submitted RFQs: their review status and how many exporters have unlocked the contact details. Quotes do not appear there — exporters contact the buyer directly by the email/WhatsApp given in the request.

    The dashboard of a buyer account
    The buyer dashboard.

Getting support

  1. 1

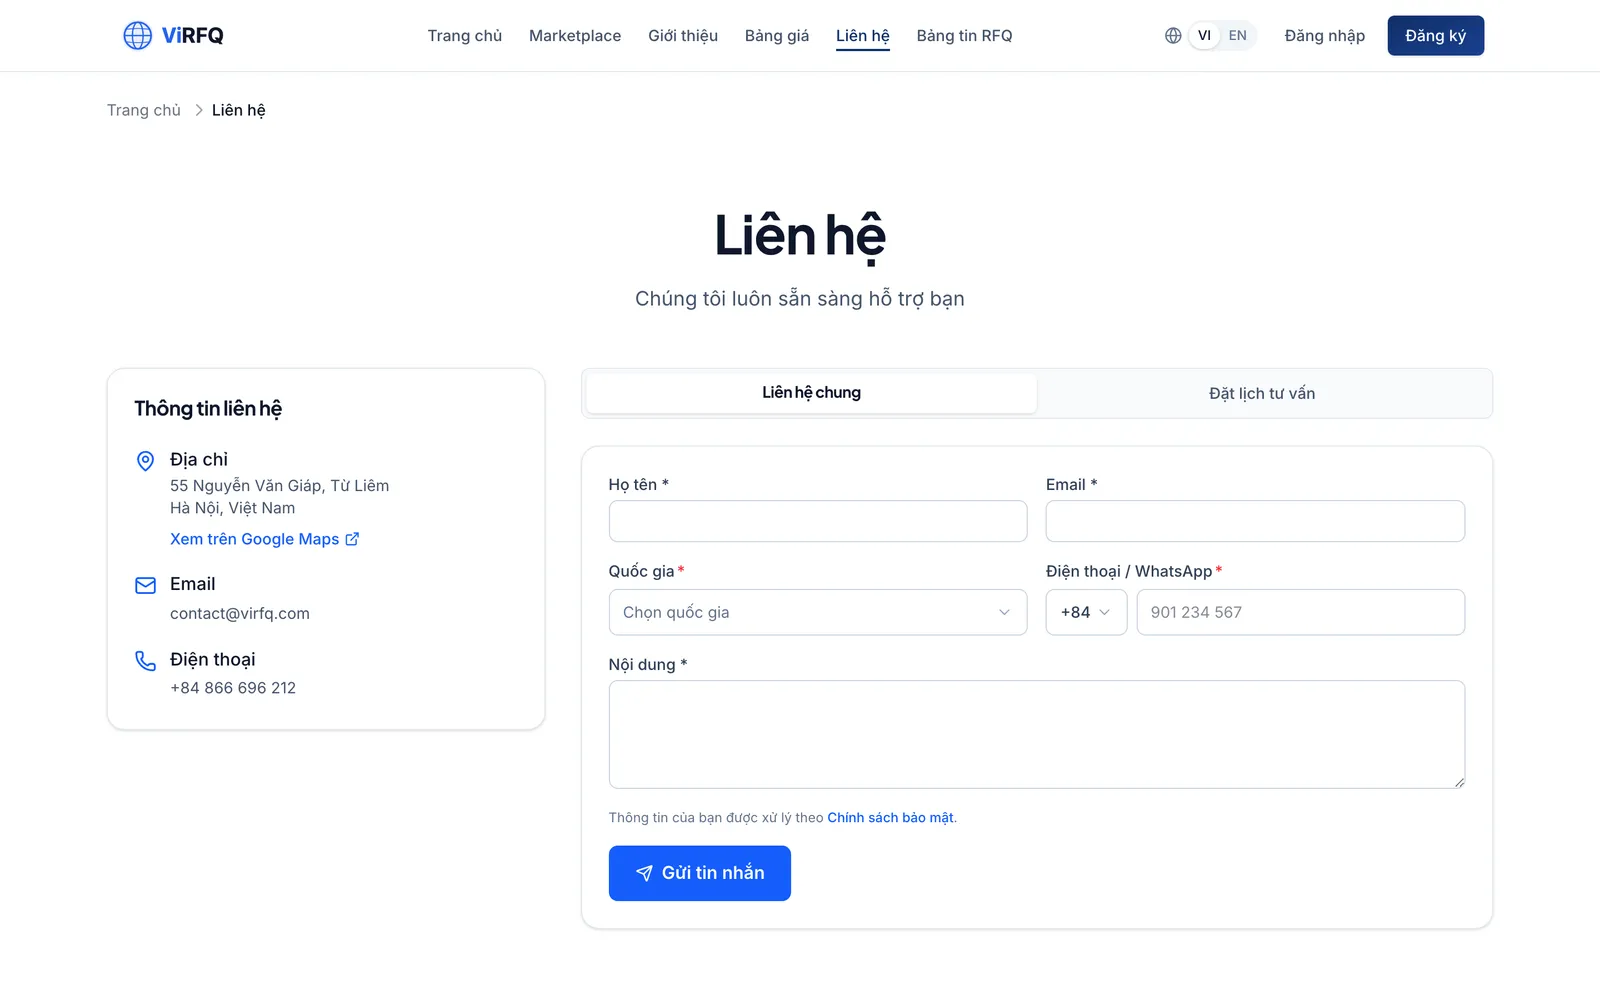
    Bước 1: Send any question through the Contact page (virfq.com/en/contact) or call the hotline in the footer. Platform customers can book a 15-minute consultation with the ViRFQ team right from the pricing page.

    The ViRFQ Contact page with the support request form
    The Contact page.

General questions about ViRFQ

Frequently asked questions

Does ViRFQ charge a commission on orders?
No. ViRFQ only sells the Platform plan by term; the transaction between buyer and exporter is direct, and ViRFQ stands outside the contract and the money flow.
Does ViRFQ guarantee transactions or inspect goods?
No. ViRFQ verifies buyers and exporters at the level of documents and responses; inspection, payment and insurance are agreed between the two parties. Use an L/C or T/T with a deposit for a new partner.
Is my data sold to third parties?
No. Contact details are shown only to partners you deliberately contact or unlock. See the Privacy Policy in the footer.
I want to delete my account.
Send the request through the Contact page from the registered email. The account and its data are deleted according to the Privacy Policy; an active plan is not refunded for the unused part.
Is there a Vietnamese version?
Yes. Click VI at the top right. Exporters usually use the Vietnamese version; buyers use the English one, and exporter content is translated automatically for buyers.